
My sweet child has really been getting into the holiday season. I can tell this is going to be a fun year for our little munchkin.
Search Result(s)
"puzzle piece "
Puzzle Piece Turkey Craft

It has been a hectic of couple of weeks. Between moving out of our house, the construction on our new house not being finished, our daughter starting preschool & just the regular everyday stuff, I have barely had a moment to think. We have had to slow down on our regular craft routine because we have limited supplies with almost all of our home still in storage.
This morning before school, Mai asked if we could do a craft. I promised her that we would when we got home. With Thanksgiving nearing, we decided to make another turkey craft and dug through our supplies to see what was available. The first bag we came across had some old puzzle pieces in it & that is what we decided to use.
What you will need:
Old puzzle pieces
Paint
Construction paper
Googly eyes
Markers
Glue
Directions:
Paint your puzzle pieces in the color of your choice.
Mai wanted purple, I chose red & Ashley chose to mix her colors.


Ashley was so excited, she painted almost the whole bag of puzzle pieces.
After you are done painting them. Let them dry.
Cut the turkey’s body out of brown construction paper. Also cut out a beak & feet.
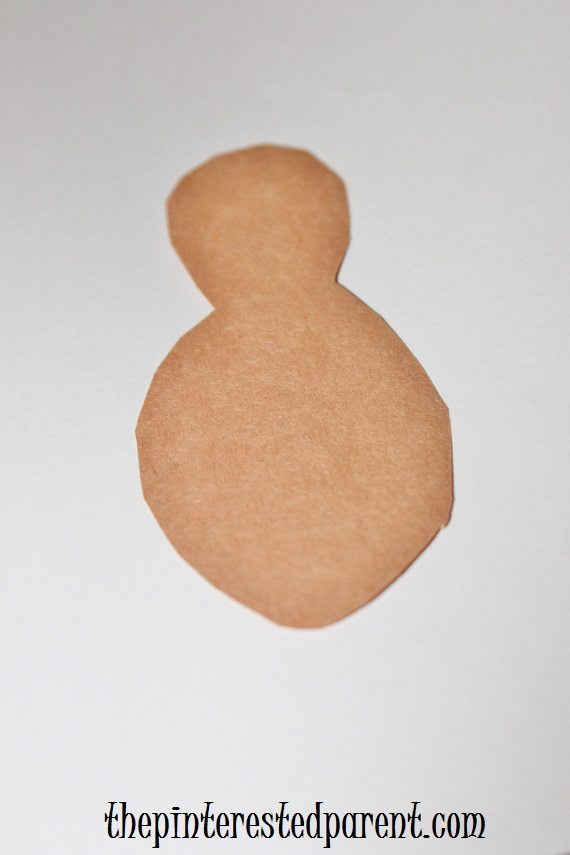
Glue the body onto a piece of paper. Glue on googly eyes, the beak & feet.

When your puzzle pieces are dry, glue them around the body to form the feathers. Draw in the wattle using a red marker.
Mai made her whole turkey by herself.

I did the bodies for me & a tired little Ashley.


This was a quick and easy craft
Thank you as always for stopping by. Please follow us on Facebook as well.
Puzzle Piece & Q-tip Skeleton

This time last year, we made pasta skeletons for Halloween.

I just re-shared it on Instagram last week. One of my Instagram friends recommended that I make a Q-tip skeleton. This sounded like a great idea, so I took her up on her suggestion. We made our skeleton using Q-tips & old mismatched puzzle pieces.
Puzzle Piece & Q-tip Skeleton
What you will need:
Puzzle pieces
Q-tips
Black & white paint
Black marker
Pipe cleaner
Glue gun (Use caution when using hot glue. Recommended for adult use only.)
Directions:
Pick out the puzzle pieces that you would like to use for your craft. We used 7.

Paint the pieces black & let dry.

Paint a skull & neck with white paint & let dry.

Glue a Q-tip to the neck & then vertically across two more puzzle pieces like shown. Break a Q-tip in half & glue on either end of the first Q-tip for shoulders.

Glue on the arm & leg bones as shown. Draw a face on your skull. Glue a pipe cleaner to the back to hang.

Thank you as always for stopping by. Please follow us on Facebook as well.
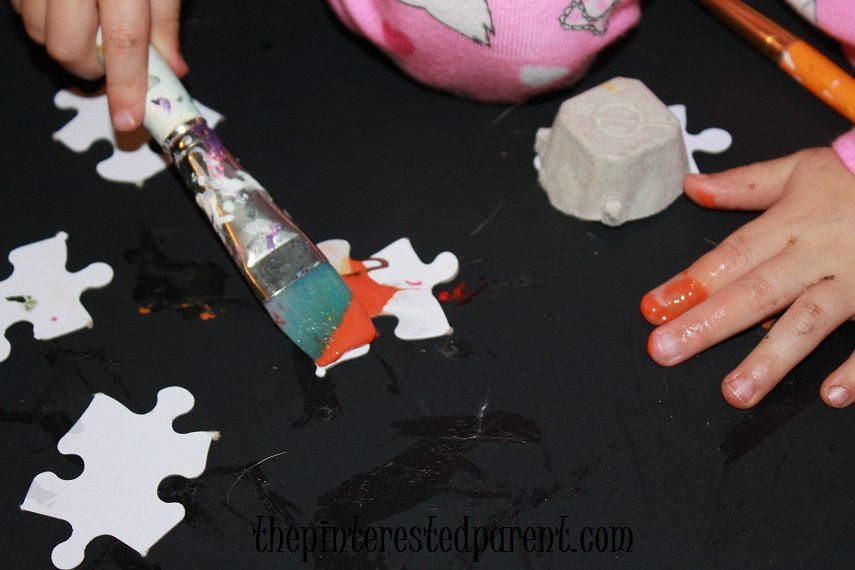
Puzzle Piece Spider
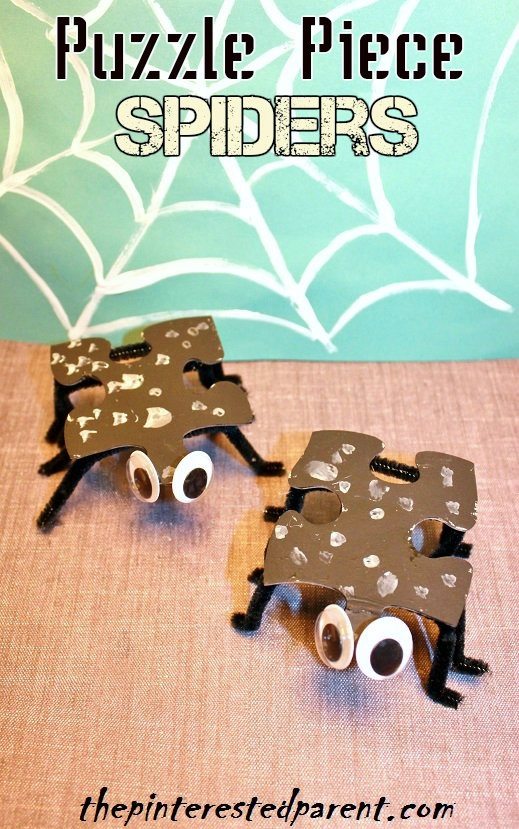
If you have old puzzles with missing pieces lying around, instead of throwing them out, consider using your old puzzle pieces to make a cute puzzle craft . Here is a quick and easy craft for the kids for Halloween.
Puzzle Piece Spider Craft
Paint a puzzle piece for each spider that you would like to make.

Dot on gray spots & let the paint dry.

Use a hot glue gun to glue googly eyes on. (Use caution when using hot glue. Adults should operate the glue gun.)

Cut 4 pipe cleaners in half for each spider.

Bend the pipe cleaners & glue in place.


Thank you as always for stopping by. Please follow us on Facebook as well.
Puzzle Piece Flower Craft

Recycled Puzzle Piece Fire Engine

A few weeks back we made a butterfly craft out of an old Doc Mcstuffins puzzle that had missing pieces. We still have several other pieces left & you all know how I hate to throw anything away, so please excuse me if I go a little crazy on puzzle piece crafts until I use them all up.
My daughter may be a little princess, but she also likes to play like a boy as well. She loves dinosaurs, bugs, cars & trucks. She had been asking to make trucks the last few days, so tonight we finally did,
We glued two end pieces together & let them dry.

We decided on a fire truck, so Mai painted the pieces red. We painted the blank back side of our puzzle pieces.

After the red dried, we added in our windows & other details using paint & markers for the finer details.

We glued our pieces to a piece of construction paper & painted in our wheels & a ladder. These would make a cute wall hanging in a child’s room.
Thank you as always for stopping by. Please follow us on Facebook as well.
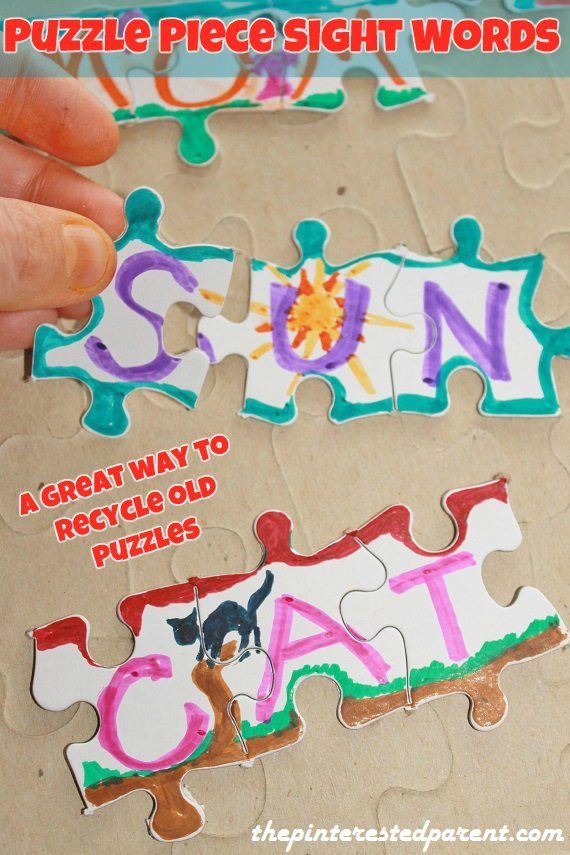
Puzzle Pieces For Teaching Sight Words

One of our favorite learning tools in our home has always been puzzles. Picture puzzles of course are fabulous for teaching them problem solving & matching up their shapes & colors, but many puzzles have an extra layer of learning to them. Puzzles have taught our daughter her US. States, a good portion of her countries & all of her planets.
We have puzzles everywhere, board puzzles, jig saw puzzles & large floor puzzles that clutter up our whole house.


The benefits have outweighed the mess.
We have been working on sight words & writing lately. Mai recognizes & can write & spell her name now. We have been trying to work on the other basics as well.
We used a blank puzzle that we have had lying around for a long time. You can purchase a blank puzzle for about a dollar at a craft store or you can just flip over your old puzzle & work on the back or paint over the front & let dry before adding in your sight words. As with most families of a small child, I am sure that you have several puzzles that are missing pieces.
Puzzle Piece Sight Words
Write out your sight word using magic markers or paint. Make a design across the pieces that you will be using to have a color & shape reference to join them back together. Make a small picture scribble of your sight word on the connecting pieces to help them understand what the word is. Mai knew right away that this was supposed to be her mama.


“Who is that Mai?”
“It’s Mama.”
“How do you spell mom?”
“M. O. M.”

We made an assortment of different words. We put each together & spelled them together. We also found another fun craft project with our extra puzzle pieces in the process. Stay tuned for our cute puzzle piece craft.


Thank you as always for stopping by. Please follow us on Facebook as well.
Related Posts:
http://dabblingmomma.blogspot.com/2015/02/dr-seuss-cvc-words.html
http://tinytotsadventure.com/2015/03/20-name-activities-and-crafts-for-toddlers-and-preschoolers/
Popsicle Stick Heart Puzzles

Love is in the air. Valentine’s Day is just a few weeks away and my daughter is loving all of the hearts. She has been making sweet Valentine’s every chance that she gets. She even learned to spell and write the word love on her own. It is wonderful to get love messages from my little girl now.
A Piece of My Heart Homemade Ornaments
Whenever I look at our Christmas tree, I have to smile. Slowly over the years, all of our beautiful glass bulbs have been being replaced one by one by homemade keepsake ornaments. Our tree is filled with so much love and memories.

*This post contains affiliate links*
My daughter has been insistent that our tree doesn’t have enough ornaments this year, so we have been working on filling it up. Salt dough ornaments are our favorite. With cookie cutters and paint, there are a million possibilities. We had an idea to press puzzle pieces into our clay to make these “pieces of my heart” ornaments.
Recycled Puzzle Butterfly Craft & Sunday’s Best Link Up #14

Yesterday we worked on our sight words using puzzle pieces. We worked on our sight word puzzles for a good portion of the morning. I have to admit that it paid off. I could not have been any happier when later that afternoon, Mai ran up to me with a drawing that she had been working on & said “Look mama, I made mom.” She wrote it twice without any help spelling or writing the letters. This was her first written word other than her own name & practicing letters. My heart swelled.

In the midst of our learning fun with the puzzle pieces, we found some other crafty uses for some of our old puzzles pieces. We flipped our Doc McStuffins puzzle over & found two similar pieces.

I drew out a design in black marker on each piece so that they mirrored one another.
Mai colored in the pieces using crayons & markers. You can use paint as well.

After coloring in the pieces, we used glue to dribble on random designs & then shook on glitter.

While the glitter was drying, I drew a butterfly body to attach our puzzle piece wings to.
I colored in the wings & then used Elmer’s glue to glue the pieces into place. We made small & large butterflies using our old puzzles.

The result was these cute little butterflies.

Thank you as always for stopping by. Please follow us on Facebook as well.
Now on to the main event.

Welcome to Week 14 of Mother 2 Mother’s Sunday’s Best Linkup. We want to wish each of you a Happy and Blessed Easter. We hope you’re enjoying lots of peeps, chocolate bunnies, colored eggs, good food and having lots of fun with family and friends.
We’re starting our April Showers theme this month. As they say, April Showers Bring May Flowers, but they also cause us to spend lots of time indoors. We’re looking for indoor activities for kids, Mother’s Day ideas, recipes, crafts, DIY, organizational tips, summer garden preparation tips, SEO and blogging tips. Anything that we can work on during those rainy days. Blow the dust off your old posts and link those too. Don’t have posts that fit into the theme, link up whatever post you would like to share. We would love to have parenting tips, DIY projects, homesteading, homeschooling, and your posts on family and life. Your linkups and giveaways are welcome here too. Anything goes, as long as it’s family friendly and you may linkup as many posts as you would like.
Each week your hosts will select their favorite post and it will be featured the following week. An image from your post will be used on my blog the following week with a link back to your blog. Be sure to check back to see if you’re a Sunday’s Best featured blogger. All Featured Bloggers will have their posts Pinned to the Sunday’s Best Pinterest Board.
If you are interested in becoming a Sunday’s Best host, please contact me for details at rhonda@mother2motherblog.com or email one of our other hosts.
Your Sunday’s Best Hosts are:
Rhonda – Mother 2 Mother Kim U. – Pinterested Parent Kim M. – Life In A House of Testosterone

Here’s the rules, please connect with us on social media before you leave or subscribe/follow to our blogs:
Mother 2 Mother: Please like my Facebook Page, follow me on Twitter, Google+, Pinterest, BlogLovin or subscribe/join my blog on the right before you leave.
The Pinterested Parent: Please like Kim’s Facebook Page, follow her on Twitter, Google+, Pinterest, Bloglovin before you leave.
Life In A House of Testosterone: Please like Kim’s Facebook Page, follow her on Twitter, Google+, Pinterest, Bloglovin, or Instagram before you leave.

Last, please help us grow by placing our button on your sidebar. If you are selected as a Featured Blogger please let your readers and followers know. They may want to join the party too! For those who have a Link Party list/directory, please add us. I appreciate your help in promoting the linkup with Re-tweets and shares. Now lets party!
The Sunday’s Best Posts are:


Kim U. selected Letter to My Girls About the Mean Girl from Confessions of a Mommyaholic

I selected PB Knock Off Fur Trimmed Pillow from Do It Yourself Inspiration

Kim M. selected – Under $50 Budget Buy for the Whole Family from Mum-bo Jumbo

Congratulations ladies! All of the posts were great, and I appreciate each of you linking up. I would like to invite all of you back to linkup your post(s) again, it could be selected this week. While you’re here take a minute to visit these great blogs. It’s a great way to meet and connect with new bloggers. Be sure to PIN or share any posts that you like, we all appreciate a little love.