Tag

Home

‘Home’ Inspired Paper Plate Masks

Home Inspired Paper Plate Masks

*Contains affiliate links*

Last weekend we took a mini vacation to the beach with some family friends. We had a great time & made some wonderful family memories.

11940699_10206323312554955_4423009267890951082_n

The drive to the beach was long though & the drive home seemed even longer. Mai’s uncle downloaded her a movie on the Ipad before we left for our trip. It was for just in case she started getting punchy during the drive. She did great the first hour, but then started to get antsy. We started the movie for her. It was Dreamworks ‘Home’.

As we drove, all I could hear were squeals & laughter coming from the backseat. She loved the movie & quickly started to imitate the characters.

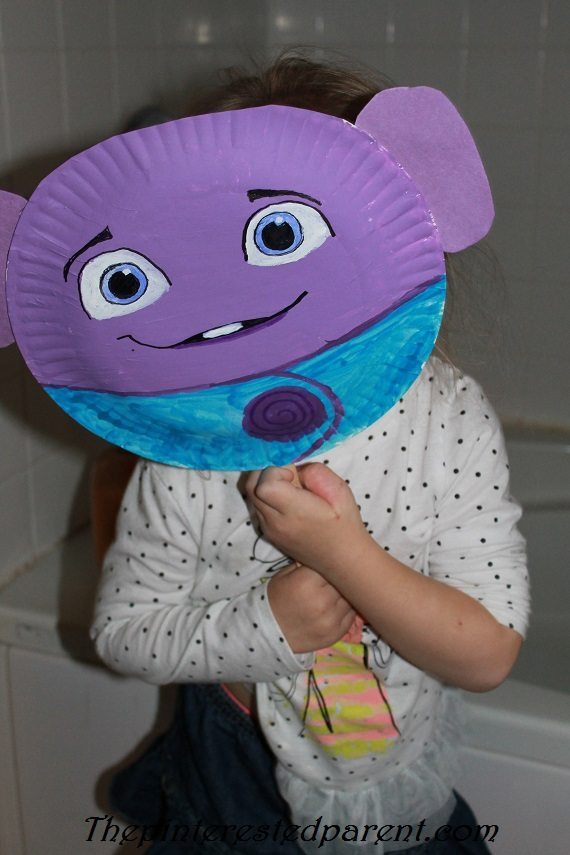
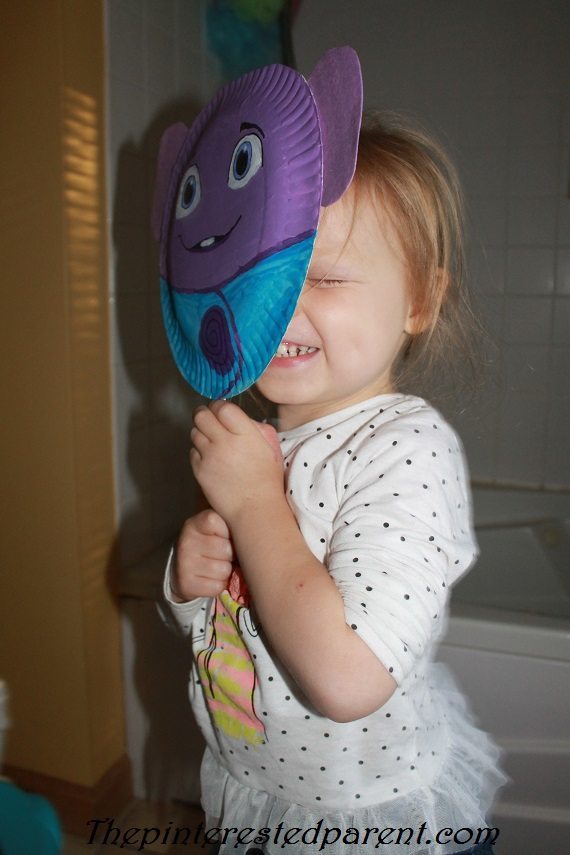
My daughter loves to pretend play. To encourage her pretend play, we often make paper plate masks. Last night, she very enthusiastically helped make ‘Home’ – inspired masks. Here is how.

What you will need:

A paper plate for each mask

Paint in purple, blue, white, light brown, dark brown, red & green

Craft sticks

Purple foam or construction paper

Glue gun (for adult use – use caution)

Black sharpie

Directions:

Draw a slightly curved lined about 1/3 of the way up from the bottom of a paper plate.

IMG_7037

Paint on the top of the line in purple. I helped my daughter by painting a strip of purple for her along the drawn line. I let her paint the rest.

IMG_7041

Paint under the purple in blue.

IMG_7043

Outline between the blue & purple with a darker purple & then draw a curve to form Oh’s uniform. Paint a purple circle in the middle of the curve as show, Paint in the white’s of the eyes & use a Sharpie to draw in the mouth & eyebrows. The face does not have to be perfect. Your child will know who it is supposed to be.

IMG_7047

Cut long ovals out of purple foam & glue them to the side of the head.

IMG_7048

Glue two craft sticks together & then glue them both to the back of the mask.

IMG_7049

Paint in the eyeballs to finish off your mask.

Paper Plate Mask - Inspired by Oh from the movie home

To make a Tip – inspired mask:

Paint the plate in light brown.

IMG_7042

Paint in the hair using a swirling pattern to form curls. The headband is optional.

IMG_7044

Draw in the face. Markers work best on smaller details.

IMG_7046

Paint in Tip’s green eyes & her sweatshirt. Add the craft sticks for the mask handle.

IMG_7056

Mai could barely wait until these were finished. She stood next to me anxiously waiting for the masks to be ready.

She loved them of course.

IMG_7068 IMG_7066

Thank you as always for stopping by. Please follow us on Facebook as well.


Yarn Embellished Initial Wall Hanging

yarninitial.jpgMy daughter as many of you may well know, is named after my mother. Mai is a less than common name, which is one of the things I love about it. She will always be unique. We have a lot of personalized & monagrammed things for her. I cannot see the letter M without thinking of my little munchkin. So when I was shopping at Michael’s and saw a giant wooden M for sale, I had to scoop it up. Her room is purple with golden & neutral tones, so I chose colors to compliment her room. What you will need: A wooden letter Different colored yarns Elmers glue Scissors Glue gun

Purchase a cheap wooden letter from a craft store or make one yourself.

023

Form a circle using the glue. Starting from the center begin circling the yarn around itself.

Form a circle using the glue. Starting from the center begin circling the yarn around itself.

Continue to circle around until you cover the glue circle.

Continue to circle around until you cover the glue circle.

Snip the end of your yarn off and form into the circle.

031

Working off the edge of the first circle add another glue circle and repeat the circling method.

032

For circles that are not full because off cut out edges, form half circles around each side cutting off the ends at the edge.

033

Continue this pattern, making circles as big or as small as you desire.

036

To fill in uncovered spaces around the circles, fill in with a different colored yarn following the same lines as your circles.

006

001

Line the edges of your letter with the accent yarn to smooth out your edges & add a more finished look.

004

Braid the different colored yarns together & knot each end.

015

With a glue gun add hot glue on the back of your initial where you would like your hanger.

017

Press your braided yarn into the glue & repeat on the other side.

018

Find a place to hang your craft.

yarninitial.jpg


Valentine’s Day String Art

IMG_20140208_0133301

String art has had me curious for a while now, but I was not brave enough to tackle it. It seemed so time consuming & difficult that I did not have the motivation to try it… until now. This was my first attempt, so I had a few crafting bumps & bruises along the way but all & all I was happy with the finished product. Here is what you need..

Supplies:

A square of solid cork board (You can substitute wood as well)

A box of small nails

Hammer

Embroidery threads of varying color. I used shades of purple with green as an accent

Lightweight paper

A pen, pencil or a marker

Tape

Glue


Draw the design of your craft project out on paper.

029

Tape it to your cork board or wood.

030

Using a hammer lightly tap your nails into the pattern. Only tap about halfway in, leaving room on the nail to wrap your string. Remove your paper template carefully by tearing it out from under the nails.

034

To start, tie a piece of the embroidery thread to the nail that you intend to start with. Use a dab of glue to secure in place & let dry.

040

Wrap your thread around the nails, weaving it back & forth between nails. You can weave it however you choose as long as you make sure to follow the design of your pattern. Keep an extra sketch of your drawing handy for reference. It is easy to lose your pattern in the nails after a while.

037

Continue to weave your thread around the nails following your pattern until complete. Tie off your thread at the end & use a dab of glue to secure. Be sure to tie off your thread in between colors too.

041

Hang up your finished product.

IMG_20140208_013330

This was a fun project. I think I might have the string art bug. I can’t wait to design my next project. It takes a little getting used to. I lost myself a little in my lettering but once I referenced my drawing I was able to decipher my pattern again. This is a very forgiving project. There is plenty of room for error & to go back.

Related topics:

http://smallestforest.net/2014/01/29/httpwp-mepeep9-1g9/

http://daisyanddaydreams.com/2014/01/30/valentines-day-decor/