Tag

necklace

Build A Necklace Activity

Jewelry craft activity - Make a necklace & earrings out of craft gems . Kid's arts & crafts

It thrills me that my daughter did not fall very far from the ol’ tree. She is so much like me in her love for arts & crafts and it is wonderful that it is something that we are able to do together. I love her creativity. It is wonderful to watch her work. The other day she was crafting on her own & grabbed some glitter and gemstones. When she was done, she handed me her finished project and told her that she had made it for me. It was so pretty & sparkly.

IMG_2547

She explained that it was two dolphins in love under a sunset. Awwww. It was so sweet. I put it on my nightstand, but when I picked it up to look at it again in the morning, I held it in the other direction and it looked like something different to me.

IMG_2547

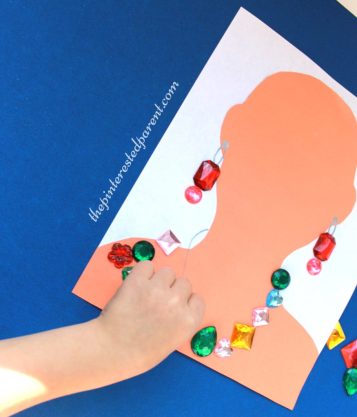
It gave me an idea for a quick activity that I thought she might like. I quickly cut out a paper bust and glued it to another piece of paper. I drew a ring around the neck with a magic marker & then some lines coming from the ears.

I gave my daughter the bag of gems and she placed the gems in place to form a necklace & earrings. You can choose to add hair and a face too, but for us, we just kept building jewelry.

Jewelry craft - make a necklace & earrings - kid's arts & craft activities

This was a quick and easy activity to set up and it was perfect for my little girly girl.

Jewelry craft - make a necklace & earrings - kid's arts & craft activities.

Jewelry craft - make a necklace & earrings - kid's arts & craft activities,

Thank you as always for stopping by. Please follow us on Facebook as well.


Roll & Wrapped Clay Pendants

My daughter and I work a lot with clay. We love our clay craft projects. There are just so many possibilities. Roll & Wrapped Polymer Clay Pendant Charms - an easy & fun to make jewelry arts & craft project. Great for kids, teens or adults to make. Cute gift idea..

*This post contains affiliate links*

We usually just make our own salt dough clay, but I had been curious about polymer clay for a while & wanted to experiment with it. The polymer was so easy to work with & was fun to work with as well.

I didn’t really know what I wanted to make, but just started breaking off chunks &  rolling them into balls & long strips. I played with the long rolled strips a little & came up with something cute, fun & easy to make.

Roll & Wrapped Clay Pendants

To form a flower-like creation, break off chunks from a few different colors of clay. Roll them lightly together into a ball & then roll out with your fingers to make a long thin rope-like strip.

IMG_8210  IMG_8216

Roll in at one end a couple of times to form a small spiral. Then loosely wrap & loop around & under the spiral.

IMG_8222  IMG_8225

After you have reached your desired size & shape, roll out a strip of green clay & form loops to form leaves.IMG_8226 IMG_8227

Follow package directions to bake your pendants. When they are hardened & cooled, run a craft string through one of the loops.  You may tie off at the ends or attach a clasp to the string. These were so fun to make. I couldn’t stop making them.

Roll & Wrapped Polymer Clay Pendant Charms - an easy & fun to make jewelry arts & craft project. Great for kids, teens or adults to make. Cute gift idea

Roll & Wrapped Polymer Clay Pendant Charms - an easy & fun to make jewelry arts & craft project. Great for kids, teens or adults to make. Cute gift idea

Thank you as always for reading. Please visit us on our Facebook page as well.

Styrofoam Ball Necklace

Painted Styrofoam Ball Necklace

Painted Styrofoam Ball Dress up necklace - fine motor activity and craft for kids

*This post contains affiliate links for convenience*

Like many little girls, my daughter loves to play dress up. She loves putting on her princess dresses & trying to walk in mommy’s high heels and she loves jewelry too. Lately, she has been enjoying threading buttons & pasta and anything else she can get her hands on to make necklaces for me & her to wear. Yesterday, we added Styrofoam to that list too.

We grabbed a handful of 2″ Styrofoam balls out of our craft supplies & then one larger one. I poked a wooden skewer into each to make it easier for painting & drying.

IMG_4964

Hold on to the skewer & use acrylic paints to paint around each ball.

IMG_4980 IMG_4977

Put the skewers in a deep container ball side up & let them stand to dry.

IMG_4978

Once dry, remove the skewer & use a plastic yarn needle to poke through the existing hole & string up your painted Styrofoam.

IMG_4981

Threading Styrofoam balls for fine motor activity & necklace craft

Tie a knot at the end to finish it off.

Just look at that smile.

IMG_5021

Thank you as always for stopping by. Please follow us on Facebook as well.