Search Result(s)

"cork"

Valentine’s Day String Art

IMG_20140208_0133301

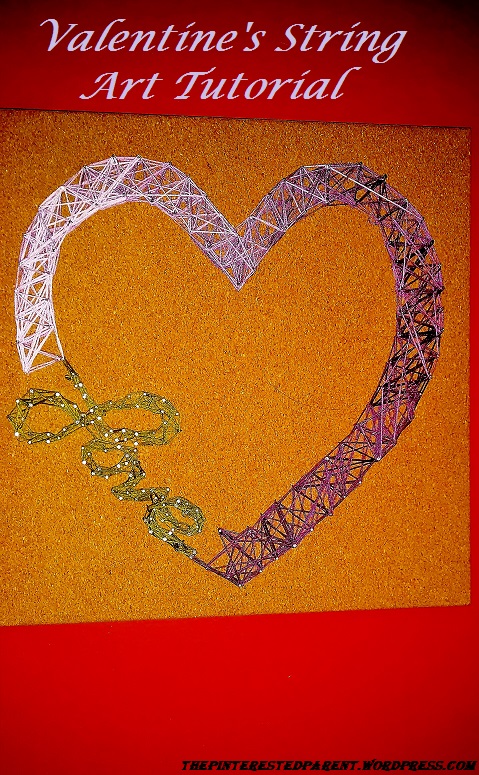
String art has had me curious for a while now, but I was not brave enough to tackle it. It seemed so time consuming & difficult that I did not have the motivation to try it… until now. This was my first attempt, so I had a few crafting bumps & bruises along the way but all & all I was happy with the finished product. Here is what you need..

Supplies:

A square of solid cork board (You can substitute wood as well)

A box of small nails

Hammer

Embroidery threads of varying color. I used shades of purple with green as an accent

Lightweight paper

A pen, pencil or a marker

Tape

Glue


Draw the design of your craft project out on paper.

029

Tape it to your cork board or wood.

030

Using a hammer lightly tap your nails into the pattern. Only tap about halfway in, leaving room on the nail to wrap your string. Remove your paper template carefully by tearing it out from under the nails.

034

To start, tie a piece of the embroidery thread to the nail that you intend to start with. Use a dab of glue to secure in place & let dry.

040

Wrap your thread around the nails, weaving it back & forth between nails. You can weave it however you choose as long as you make sure to follow the design of your pattern. Keep an extra sketch of your drawing handy for reference. It is easy to lose your pattern in the nails after a while.

037

Continue to weave your thread around the nails following your pattern until complete. Tie off your thread at the end & use a dab of glue to secure. Be sure to tie off your thread in between colors too.

041

Hang up your finished product.

IMG_20140208_013330

This was a fun project. I think I might have the string art bug. I can’t wait to design my next project. It takes a little getting used to. I lost myself a little in my lettering but once I referenced my drawing I was able to decipher my pattern again. This is a very forgiving project. There is plenty of room for error & to go back.

Related topics:

http://smallestforest.net/2014/01/29/httpwp-mepeep9-1g9/

http://daisyanddaydreams.com/2014/01/30/valentines-day-decor/

Cool whip finger painting & more messy play

Cool Whip Finger Paints - edible paints & messy fun for toddlers
As any mother of a toddler knows, toddlers have a short attention span and like to keep busy constantly. They are discovering and learning something new every day, every minute, every second. It is an incredible to thing to watch. It can be uplifting, amazing, funny, heartwarming, frustrating and oh so tiring.
It can be extremely difficult finding activities that will engage & hold my daughter’s interest. She, like her father is a runner. She does not like to stay still even for short periods of time, which is the reason I think I have such a hard time getting her to eat her meals.

One thing my daughter does like is finger painting. Like most children her age she also likes to put everything in her mouth. I found this recipe for edible finger paints last year on Pinterest.

Edible Finger Paint 
2 Tbs. corn starch
4 Tbs. water
food coloring as desired
 
Combine and mix well.

I have made these several times. Here is Mai hard at work.

IMG_20130803_130208_167

IMG_20130803_130654_776 (1)

The verdict…
This is a great recipe but I found that with this and with other finger paint recipes that they were too soupy.
She would pour out her paint containers within minutes, and that would be end of that.

I saw another idea for playing in shaving cream and I thought this was a great idea but I didn’t want her eating it.

The image of the shaving cream brought to mind Cool Whip. Lucky for me I always have a tub of Cool Whip handy.
I portioned out the Cool Whip into 3 containers and added food coloring and stirred until I achieved the desired color.
002

Mai was curious about it right of the bat. I set up her painting area by putting down a drop cloth under her chair and set a piece of poster board down for her at the kitchen table.
Let the paint fly, Mai!

She, of course, had to start off with a taste test.

025

It passed with flying colors, now she is ready to paint.

028

029

I gave her a cork and a paintbrush to work with. I was impressed with my little Picasso. She used the brush to paint the cork and then used the cork to stamp the paper.

033

032

BeFunky_030.jpg

Mai’s finished Mess-terpiece.

031

The verdict…
The Cool Whip paints worked wonderfully. The denser texture made for a better contained mess & it was much easier to mix than regular finger paints. It tastes better too.

WATER PLAY
Mai loves playing with liquid. One of my daughters favorite things to do is to take her sippy cup and pour her juice, milk, etc into anything she thinks will hold it. I have caught her taking random toys and putting them in her play pots and making soup out of them.

Here is another simple activity. Leave the splash mat out.

I used a small Rubbermaid container and filled it halfway with food colored water. We added some play cups and bath toys. She held on the the paint brush, too. She became really attached to it.

044

040

048
I also gave her a pump bottle filled with the same colored liquid. She loved this.

046

047

The verdict…
This one was a winner. I was able to cook a whole dinner while she enjoyed her water play. Thank you, baby.

Thank you as always for stopping by. Please follow us on Facebook as well.

Cool Whip Finger Paints - edible paints & messy fun for toddlers