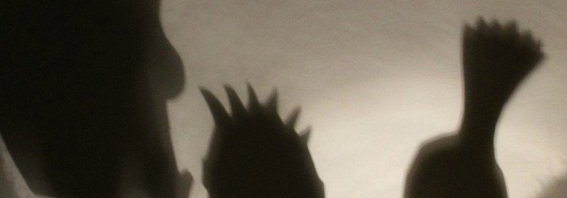
We have a sky light in our living room that brings in a lot of lovely natural light into our home. Yesterday afternoon it cast a shadow on our wall that had my daughter squealing with excitement.
“Look, it’s Gru. It’s Gru”
My husband & I both laughed. It did look like Gru from Despicable Me. Despicable is one of my daughter’s all time favorite movies. She was very disappointed when the sun moved & she lost her shadow. I wanted to keep her shadow fun going, so we made some shadow puppets.
I drew out a picture of Gru on a black foam sheet with a piece of chalk & then cut it out. (Printables to cut out the puppet shapes are attached below.)
Glue a craft stick to the foam sheet cut-out and let dry.
Head to a dark room with a flashlight & shine it on the wall. You may have to play with the flashlight a bit to get it to cast the right light. We were able to just lay the flashlight on the floor.
Mai was having so much fun that she cast her own shadow puppet.
Our shadow puppet theater was a big hit. I could barely get Mai off to bed.
Is it weird that I have 8 boxes of pasta in my house designated only for crafting? I have more pasta for arts & crafts than I do for actually eating. I love pasta crafts. It is so much fun to work with and it comes in so many varieties & shapes. You can paint it, string it together & glue it. They are so many possibilities.
When I asked Mai if she wanted to make pasta skeletons with mommy tonight, she jumped up and threw her hands in the air & said “Yeeeeeeaaaah & and we make pasta monsters, and pasta kitty cat & a pasta mama and dada….”
Taking one of my daughter’s suggestions, we made some pasta monsters too.
What you will need:
Unlined ziti
Mezza Rigatoni
Elbow macaroni
Farfalle
Small shells
Jumbo shells for stuffed shells
Ditalini
Wagon Wheels
Hot Glue gun
Yarn
Paint
While Mai painted the jumbo shells for the monsters, I started to string & glue the skeleton together.
PASTA SKELETON
Directions:
Use a piece of yarn to string up 2 pieces of ziti with 2 pieces of Ditalini between them. Tie a knot on each end. Press the glue gun into each end & push the knot into the pasta & insert glue. Make 3 more exactly like this. You will need 4 total for arms & legs.Take two of the pasta/yarn strands. Glue a small shell to the ziti end of each strand. Glue one piece of farfalle to each strand using the ditalini end.Glue 3 pieces of elbow macaroni to both ends of a piece of ziti as shown to form the rib cage.Glue the rib cage to the center of the farfalle.Stack two elbow pieces to the top of the rib cage and glue into place. Place two rigatoni pieces on either side of this. From the ditalini side, glue the other two pre-made strands to the rigatoni. Glue two elbows to the bottom of each arm.Fold a strand of yarn in half. Insert both ends into one piece of ziti & knot off on the end. Push the knot into the ziti with glue gun & squeeze a drop of glue on each end of the ziti.Glue the ziti inside of a jumbo shell with about a half inch of the ziti sticking out for the neck. Use a drop of glue to secure the yarn strands on the other end of the shell.
Next we were on to our monsters. Mai & I made quite a mess as we painted our pieces for our monsters.
PASTA MINIONS
Directions: These are directions to make one minion. Paint a jumbo shell & two pieces of ziti yellow. Paint two wagon wheels white with a dot brown in the center. (We used blue, because Mai wanted blue eyes.) Paint two small shells & one ditalini black. Let the paint dry. Use the glue gun to glue wagon wheels in place for the eyes. Use black paint to paint a thick line on either side of the wagon wheels so that it looks like goggles. Paint in your mouth & teeth using black & white paint. With blue paint, paint the bottom 3rd portion of your minion. Paint a thick stick of black around each yellow ziti piece. Let dry. Glue the ziti to the sides of the minion to make arms. Glue the two small black shells to the bottom of the minion to form feet. Glue a black ditalini in the middle of the blue painted portion of the minion.
PASTA MONSTER
Paint a jumbo shell, 6 ziti pieces, 1 elbow macaroni & 4 small shells green. Paint one wagon wheel white. Add a blue circle in the middle & then a black dot. Let dry. Glue the ziti arms in place using 2 pieces on each side. Glue a small shell to the end of each arm to form a hand. Glue two pieces of ziti in place for the legs & then add the small shells as feet. Glue the wagon wheel eye in place & then add the elbow macaroni over the eye to form an eyelid. Paint in a crooked mouth with black paint & dot with white for teeth. Let dry.
Thanks as always for reading. Please follow us on Facebook.
This website uses cookies to improve your experience. These cookies feedback information to our analytics and advertisers. We track views of the site - which pages are visited, whether you are a regular or returning visitor to help generate a more personalised experience. You can switch cookies off or follow the READ MORE. AcceptRejectRead More
Privacy & Cookies Policy
Privacy Overview
This website uses cookies to improve your experience while you navigate through the website. Out of these, the cookies that are categorized as necessary are stored on your browser as they are essential for the working of basic functionalities of the website. We also use third-party cookies that help us analyze and understand how you use this website. These cookies will be stored in your browser only with your consent. You also have the option to opt-out of these cookies. But opting out of some of these cookies may affect your browsing experience.
Necessary cookies are absolutely essential for the website to function properly. This category only includes cookies that ensures basic functionalities and security features of the website. These cookies do not store any personal information.
Any cookies that may not be particularly necessary for the website to function and is used specifically to collect user personal data via analytics, ads, other embedded contents are termed as non-necessary cookies. It is mandatory to procure user consent prior to running these cookies on your website.