Tag

puppets

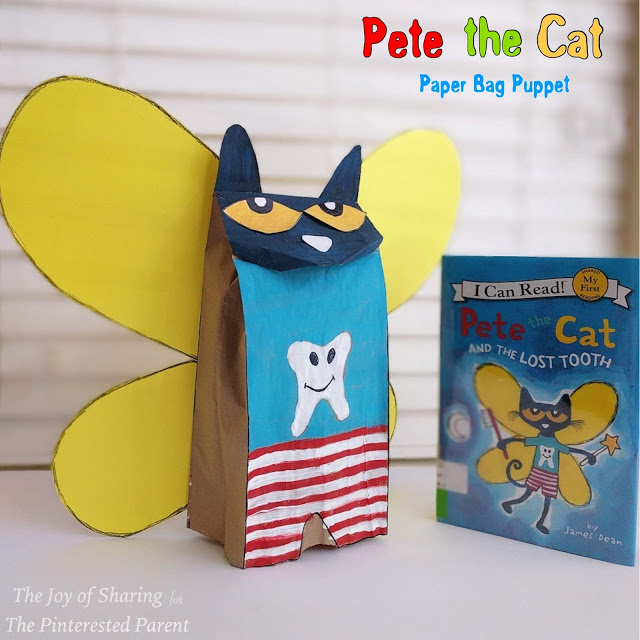
Pete the Cat Paper Bag Puppet

A special thanks to Shikha from The Joy of Sharing for sharing this wonderful Pete the Cat inspired puppet craft with us. She has a lot of fun and creative ideas, be sure to head over to her page.

Hello! I am Shikha from The Joy of Sharing. Craft is my passion. So much that, my three-year-old daughter and I create crafts together in her play time. My daughter loves doodling and cutting so it’s a lot of fun for both of us. I love sharing easy , fun and educational crafts that can be created by moms with their tots or preschool teachers with their students. Happy crafting!

“Not everyone is the same. But being kind is always cool.” Pete the Cat (James Dean)

Pete the cat is wise and funny. That’s why we introduced her to our tot in the last few weeks If our tot adopted Pete’s attitude early in her life, she would take a lot less stress and be a happy person.

So, this post is to celebrate this spunky book character in our characteristic craft style – a paper bag puppet craft of Pete as the tooth fairy. It turned out really well with her magic wings while giving our tot some preparation for the future: she will lose some teeth but should she panic? Goodness No! Pete does not panic!

Enjoy making this craft with your little ones and see them pick up some life skills on the side.

Happy Crafting!

Arts & crafts for kids, kids crafts, paper craft, art projects, easy & fun crafts, toddler, preschool, kindergarten crafts school crafts, book inspired, book based crafts, kids book craft, pete the cat, pete the cat and the lost tooth, paper bag craft, paper bag puppet, puppet craft, playful craft, pretend play ideas,

*The Pinterested Parent is a participant in the Amazon Services LLC Associates Program, an affiliate advertising program designed to provide a means for sites to earn advertising fees by advertising and linking to Amazon.com. In addition, text and image links in this post may be affiliate/referral links, which means we may be compensated if you make a purchase after clicking through these particular links* See full disclosure policy.

See it in action here!

Continue Reading…

Black Glue Scarecrow Puppets

There is nothing scary about these adorable scarecrow puppets.

By now, you have probably already realized that I am in love with all things fall. Fall trees and their leaves are my absolute favorite, but coming in a very close second are scarecrows.  They are just so cute with their hair made out of hay, their floppy hats and their overalls. These black glue scarecrow puppets are fun to design and paint and will make for a fun fall themed puppet show for the kids when they are done.

Black glue and watercolor scarecrow puppets with printable template to decorate. Fall / autumn arts and crafts for kids. Painting

Continue Reading…

Toilet Paper Tube Scarecrows

We began a little fall decorating this weekend. We bought a bale of hay to use both for a fun sensory bin for my daughter & to pretty up our front yard for the season.

Toilet Paper / paper towel roll scarecrows - the tubes make great finger puppets for a fun craft or pretend play. autumn & Halloween arts & crafts for kids

*This post contains affiliate links*

We placed our hay in our front yard in anticipation of going to a local farm over the weekend for scarecrow making & pumpkin and gourd picking. I told my daughter that we were going to place scarecrows on our bale of hay. She told me that she wanted to make a girl scarecrow and a mama scarecrow. All of the scarecrow talk had me inspired to start making some scarecrows right now.

Cardboard Tube Scarecrows

What you will need:

Cardboard Tube

Acrylic Paint

Egg Carton Sections

Jumbo Craft Sticks

Foam Sheets

Yarn

Buttons

Markers

Low Temp Glue Gun (Use caution when operating any glue gun.)


Directions:

Poke a slit on either end of your cardboard roll about 1/3 of the way down. Make it large enough so that the craft stick can slide through.

img_4006

img_4007

Take the stick back out & paint the stick in whatever color you will want your scarecrow’s shirt to be.  Paint about a 1/4 of the tube in a flesh tone. Then paint half of the remainder in the shirt color & then the other half in the pant color. Let the paint dry.

img_4010

Paint an egg carton section in whatever color that you want the hat to be & then cut out a wavy circle. Let the paint dry.

img_4008

Glue the egg carton piece to the center of the foam shape.

img_4013

Crumple up the foam a little so that it has a more natural hat feel.

img_4012

Glue strands of yarn to the ends of the craft stick.

img_4014

Glue a few strands of yarn over the top of the flesh toned area on the tube & then glue the hat on.

Glue more strands under the head & then glue on buttons. Draw a face on the scarecrow with magic markers.

The tubes fit perfectly over a couple of fingers to make fun puppets.

Toilet Paper / paper towel roll scarecrows - the tubes make great finger puppets for a fun craft or pretend play. autumn & Halloween arts & crafts for kids

We made a mama scarecrow & a little girl one just as my daughter wanted. She had a ton of fun playing with these. These made a wonderful addition to her already amazing imagination for pretend play.

Toilet Paper / paper towel roll scarecrows - the tubes make great finger puppets for a fun craft or pretend play. autumn & Halloween arts & crafts for kids

Thank you as always for stopping by. Please follow us on Facebook as well.


Dr. Seuss Shadow Puppets (Free Printable Cut-outs)

Dr. Seuss' 'The Cat In The Hat' Inspired shadow puppets with free printable cutouts.

*This post contains affiliate links”

My daughter loves books. Every night she is given the choice to play or to clean up early and read extra books. The books win out every time. She has a wide range of favorites, but her Dr. Seuss books are definitely on top.  We all have our favorites in the house. My husband seems to prefer ‘A Fly Went By‘, which is not actually Dr. Seuss, but is his brand, while my favorite book is the lesser known and beautiful ‘My Many Colored Days’.

134028

My daughter’s favorites ,on the other hand, change from week to week. Currently, her books of choice are ‘ABC‘ & ‘The Cat In The Hat Comes Back.’ She can recite these books from cover to cover & sometimes reads to me now at bedtime too.

We made ‘Despicable Me’ inspired shadow puppets a while back & they were a huge hit with my daughter, so this week I felt inspired to make some from our favorite ‘The Cat in the Hat’ characters.

I sketched out the characters & cut them out of foam sheets & then glued a craft stick to the back of each. *Free printable cutouts are available below.*

IMG_4862

Dr. Seuss Printables (all)

My daughter has a great little key chain flashlight that we used to shine on the dark wall to make our puppets come to life.

Sally & Her Brother Printable

IMG_4845 IMG_4844

Thing One Thing 2 Printable

IMG_4842 IMG_4834

The Fish Printable

IMG_4841

The Cat in The Hat Printable

IMG_4813

The puppets were again a hit. Thing 1 & Thing 2 were the most fun. They were always running.

Thank you as always for stopping by. Please follow us on Facebook as well.

Dr. Seuss' 'The Cat In The Hat' Inspired shadow puppets with free printable cutouts.

Despicable Me Shadow Puppets

Despicable Me Shadow Puppets


We have a sky light in our living room that brings in a lot of lovely natural light into our home. Yesterday afternoon it cast a shadow on our wall that had my daughter squealing with excitement.

“Look, it’s Gru. It’s Gru”

IMG_1318

My husband & I both laughed. It did look like Gru from Despicable Me. Despicable is one of my daughter’s all time favorite movies. She was very disappointed when the sun moved & she lost her shadow.  I wanted to keep her shadow fun going, so we made some shadow puppets.

I drew out a picture of Gru on a black foam sheet with a piece of chalk & then cut it out. (Printables to cut out the puppet shapes are attached below.)

IMG_1320

Glue a craft stick to the foam sheet cut-out and let dry.

IMG_1321

Gru Printable

I did the same with Agnes & a minion,

IMG_1354 IMG_1355

Minion & Agnes Printable

Head to a dark room with a flashlight & shine it on the wall. You may have to play with the flashlight a bit to get it to cast the right light. We were able to just lay the flashlight on the floor.

IMG_1336

IMG_1337IMG_1338 IMG_1339

Mai was having so much fun that she cast her own shadow puppet.

IMG_1348

Our shadow puppet theater was a big hit. I could barely get Mai off to bed.

IMG_1350

IMG_1347

IMG_1352

Thank you as always for stopping by. Please follow us on Facebook as well.


PUPPET THEATER part 1 DIY felt puppets

0241

It can sometimes be exhausting finding activities to fill your toddler’s day, especially when they are as curious as my busy baby. We try to fill her days with fun activities and books but sometimes (and don’t think me a bad mom) it is a nice break to sit her down in front of Disney Junior or a Baby Einstein video, so I can fix dinner or just grab a moment for ourselves.

Lately she has been requesting to watch television far more than I want to accommodate. Mommy created a bad habit. This worries me. She has a particular fondness to ‘Little Einstein’s’. “Stein, Stein” she asks, when she wants to watch them. She loves these characters. I came across a few different ideas for puppets the other day & it made me think, maybe I could give her those characters she loves without having to turn on the dreaded t.v.

Tonight’s inspiration… ‘Little Einsteins’s’ felt puppets.

If you have been following us, you know that I love working with felt. It is easy & fun to work with & fairly inexpensive.

                                                                                  What you will need

Felt

Glue Gun

Markers

Scissors

Needle & thread

Decide how large you would like your puppets. Trace out the shape of your characters. I used a white marker, so lines would be less visible if missed after cutting. Cut out the body of your puppet (front & back).

005

Use scissor to cut out facial details such as eyes and mouth & hair if needed.

007

Use your glue gun to secure details to the body of the puppet.

009

011

Use markers to draw in fine details such as eyelashes or eyebrows.

014

Sew around the outside of the body to secure the front & back of the puppet together.015

016

Repeat this process for all characters.

017 020 033

Here is our finished ‘Little Einstein’ collection…

0322

Up next…Puppet Theater part 2 the stage