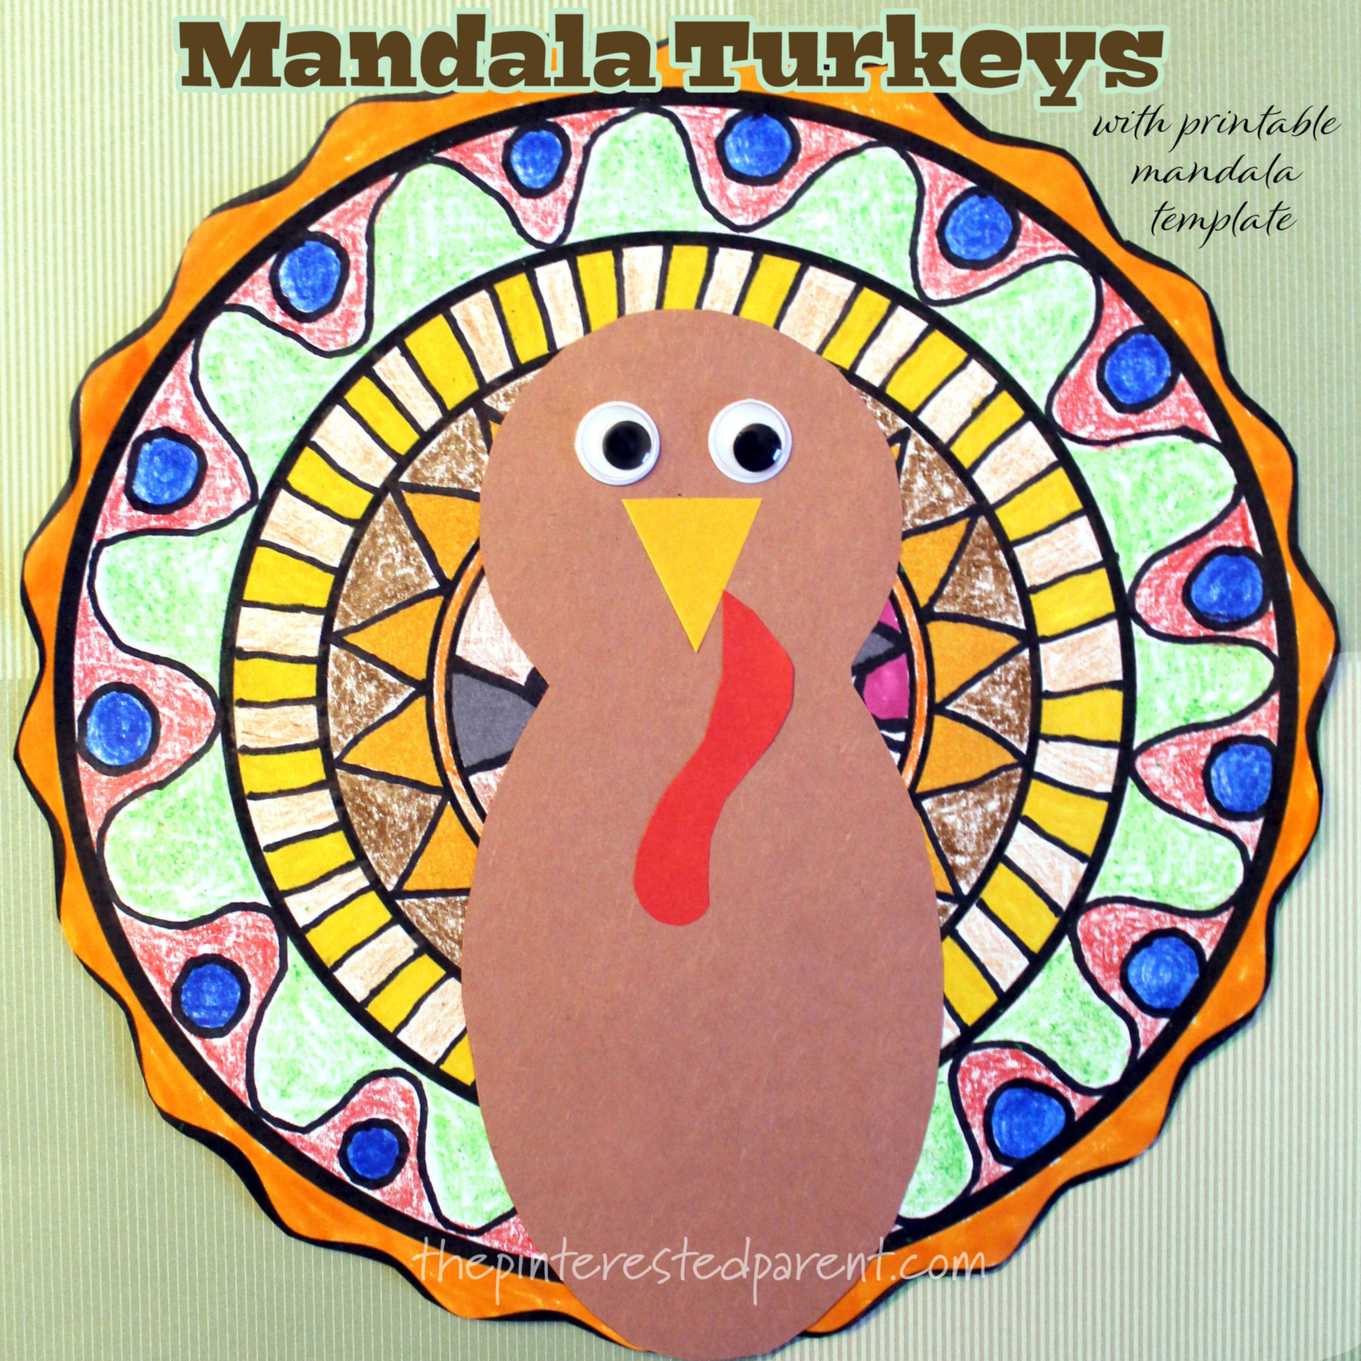
Gobble gobble gobble! Thanksgiving is a month away. If you are looking for a simple and fun Thanksgiving craft that you can do with the kids, here you go. This paint scraped turkey craft is as easy as it comes and only takes about 10 minutes to make.
Category
Thanksgiving
Scrap Paper Turkey Craft for Thanksgiving
Here is a little secret about me. I used to be a scrapbooker, a big one. I have books and books filled with lovely memories set on pretty paper with stickers and stories surrounding them.
After having my daughter, I found less and less time to scrapbook, but still have a lot of supplies. I love scrapbook paper. It is pretty. It is thick and it is wonderful to craft with.
Cleaning out our craft room this weekend, I stumbled across a ton of paper stowed away in the closet. We wanted to take advantage of our find and use it to make a cute Thanksgiving craft. I had a ton of scraps to use, so I selected whatever random pieces that I had to work with.
My daughter and I both cut strips of the paper to form our turkey’s feathers.
My daughter told me that I was making a mama turkey and she was making a baby turkey. She cut her scraps into tiny strips.
For the body, I cut out a bowling pin looking shape and my daughter cut out two circles, one larger than the other.
We glued our scrap pieces flared out around our body with the printed side of the scraps facing down. When we were satisfied with the amount of scrap feathers on our turkeys, we flipped them over and added googly eyes and an orange triangle for a beak.
My daughter insisted that the mama and baby turkey had to be glued together. It made perfect sense to me. How cute is my sweet little baby? This is a great craft for Thanksgiving and a wonderful way to practice cutting skills.
Thank you as always for stopping by. Please follow us on Facebook as well
Craft Stick Stamped Thanksgiving Turkey
My daughter loves to create and will do it with anything that is at her fingertips. Yesterday, she grabbed a pair of scissors and cut out two squares. She told me that she was going to make a jelly sandwich. She went and got some paint and a craft stick and spread her two squares with paint and made a grape jelly sandwich.
Watching her paint with the craft stick gave me an idea. With Thanksgiving nearing, I thought that we could use the craft stick as paint stamp to create a cute turkey craft.
Craft Stick Stamped Turkey
We squeezed acrylic paints in the color of our choosing onto paper plates and then dipped half of the craft stick into the paint.
We pressed the paint covered stick onto a piece of paper. We continued to dip and stamp the craft stick around the paper to form the turkey’s feathers.
Once we stamped on all of the feathers to our liking, we set our paint aside to dry. If the paint is very thick in spots, you can blot the paint to help it dry.
While the paint dried, we cut two circles. We made one of the circles larger than the other and then cut out a small triangle for a beak and a waddle to go under the beak.
We just slightly overlapped the smaller circle over the larger circle and glued it into place. We each glued a pair of googly eyes onto the top of the smaller circle and then glued the beak and waddle underneath it.
Once the paint dried, we glued the turkey’s body in front of its feathers.
Thank you as always for stopping by. Please follow us on Facebook as well.
Pine Cone Pets
A fun thing happened the other day. I found a huge bag of pine cones in my basement.
Puzzle Piece Turkey Craft
It has been a hectic of couple of weeks. Between moving out of our house, the construction on our new house not being finished, our daughter starting preschool & just the regular everyday stuff, I have barely had a moment to think. We have had to slow down on our regular craft routine because we have limited supplies with almost all of our home still in storage.
This morning before school, Mai asked if we could do a craft. I promised her that we would when we got home. With Thanksgiving nearing, we decided to make another turkey craft and dug through our supplies to see what was available. The first bag we came across had some old puzzle pieces in it & that is what we decided to use.
What you will need:
Old puzzle pieces
Paint
Construction paper
Googly eyes
Markers
Glue
Directions:
Paint your puzzle pieces in the color of your choice.
Mai wanted purple, I chose red & Ashley chose to mix her colors.
Ashley was so excited, she painted almost the whole bag of puzzle pieces.
After you are done painting them. Let them dry.
Cut the turkey’s body out of brown construction paper. Also cut out a beak & feet.
Glue the body onto a piece of paper. Glue on googly eyes, the beak & feet.
When your puzzle pieces are dry, glue them around the body to form the feathers. Draw in the wattle using a red marker.
Mai made her whole turkey by herself.
I did the bodies for me & a tired little Ashley.
This was a quick and easy craft
Thank you as always for stopping by. Please follow us on Facebook as well.
Button Cornucopia Thanksgiving Craft
Buttons, buttons, buttons…my daughter is just crazy for buttons. Whether it is using them in sensory play, selling them in her pretend button store or doing crafts with them she loves them.
Button Color Match Turkey Craft
We have been packing in a lot of fall fun & activities lately. We visited a corn maze recently.
In the maze there was a series of questions at each checkpoint in the maze leading to the maze’s end. All of the questions were about turkeys. My daughter was excited every time we found a checkpoint. We asked her a question and would try to figure it out all together. She thought it was especially funny when she found out that the red thing dangling from its neck was called a wattle. She still found it funny last night when we made a turkey craft.
Our turkey craft matched up colorful buttons with the coordinating feathers.
What you will need:
Construction paper:
Buttons
Glue
Googly eyes
Directions:
Cut out shapes for the turkey feathers out of construction paper & then glue onto another piece of paper.
Cut out a shape for the turkey’s body.
Cut out the turkey’s feet & beak & glue them onto the turkey. Cut out the wattle (still funny) & glue it to the neck.
Glue the turkey body over the feathers & add a pair of googly eyes.
Sort out the colored buttons that coordinate with the turkey feathers.
Have your child glue the buttons onto its coordinating color.
Our turkey came out adorable, wattle & all. I can’t wait for more turkey crafts.
Thank you as always for stopping by. Please follow us on Facebook as well.
100 Things That I am Thankful For
Why is it that it takes the holidays for us to reflect on the things in our life that are most important? On New Year’s we resolve to better ourselves, on Valentine’s Day we show appreciation for our spouses & lovers and on Thanksgiving we give thanks for all of the gifts that god has given us. We should resolve to be better every day. We should celebrate our love & all of these gifts every second, but with the stresses of work, bills & daily life often we do forget. The holidays do offer a great nudge. This week is Thanksgiving. There are many things that I am grateful for but often take for granted. I challenged myself to make a list of 100 things, some are things that I cannot live without, some are the little things that make me smile, but all are things that make be thankful. These are not listed in any particular order.
1. My husband & daughter and my extended family
2. Life and health
3. A good-natured debate
4. Watching my daughter sleep
5. Low fat frozen yogurt
6. Weekends off
7. My memories
8. Sweatpants
9. Art
10. My daughter’s laughter
11. Owls
12. Changes of season
13. My mother-in-law
14. Spanx
15. Meditation
16. The money in my wallet
17. Beauty in unexpected places
18. Our travels
19. Chocolate
20. Inspiration
21. My sister
22. Color
23. Day dreams
24. Heated mattress pads
25. Inside jokes
26. Home movies
27. Forgiveness
28. Good friends that are always there
29. Books
30. Unsolicited compliments
31. Thunderstorms
32. ‘The Princess Bride’
33. Tears of happiness
34. Hugs
35. Upbeat people
36. Decaf coffee
37. Foot rubs
38. Singing when no ones listening
39. Raw honey
40. Our dog
41. All the I love yous
42. Old photographs
43. A good sneeze
44. The blogs that I follow & the ones that follow me
45. Peppermint Patties- Get the sensation
46. My mother visiting in my dreams
47. Pinterest
48. Central Air
49. Post-It notes
50. The Beatles
51. Water
52. My snooze button
53. Dance
54. Finding a solution to a problem
55. Bubble baths
56. The warmth of the sun
57. Cherry blossoms
58. Swiffer
59. Baby feet
60. Traditions
61. Drive through windows
62. “The Big Bang Theory” nerds
63. Naps
64. Movie quotes
65. Moments of silence
66. Kisses
67. Brie & jelly
68. Dimples
69. Anti-bacterial wipes
70. Netflix Streaming
71. Internet shopping
72. Sunsets
73. Family outings
74. That perfect little black dress
75. Herbal tea
76. Pearl jewelry
77. The sound of bagpipes
78. Respect
79. Moments of clarity
80. Snow Days
81. Looking up at the stars
82. Cuddling on the couch
83. Our home
84. Christmas Carols
85. The sounds & smell of the beach
86. Toe socks – Have you ever worn a pair? You would be thankful too.
87. A blank canvas
88. A quick-witted comeback
89. Girls’ nights out
90. Kindness of strangers
91. Nutella
92. The lessons I have learned from the mistakes I have made
93. Puns
94. Musicals
95. Vicks Vapor Rub
96. A lit fireplace on a cold night
97. Hair colorant
98. Over-sized sweaters
99. My glue gun
100. God for blessing me with all of these gifts
What are you most thankful for? Can you list 100 things that you are grateful for? I challenge you to post your list. Link back to me if you do so that I may see what makes you thankful.
Tissue Layering & Paper Plate Crafts
There are many reasons that I love craft projects with my toddler. One of the big ones is that it keeps her mind & hands occupied. I do many crafts side by side with her, but sometimes it is great to have her work independently while I cook supper or get chores done. Arts & crafts are a far better alternative to sitting in front of the television. This is why I love tissue paper crafting. It can keep her content for long periods of time.
Tearing the tissue into pieces is fun for her destructive little hands. Layering the tissue in different colors & patterns is a great creative outlet for my little artist.
What you will need:
Different colored sheets of tissue paper
Paper plates
Vinegar
Elmer’s glue
Paint brush
Mix 3 parts vinegar with 1 part glue & stir. The vinegar will cause the colors to bleed together & the glue will adhere the tissue to the plate.
Cut or rip the tissue paper into several pieces & colors. Layer the tissue pieces & paint on the vinegar/glue mixture. Do a few pieces at a time. Let dry & then trim the excess that hangs over the edges.
Mai said that she wanted to make a fish. We picked two colors & layered the bottom of a paper plate. Let it dry & trim around the edges. Cut out a triangle for the mouth & set the triangle aside. Cut out a triangle using a piece of construction paper. Glue the triangle mouth cutout to the inside of the construction paper cutout & glue to the opposite end of the fish’s mouth. Glue a small black circle inside of a larger black circle & glue above the mouth to make an eye.
Mai wanted to make more animals. She asked for us to make animals that live on a farm. Since Thanksgiving is coming, I suggested a turkey.


Pine Cone & Play-Doh Turkey Crafts
One of my favorite parts of my daughter’s days at daycare are receiving her daily reports & seeing all of the craft projects that she brings home. I love seeing her beautiful crafts, even the ones that she does with someone else.
This week she brought home a lovely fall one. It was branches bound together & decorated with Play-Doh. Miss Laura said that Mai worked on it for 2 hours.
This weekend there was a sale on Play-Doh at the supermarket, so I stocked up. Mai was so excited when I came home with a box filled with 24 different shades of it. She dove right in & started creating.
She is becoming quite the little artist. Her imagination is developing so quickly. I watched her as she kneaded & forms different shapes & put them together. She explained to me as she molded her creation what she was making. “Look mama, a frog! He has a blue fly on his tongue.” I have to admit, I was very proud.
She did not stop there. “Look Mama, I made Dukey’s poop.” Oh dear! It does look like Dukey’s poop.
Since we already were in such a crafty mood & had a table full of Play-Doh, I thought we could make something together.
Thanksgiving Turkey Craft
This just require pine cones & Play-doh. I used craft pine cones only because they were handy. You can use ones from your yard as well.
Form & mold the turkey’s head to the fat part of the pine cone. Show your child how to do it & let them do it to their own.
(If your pine cone is wobbly, place a chunk of Play-doh underneath to keep sturdy.)
Form long oval shaped pieces to use as the turkey feathers.
Insert towards the back between the pine cone scales.
Again, show your little one how to do it.
Add the beak. Older children may be able to do this step, but the smaller hands might need the help. Mai asked mama to make her turkey face.
Add the eyes next.
Add the turkey’s waddle & you are done.