Category

Dessert

It’s A Marshmallow World – Marshmallow crafting & cooking

MarshmallowCrafts.jpg

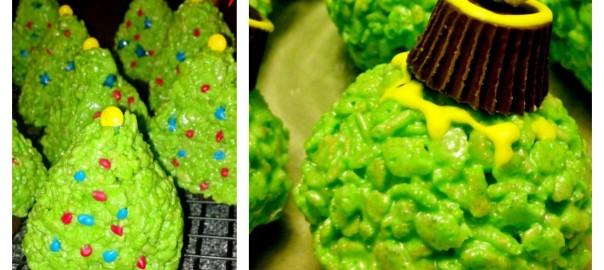
Let the Christmas crafting continue. Last week we made Christmas themed Rice Krispies treats. I needed marshmallows for making these. They were luckily on sale at the grocery store that day & I bought far more marshmallow than any household needs.

While making our treats, I noticed that Mai really enjoyed playing with them. We had enough of them, so let’s play.

Today, it was Mai & Mommy’s marshmallow crafting day. Lately, Mai has been doing a lot of painting. She asks me almost every day. Today would be no different. “Paint, mama! Paint! Paint!”. Painting it is! We could use the marshmallows to paint with, ala pointillism style. My thoughts were to cut out a Christmas tree & then use the marshmallows to dot on the ornaments with paint.

Here is what you will need..

Construction paper- green, yellow, white, red & brown

Marshmallows

Non Toxic Paint -I whipped up our usual batch of Cool Whip paints           http://thepinterestedparent.wordpress.com/2013/11/01/cool-whip-finger-painting-more-messy-play/

Glue Stick

Scissors

Directions:

Draw the outline of the Christmas tree.

0171

Cut out around the outline of the tree.

0181

Cut out a rectangle for the stump, an oval for tree skirt & a star for the top of the tree.

0241

Loosely tape tree to a scrap piece of paper temporarily & then show your child how to use the marshmallow to stamp on the paint.

0221

Let your toddler paint their masterpiece.

0471 0381 0411 0401

Mommy wants to join in on the fun too.

0291 0311

After finishing your tree, let it dry & glue to a fresh piece of construction paper, with the stump, tree skirt & star.

0281

Mai’s finished artwork.                                              Mommy’s too.

IMG_20131210_113624_027                       0351

I had as much fun with this as she did. This was a fun & easy project for any age.

The marshmallow fun didn’t stop there. We needed a sweet treat after all that painting.

Peanut Butter Melting Snowman Smores

Ingredients:

Marshmallows

Graham crackers

Peanut butter

Peanut butter cup minis

M&M minis

Writing icing

Directions: Preheat oven to 350. Break graham crackers into double square squares. Spread a thin layer of peanut butter on to the cracker. Place one marshmallow on each square. Place in the oven. Bake until marshmallow is almost melted. Do not let burn. Remove from the oven & lightly flatten the marshmallow with a spatula. Let cool for about 2 minutes. Place a peanut butter cup on the still warm marshmallow, where you would like your hat to be. It will melt slightly. Put in the fridge for a few minutes to let the hat cool & set. Remove from the fridge & add two chocolate M&M mini for eyes. Use orange writing icing to make a carrot nose & use black or brown icing to dot on the mouth. Let cool & enjoy.

0491

0531

0541

0611

0651

0691 0711

These are delicious. The peanut butter offers a wonderful twist. I know someone that agrees.

0891

Up next: Meet Our Daughter, The Parrot.

Related Topics:

http://glitterbatterandothermatters.com/2013/12/10/smores-dip/

http://stamchocolate.wordpress.com/2013/12/10/bar-in-a-jar/

http://thecraftycultivator.wordpress.com/2013/12/09/gingerbread-marshmallows/

http://zouptonuts.wordpress.com/2013/12/08/baked-smores-not-just-for-the-campfire/

Marshmallows.jpg

It’s a Rice Krispies Treat Christmas

RiceKrispieTreats.jpg

I think it is safe to say, that most people like Rice Krispies treats. What’s not to like? They are easy to make, sweet , gooey & just so darn delicious.

My husband & I like them a bit more than the average person. If you don’t believe me, how many of you had your wedding cake made out of Rice Krispies treats?

Ricekrispie.jpg

It is a lot less messy during the cake feeding, but it hurts a lot more if you smash it into your spouse’s face.

39871_1463749806996_3795368_n

You can imagine my excitement when I was at the checkout counter of the grocery store & saw a magazine cover featuring a Rice Krispies Christmas tree.  I already had an idea for making Rice Krispies ornaments & was anxious to try them both.

I immediately took mental stock of my ingredients.  All I needed was some marshmallows.  Just in case you don’t stock all the ingredients for Rice Krispies treats handy, here is what you need.

Ingredients

5 cups of Rice Krispies

1/4 cup of butter or margarine

40 large marshmallows

green food coloring

colored icing

peanut butter cup minis

mini M&Ms

Directions for trees

1.In a large saucepan, melt butter over low heat.

2.Stir in marshmallows & food coloring until you achieve desired color. Stir until completely melted .

3.Remove from heat & slowly stir in cereal until evenly coated with marshmallow mixture.

4.Lay down a layer of wax paper to work on.

5.Wet your hands to keep the Rice Krispies from sticking & grab a handful & form into a triangular shape (keep hands moistened in between each formation to avoid sticking.)

6. After all triangles are formed & cooled, use icing to add a peanut butter cup to the base.

7. Add a yellow M&M mini to the top of the tree, adhering it with icing.

8. Use red & green icing to dot on the ornaments.

015a 0231 0271 0291 0301 0311 0341 0351 0381

Ricekrispietrees.jpg

Directions for Ornaments

The same amount of ingredients will be needed as well as Cheerios

Follow steps 1-4

Wet hands & form fist sized balls with Rice Krispies treats.

After using all of the mixture to form balls, set aside to cool.

Use icing to adhere a peanut butter cup to the top of each ball.

Use icing to decorate your ornament.

With icing secure a Cheerio to the top of the peanut butter cup.

0321 0361 0441

RiceKrispieornaments.jpg

Don’t forget to thank your favorite helper.

0501 0391

Serve the treats to your hungry family & enjoy the smiles.

0721 0711

Up next…Indoor Snowman

Related Topics:http://pinningcousins.wordpress.com/2013/12/08/mini-gingerbread-houses/

http://foodandeverythingelse.me/2013/12/08/braided-nutella-christmas-tree/

http://www.bloglovin.com/frame?post=2021146593&group=0&frame_type=a&blog=2098008&link=aHR0cDovL2ZlZWRwcm94eS5nb29nbGUuY29tL35yL1RoaXNNYW1hTG92ZXNIZXJCYXJnYWlucy9-My9CMjQ4MThNVkZCby8&frame=1&click=0&user=0

http://www.bloglovin.com/frame?post=2011518129&group=0&frame_type=b&blog=845719&link=aHR0cDovL3d3dy5rZWxseXNrb3JuZXJibG9nLmNvbS8yMDEzLzEyL3Nob3ctdXMteW91ci1saWZlLWZhdm9yaXRlLWhvbGlkYXkuaHRtbA&frame=1&click=0&user=0

Saltine Cracker Bark

0861

A question was posed to me the other day by a fellow blogger. She asked me “What is your favorite Thanksgiving dish that you cook?” My reply was, it was actually a dessert that was my favorite thing to make. This inspired me to share this recipe with you. With the holidays coming, this is a great treat to bring to holiday parties & get togethers. They are a never fail hit. Every holiday, for more years than I can remember my family has put in a special request for me to make this super easy, ridiculously delicious & crazy addicting dessert.

Here is what you will need.

Ingredients

1 sleeve of saltine crackers

1 cup of semi sweet chocolate chips

1 cup of margarine (2 sticks)

1 cup of sugar

1 cup of crushed walnuts

(For white chocolate bark replace chocolate chips with white chocolate chip & walnuts with almonds slivers.)

DIRECTIONS

Preheat oven to 375

In a saucepan melt the margarine on low heat. Do not let it bubble.

051

While margarine is melting, line a baking sheet with aluminum foil & lay out the saltines side by side so that the edges are touching

054

When margarine is fully melted, slowly pour in sugar & stir until sugar dissolves.

055

Quickly pour the mixture evenly over saltines & spread with rubber spatula.

059

Bake for 8 to 10 minutes or until golden brown. Times will vary depending on your oven, so watch to make sure they don’t burn.

Take out of the oven & pour the chocolate chips over the top. When the chips turn shiny, spread evenly with a rubber spatula.

068

Sprinkle nuts over the top & let cool.

069

After the chocolate hardens, break up into bite sized pieces.

071

These seriously are an amazing dessert. I make tins of these during the holidays & give them as gifts. Enjoy!

0832

Related Topics:

http://dailypost.wordpress.com/2014/03/15/daily-prompt-pour-some-sugar-on-me/