Tag

dessert

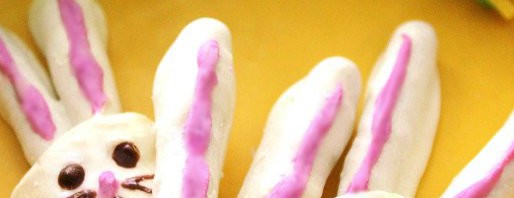
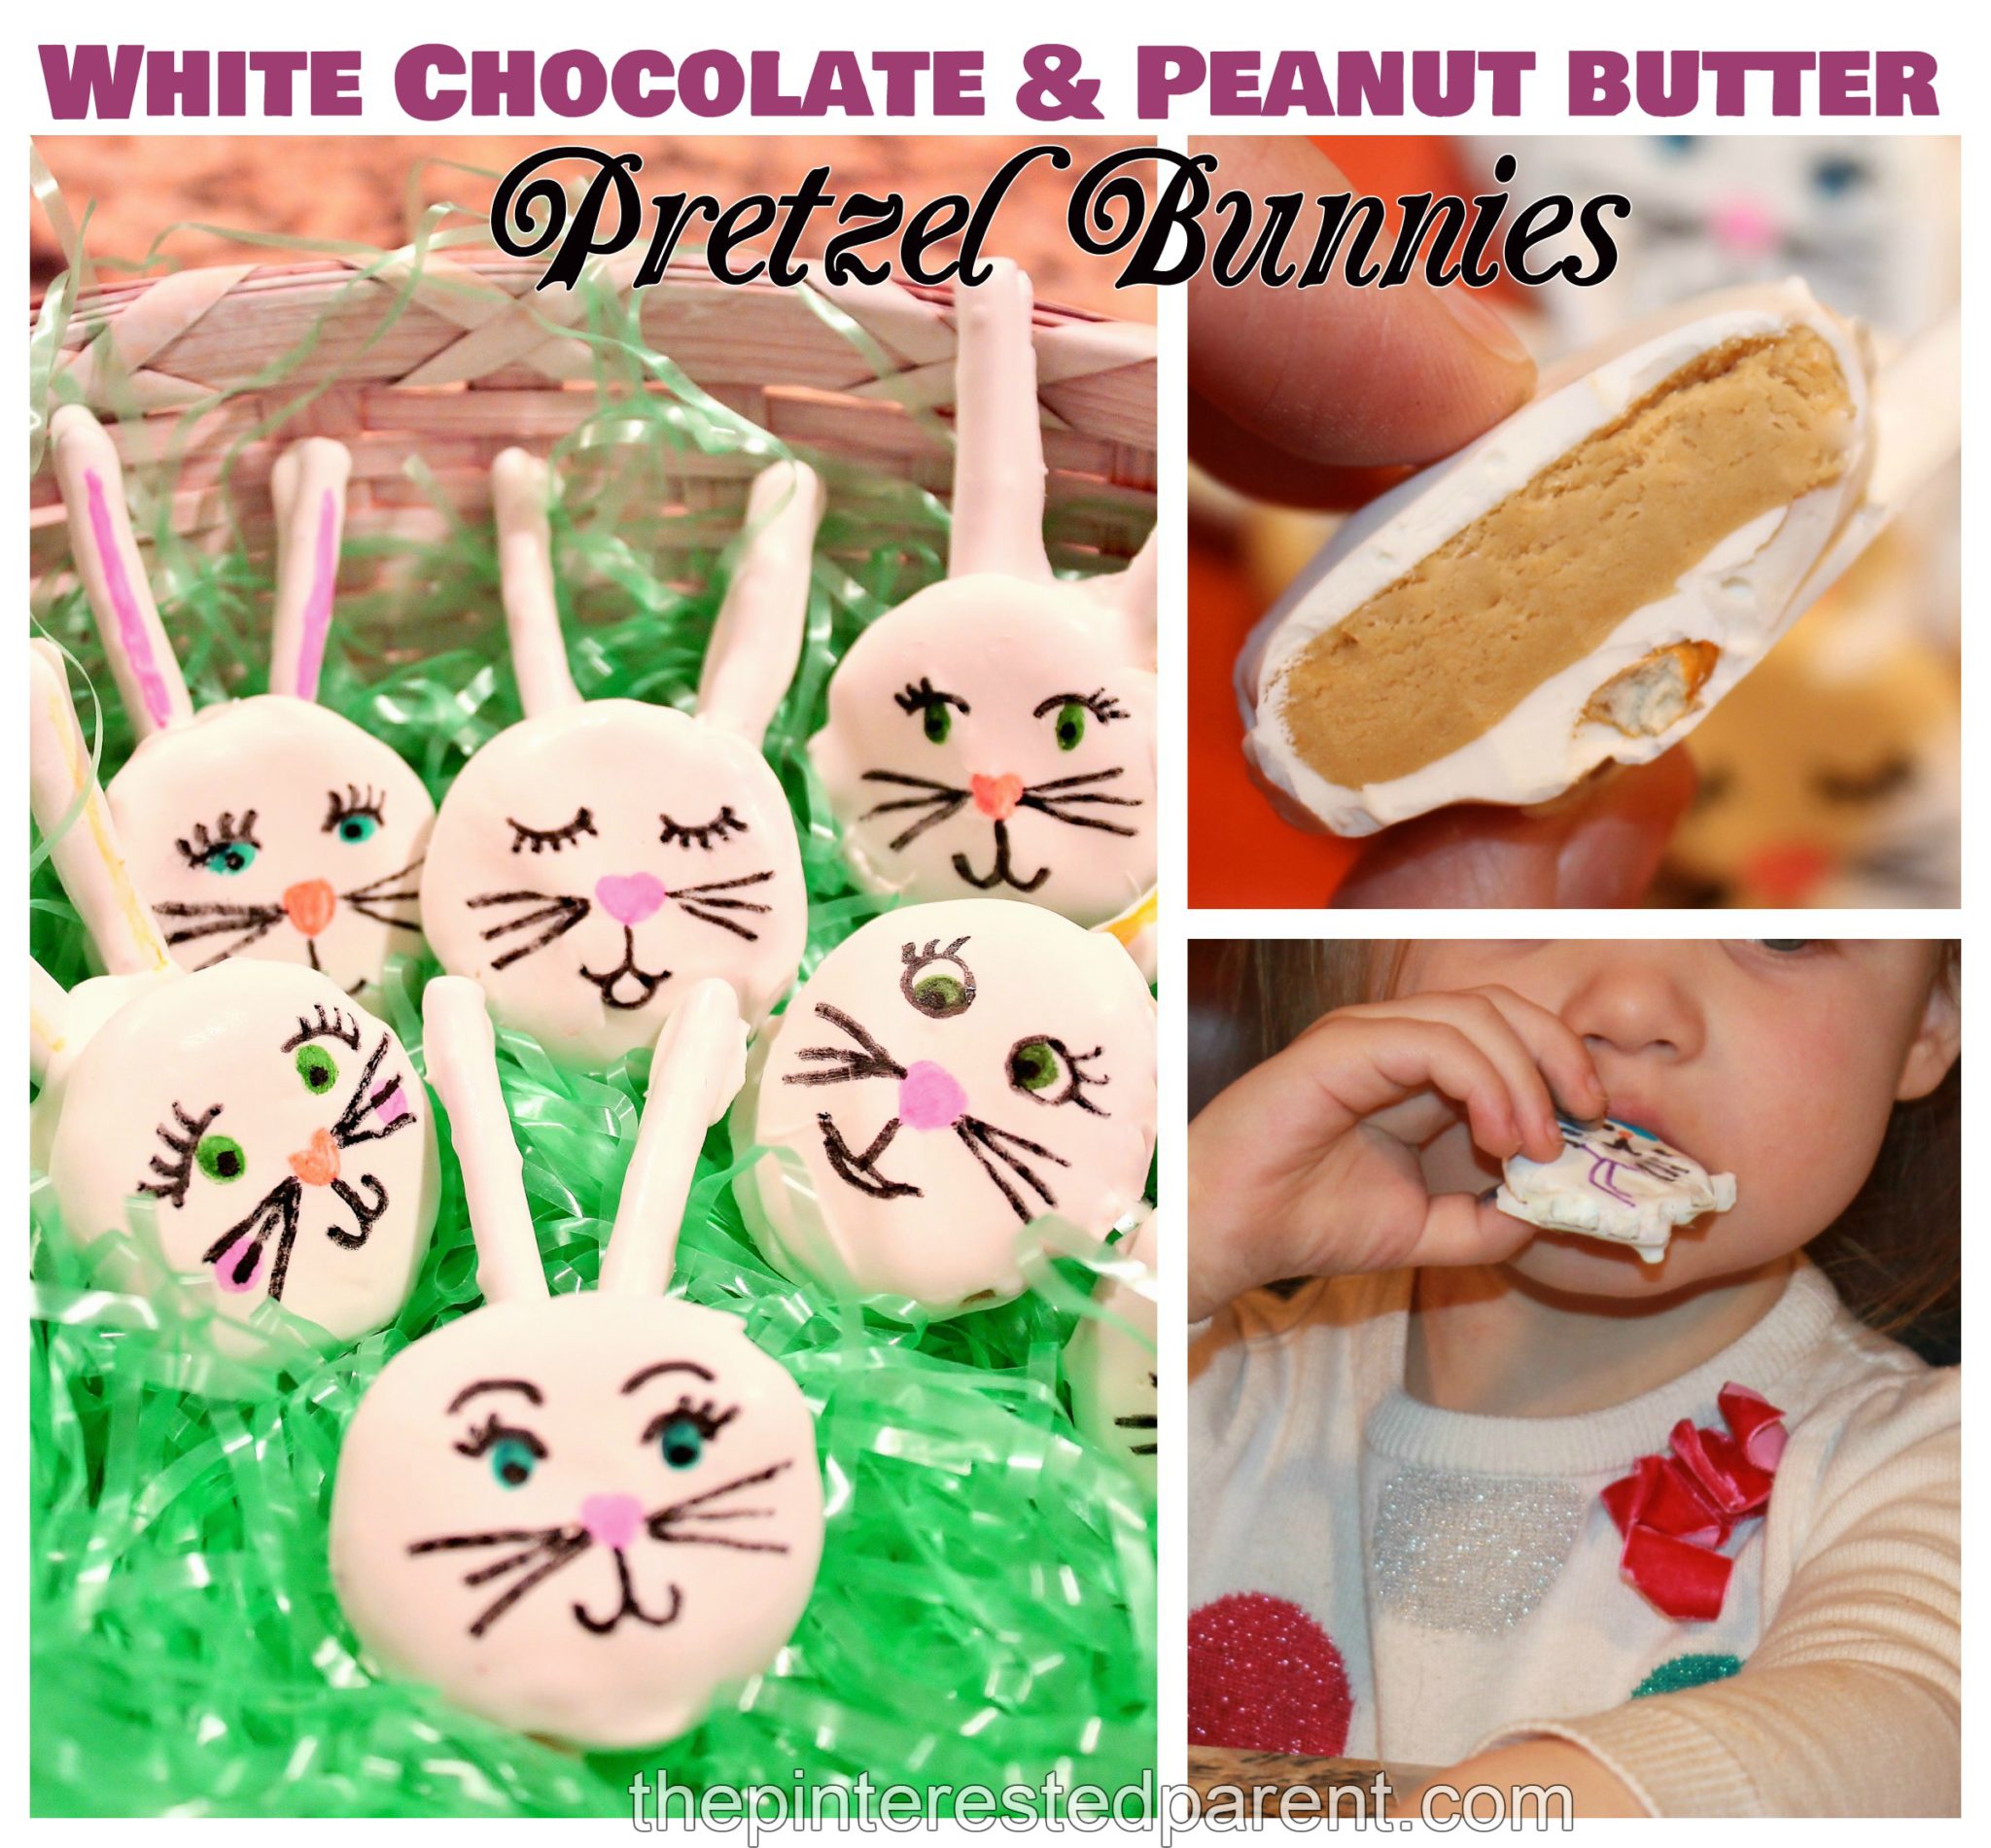
White Chocolate & Peanut Butter Pretzel Bunnies

Easter is quickly approaching and with the holiday comes all of its delicious sweet treats.  White chocolate & peanut butter pretzel stick Easter bunnies recipe. These bunny treats were a huge hit & my kid loved to decorate them.

*This post contains affiliate links*

Last year I had experimented with pretzel bunnies. They were a big hit with my family, so I wanted to try them again with a little help from my favorite little helper. We had recently purchased a set of food markers & we both could not wait to use them.

White chocolate & peanut butter pretzel stick Easter bunnies recipe. These bunny treats were a huge hit & my kid loved to decorate them.

What you will need:

White chocolate melts

Pretzel sticks

Peanut butter

Confectioners sugar

Butter

Vanilla

Food markers

Directions:

Melt 3 Tbsp of butter. Mix it with 1/2 cup of creamy peanut butter, 1 cup of confectioners sugar & 1 tsp of vanilla. Mix it well. Scoop a heaping tsp of peanut butter mixture and roll into a ball. Place on a sheet of wax paper & use a spoon to flatten into a disc. Put them into the freezer for about a half hour or until they are slightly hardened.

IMG_5459 IMG_5460 IMG_5461 IMG_5462

Melt the chocolate according to package directions.

IMG_5453

Lay out another sheet of wax paper. Dip the pretzel sticks, two at a time into the melted chocolate. Let the excess chocolate drip off & place them on the wax paper in a V shape.

IMG_5463

Remove the peanut butter discs from the freezer a few at a time. Dip them one at a time making sure to cover the top, bottoms & sides & place over the pretzel, just covering about 1/4 of the bottom. Use a rubber spatula to fill in any empty space. Let the chocolate cool & harden.

IMG_5476

Then comes the fun part. Use your food markers to draw in the bunny faces. My daughter couldn’t wait to draw on her bunnies.

IMG_5472

Here was her favorite bunny that she made, complete with hair bow & scarf.

IMG_5474 IMG_5475

They were a huge hit again with my family and my friends at work.

Thank you as always for stopping by. Please follow us on Facebook as well.

Chocolate Covered Pretzel Bunnies & Sunday’s Best Link Up # 13

Chocolate Covered Pretzel Rod Easter Bunnies


I took a poll on my Facebook page yesterday. I was curious about what people preferred, sweet or salty. My husband is salty & I am definitely sweet, but the truth is I love the two mixed together the best. One of my weaknesses is for chocolate covered pretzels.

With only one week left before Easter, I have a few more days of Easter inspired fun. Tonight we made some sweet & salty Easter treats in the form of our favorite Easter pal.


Melt white chocolate in the microwave. Put the chocolate in a microwave safe dish & heat for a minute. Check it & microwave in 30 second intervals, checking to see if it is melted before each interval. Be careful not to burn.

IMG_9986

When the chips are soft & shiny stir with a spoon.

IMG_9987

Dip pretzel dipper sized rods into the melted chocolate & lay out on wax paper. Lay two dipped pretzels side by side to form a V shape.

IMG_9988

With a spoon, spoon out a dollop of chocolate over the bottom in the shape of a circle. Be careful to not dribble chocolate over the top. It works best when the chocolate is smooth. Use a rubber spatula to smooth out any rough edges while chocolate is still hot.

IMG_9989 IMG_9991

Melt pink chocolate or in a pinch use white chocolate with just a touch of food coloring gel. Using a toothpick draw a line for the inside of the ears & add a dot for the nose.

IMG_9995 IMG_9996

Melt a small dish of milk or dark chocolate & add in eyes, mouth & whiskers. Let your chocolate cool & remove from the wax paper. If you have any imperfections, which I had a plenty, scrape the hardened chocolate with a knife to smooth out.

IMG_9998

Chocolate Covered Pretzel Rod Easter Bunnies

Now let’s hop on over to our main event. Welcome to week 13 of our Sunday’s Best Link-Up.


Welcome to Week 13 of  Mother 2 Mother’s Sunday’s Best Linkup This is the last week for our Spring Forward theme. We will be starting our April Showers theme next week. We will be looking for indoor activities, recipes, crafts, gardening and blogging tips for those rainy days.  


This week we’re celebrating the thaw across the country, so linkup Easter posts, crafts, recipes, gardening, decorating ideas, room makeovers, Easter tablescapes, spring cleaning and organizational tips. Blow the dust off your old posts and link those too. Don’t have posts that fit into the theme, link up whatever post you would like to share. We would love to have SEO, blogging, and parenting tips, DIY projects, homesteading, homeschooling, and your posts on life.  Your linkups and giveaways are welcome too. Anything goes here, as long as it’s family friendly and you may linkup as many as you would like. 

Each week your hosts will select their favorite post and it will be featured the following week. An image from your post will be used on my blog the following week with a link back to your blog. Be sure to check back to see if you’re a Sunday’s Best featured blogger. All Featured Bloggers will have their posts Pinned to the Sunday’s Best Pinterest Board.    

If you are interested in becoming a Sunday’s Best host, please contact me for details at rhonda@mother2motherblog.com  


                                             Your Sunday’s Best Hosts:


            Rhonda – Mother 2 Mother                Kim U. – Pinterested Parent         Kim M. – Life In A House of Testosterone


Here’s the rules, please connect with us on social media before you leave or subscribe/follow our blogs:  


Mother 2 Mother: Please like my 
Facebook Page, follow me on Twitter,  Google+, PinterestBlogLovin or subscribe/join my blog on the right before you leave.   


The Pinterested Parent: Please like Kim’s Facebook Page, follow her on Twitter, Google+, Pinterest, Bloglovin before you leave.  


Life In A House of Testosterone: Please like Kim’s Facebook Page, follow her on Twitter, Google+, Pinterest, Bloglovin, or Instagram before you leave. 


Mother 2 Mother Blog

Please help us grow by placing the Sunday’s Best button above on your sidebar or in your Link Party lists/directory. I appreciate your help in promoting the linkup with Re-tweets and shares. If you are selected as a Featured Blogger, let your readers and followers know that you were featured on Sunday’s Best.  Now lets party! 

The Sunday’s Best Posts are:


Kim U. selected Moss Covered Bunny from Pinterventures 


Sunday's Best Linkup, featured bloggers


I selected Pastel Deviled Eggs from Intelligent Domestications


Kim M. choose Keeping Up With the Joneses from Sequins In The South

All of the posts were great, and I appreciate each of you linking up. I would like to invite all of you back to linkup your post(s) again, it could be selected this week. While you’re here take a minute to visit these great blogs. It’s a great way to meet and connect with new bloggers. Be sure to PIN or share any posts that you like, we all appreciate a little love. 


Banana Rice Pudding

BananaRicePudding.jpg

Rice, rice, baby!! We love rice in our house. We love it so much that we own not one, but two rice cookers. When my mother was still alive, God rest her soul, she would buy me a fifty pound bag of rice every year along with my favorite soy sauce. When you have that much rice at your fingertips, you want to find different ways to cook it. I like it plain, fried, in risotto & it also makes a lovely rice pudding. For a smoother, creamier pudding use a smaller grain of rice. If you prefer your pudding with a bit more texture use a longer grain of rice.

Ingredients:

1 cup of uncooked rice

2 ripe bananas

1 egg (beaten & at room temperature)

2 tbsp brown sugar

2 cups of water

1 cup milk

1 tsp vanilla

1 tbsp margarine or butter

1/2 tsp cinnamon

1/2 tsp sea salt

Directions:

In a medium saucepan, combine rice, water, margarine & salt. Bring to a boil. Cover & cook for 2o minutes. Do not stir! In a mixing bowl smash up the bananas with a fork. Add brown sugar, vanilla, cinnamon & 1/2 cup of milk to the banana. Mix well. After rice is done cooking, pour the banana mixture over the rice & stir. Cover & simmer for an additional 20 minutes stirring occasionally. After 20 minutes remove from heat & beat in the egg. Beat for a minute & then add the other 1/2 cup of milk. Chill. Top with whipped cream & serve.

001 003

004 005

006 009

011 012

019


013       015

Mai really liked the rice pudding. In between every bite, she kept telling me “Thank you, Mama.” You are welcome, sweetheart.

Oatmeal Chocolate Chip Cheesecake Bars

Oatmealchocolatechipcheesecake.jpg

I think I have mentioned before that my work has a monthly pizza party to celebrate all of the birthdays in that month within our company. On pizza day, they bring in a variety of different topping pizzas and a ton of desserts. Oh the desserts, oh so many delicious desserts. Ever since the last pizza party I have become obsessed with cheesecake. Not that I didn’t love it before, but now I find myself craving it all the time. Last week it was french toast with cheesecake filling and this week, it is cheesecake bars. This does not really fit into my diet, but oh well. These are super simple to make and so good.

Oatmeal Chocolate Chip Cheesecake Bars

Ingredients:

Cookie crust

A package of Betty Crocker oatmeal chocolate chip cookies

1 egg (per directions)

1 stick of margarine (softened) (per directions)

Filling

1 8oz  package of cream cheese (softened)

1/4 cup of sugar

1/2 cup of vanilla greek yogurt

1 egg

1/4 cup of chocolate chips

Directions:

Preheat oven to 375. Prepare cookie mix per package directions. Press 1/2 the cookie mixture into a square 8″ baking pan. In a mixing bowl, blend cream cheese, sugar & yogurt on low speed until blended and smooth. Do not overbeat. Add the egg & quickly beat in. Add the chocolate chips & stir. Pour the cheese mixture over the cookie crust. Take the remaining cookie dough & press and flatten between hands and place over the cheese mixture. Do this in pieces and spread out evenly. Bake for 40-45 minutes or until cookie is golden & is firm in the middle. Cook times will vary. Let cool before cutting and serving. They will set as they cool.

013

015

016

017

019


021

023

025

026

029


IMG_20140426_242626895

Related Topics:

http://rhythm-of-food.com/2014/04/26/banana-and-cacao-muffins/

http://toniandrukaitis.wordpress.com/2014/04/26/friday-life-is-short-eat-dessert-first/

http://toosexytocook.wordpress.com/2014/04/26/chocolate-chip-cookies/


Krispie Peanut Butter & Chocolate Balls

krispiepeanutbutterchocolateballs.jpg

Here is a simple fact of life…women love chocolate. We do! Men do not understand this as much. My husband would prefer a bowl of Doritos, but hand me a piece of chocolate and I am happy.

Tonight I had a craving. Why is it when ever you want candy, there is not a piece to be found, but as soon as you are on a diet, there is chocolate around every corner?
I wanted some chocolate, but I like my candy with nuts or some kind of crunch. We had chocolate chips, but I needed something more.

Krispie Peanut Butter & Chocolate Balls

Ingredients:
1 tbsp of butter
1/2 cup of crunchy peanut butter
2 cups of chocolate chips
1 cup of white chocolate chips
2 cups of Rice Krispies

Directions:
In a large saucepan melt the butter over low heat. Add the peanut butter. Stir for about a minute until melted. Add your chocolate chips. Stir until melted and smooth. DO NOT OVERCOOK. Once chocolate is melted add the Krispies. Mix until all of the Krispies are covered. Spoon out the mixture & fill a ball pop mold. Refrigerate until chocolate has hardened & then pop candies out of mold.

028 029033 034krispiepeanutbutterchocolateballs.jpg

Peanut Butter Apple Crisp

PeanutButterapplecrisp.jpg

Peanut butter is one of those thing that I think that you can couple with just about anything. I have always loved peanut butter… peanut butter & jelly, peanut butter on celery, peanut butter with bananas & one of my all time favorites peanut butter & apples. If you have never tried it, it may sound strange, but it is a wonderful combination.
My daughter in one of her unusual requests, asked for an apple pie & watermelon this morning for breakfast. It got a chuckle out of me & then got me thinking, an apple pie did sound good. I decided on an apple crisp instead & while in the midst of making it, started thinking about my favorite snack. This resulted in a fruity peanut buttery treat.

Peanut Butter Apple Crisp

Ingredients:

5 Granny Smith apples

1/2 cup of flour

1/2 cup of quick oats

1/2 cup of brown sugar

1/2 cup of melted butter or margarine

3 Tbsp of creamy peanut butter

1/2 tsp of salt

Ice cream or whipped cream for an optional topping

Directions:

Preheat oven to 350 degrees. In a medium bowl mix all dry ingredients. Add the peanut butter & melted butter. Mix well using a fork to smash the ingredients together. Do this until the mixture is crumbly & well blended.

Peel, core & slice the apples & place slices in a 9 1/2 inch round baking dish. Add the peanut butter crumble over the apples evenly. Bake for 45 minutes. Let cool slightly & serve warm topped with ice cream or cream. Enjoy!

013014

015018

019020

052

IMG_20140301_185333662

Related Topics:

http://prettylittlepastimes.com/2014/03/02/national-peanut-butter-lovers-day/

Nutella Filled Crescent Hearts

IMG_20140129_2038467011

Nutella is such a wonderful thing. I want to find the person that invented the delicious nutty spread & give them a giant kiss. It is guilty pleasure of mine. I have been known to just sit there with the jar & a spoon and indulge in the sweet treat right out of the jar. I also am a fan of the crescent roll. If you stuff a crescent with just about anything it is delicious. I am guessing I would even eat a dirty shoe if a crescent was rolled around it. In honor of Valentine’s Day, I decided to couple two of my favorite foods .

Ingredients:

A sheet of seamless crescent

Nutella

1/4 cup of finely chopped hazelnuts

2 Tbsp of butter or margarine

1 Tbsp of brown sugar

1/4 cup of chocolate chips

Directions:
Preheat oven to 350. Unroll the sheet of crescent dough. Using a heart shaped cookie cutter, cut out crescent hearts for the top & bottom of your treats. Gather excess crescent & roll out with a rolling pin. Cut out more hearts until you have used most of the dough. Lay one heart down on an ungreased cookie sheet & generously scoop Nutella & spread in the middle following the heart shape & avoiding the edges. Place another heart over the first heart & Nutella. Pinch the edges. Do this until you use all of your dough hearts.
In a saucepan melt butter or margarine over low heat. Add brown sugar & stir until dissolved & then add hazelnuts. Make sure they are finely chopped. Mix until coated with butter & sugar.
In the middle of your formed crescent hearts, use a smaller heart cookie cutter & press in the center. Sprinkle nut mixture in the middle of the cookie cutter until in fills in the shape. Repeat with all formed crescent hearts. Bake for about 10-15 minute or until golden.
Melt chocolate in a bowl in the microwave. Heat it in 30 second intervals. Use a spoon to drizzle chocolate over your hearts & let cool.

001002003007009010012016

IMG_20140129_2038467011

Related Topics:

http://sesamebasket.wordpress.com/2014/01/30/hi-nutella/

http://thechristinejuang.wordpress.com/2014/01/30/foodie-nutella-cinnamon-rolls/

http://butterandsprinkles.com/2014/01/29/nutella-crumb-bars/

http://weheartcards.wordpress.com/2014/01/29/no-bake-rice-krispie-cakes-with-popcorn-nutella-and-peanut-butter/

It’s a Rice Krispies Treat Christmas

RiceKrispieTreats.jpg

I think it is safe to say, that most people like Rice Krispies treats. What’s not to like? They are easy to make, sweet , gooey & just so darn delicious.

My husband & I like them a bit more than the average person. If you don’t believe me, how many of you had your wedding cake made out of Rice Krispies treats?

Ricekrispie.jpg

It is a lot less messy during the cake feeding, but it hurts a lot more if you smash it into your spouse’s face.

39871_1463749806996_3795368_n

You can imagine my excitement when I was at the checkout counter of the grocery store & saw a magazine cover featuring a Rice Krispies Christmas tree.  I already had an idea for making Rice Krispies ornaments & was anxious to try them both.

I immediately took mental stock of my ingredients.  All I needed was some marshmallows.  Just in case you don’t stock all the ingredients for Rice Krispies treats handy, here is what you need.

Ingredients

5 cups of Rice Krispies

1/4 cup of butter or margarine

40 large marshmallows

green food coloring

colored icing

peanut butter cup minis

mini M&Ms

Directions for trees

1.In a large saucepan, melt butter over low heat.

2.Stir in marshmallows & food coloring until you achieve desired color. Stir until completely melted .

3.Remove from heat & slowly stir in cereal until evenly coated with marshmallow mixture.

4.Lay down a layer of wax paper to work on.

5.Wet your hands to keep the Rice Krispies from sticking & grab a handful & form into a triangular shape (keep hands moistened in between each formation to avoid sticking.)

6. After all triangles are formed & cooled, use icing to add a peanut butter cup to the base.

7. Add a yellow M&M mini to the top of the tree, adhering it with icing.

8. Use red & green icing to dot on the ornaments.

015a 0231 0271 0291 0301 0311 0341 0351 0381

Ricekrispietrees.jpg

Directions for Ornaments

The same amount of ingredients will be needed as well as Cheerios

Follow steps 1-4

Wet hands & form fist sized balls with Rice Krispies treats.

After using all of the mixture to form balls, set aside to cool.

Use icing to adhere a peanut butter cup to the top of each ball.

Use icing to decorate your ornament.

With icing secure a Cheerio to the top of the peanut butter cup.

0321 0361 0441

RiceKrispieornaments.jpg

Don’t forget to thank your favorite helper.

0501 0391

Serve the treats to your hungry family & enjoy the smiles.

0721 0711

Up next…Indoor Snowman

Related Topics:http://pinningcousins.wordpress.com/2013/12/08/mini-gingerbread-houses/

http://foodandeverythingelse.me/2013/12/08/braided-nutella-christmas-tree/

http://www.bloglovin.com/frame?post=2021146593&group=0&frame_type=a&blog=2098008&link=aHR0cDovL2ZlZWRwcm94eS5nb29nbGUuY29tL35yL1RoaXNNYW1hTG92ZXNIZXJCYXJnYWlucy9-My9CMjQ4MThNVkZCby8&frame=1&click=0&user=0

http://www.bloglovin.com/frame?post=2011518129&group=0&frame_type=b&blog=845719&link=aHR0cDovL3d3dy5rZWxseXNrb3JuZXJibG9nLmNvbS8yMDEzLzEyL3Nob3ctdXMteW91ci1saWZlLWZhdm9yaXRlLWhvbGlkYXkuaHRtbA&frame=1&click=0&user=0

Saltine Cracker Bark

0861

A question was posed to me the other day by a fellow blogger. She asked me “What is your favorite Thanksgiving dish that you cook?” My reply was, it was actually a dessert that was my favorite thing to make. This inspired me to share this recipe with you. With the holidays coming, this is a great treat to bring to holiday parties & get togethers. They are a never fail hit. Every holiday, for more years than I can remember my family has put in a special request for me to make this super easy, ridiculously delicious & crazy addicting dessert.

Here is what you will need.

Ingredients

1 sleeve of saltine crackers

1 cup of semi sweet chocolate chips

1 cup of margarine (2 sticks)

1 cup of sugar

1 cup of crushed walnuts

(For white chocolate bark replace chocolate chips with white chocolate chip & walnuts with almonds slivers.)

DIRECTIONS

Preheat oven to 375

In a saucepan melt the margarine on low heat. Do not let it bubble.

051

While margarine is melting, line a baking sheet with aluminum foil & lay out the saltines side by side so that the edges are touching

054

When margarine is fully melted, slowly pour in sugar & stir until sugar dissolves.

055

Quickly pour the mixture evenly over saltines & spread with rubber spatula.

059

Bake for 8 to 10 minutes or until golden brown. Times will vary depending on your oven, so watch to make sure they don’t burn.

Take out of the oven & pour the chocolate chips over the top. When the chips turn shiny, spread evenly with a rubber spatula.

068

Sprinkle nuts over the top & let cool.

069

After the chocolate hardens, break up into bite sized pieces.

071

These seriously are an amazing dessert. I make tins of these during the holidays & give them as gifts. Enjoy!

0832

Related Topics:

http://dailypost.wordpress.com/2014/03/15/daily-prompt-pour-some-sugar-on-me/