Tag

recipes

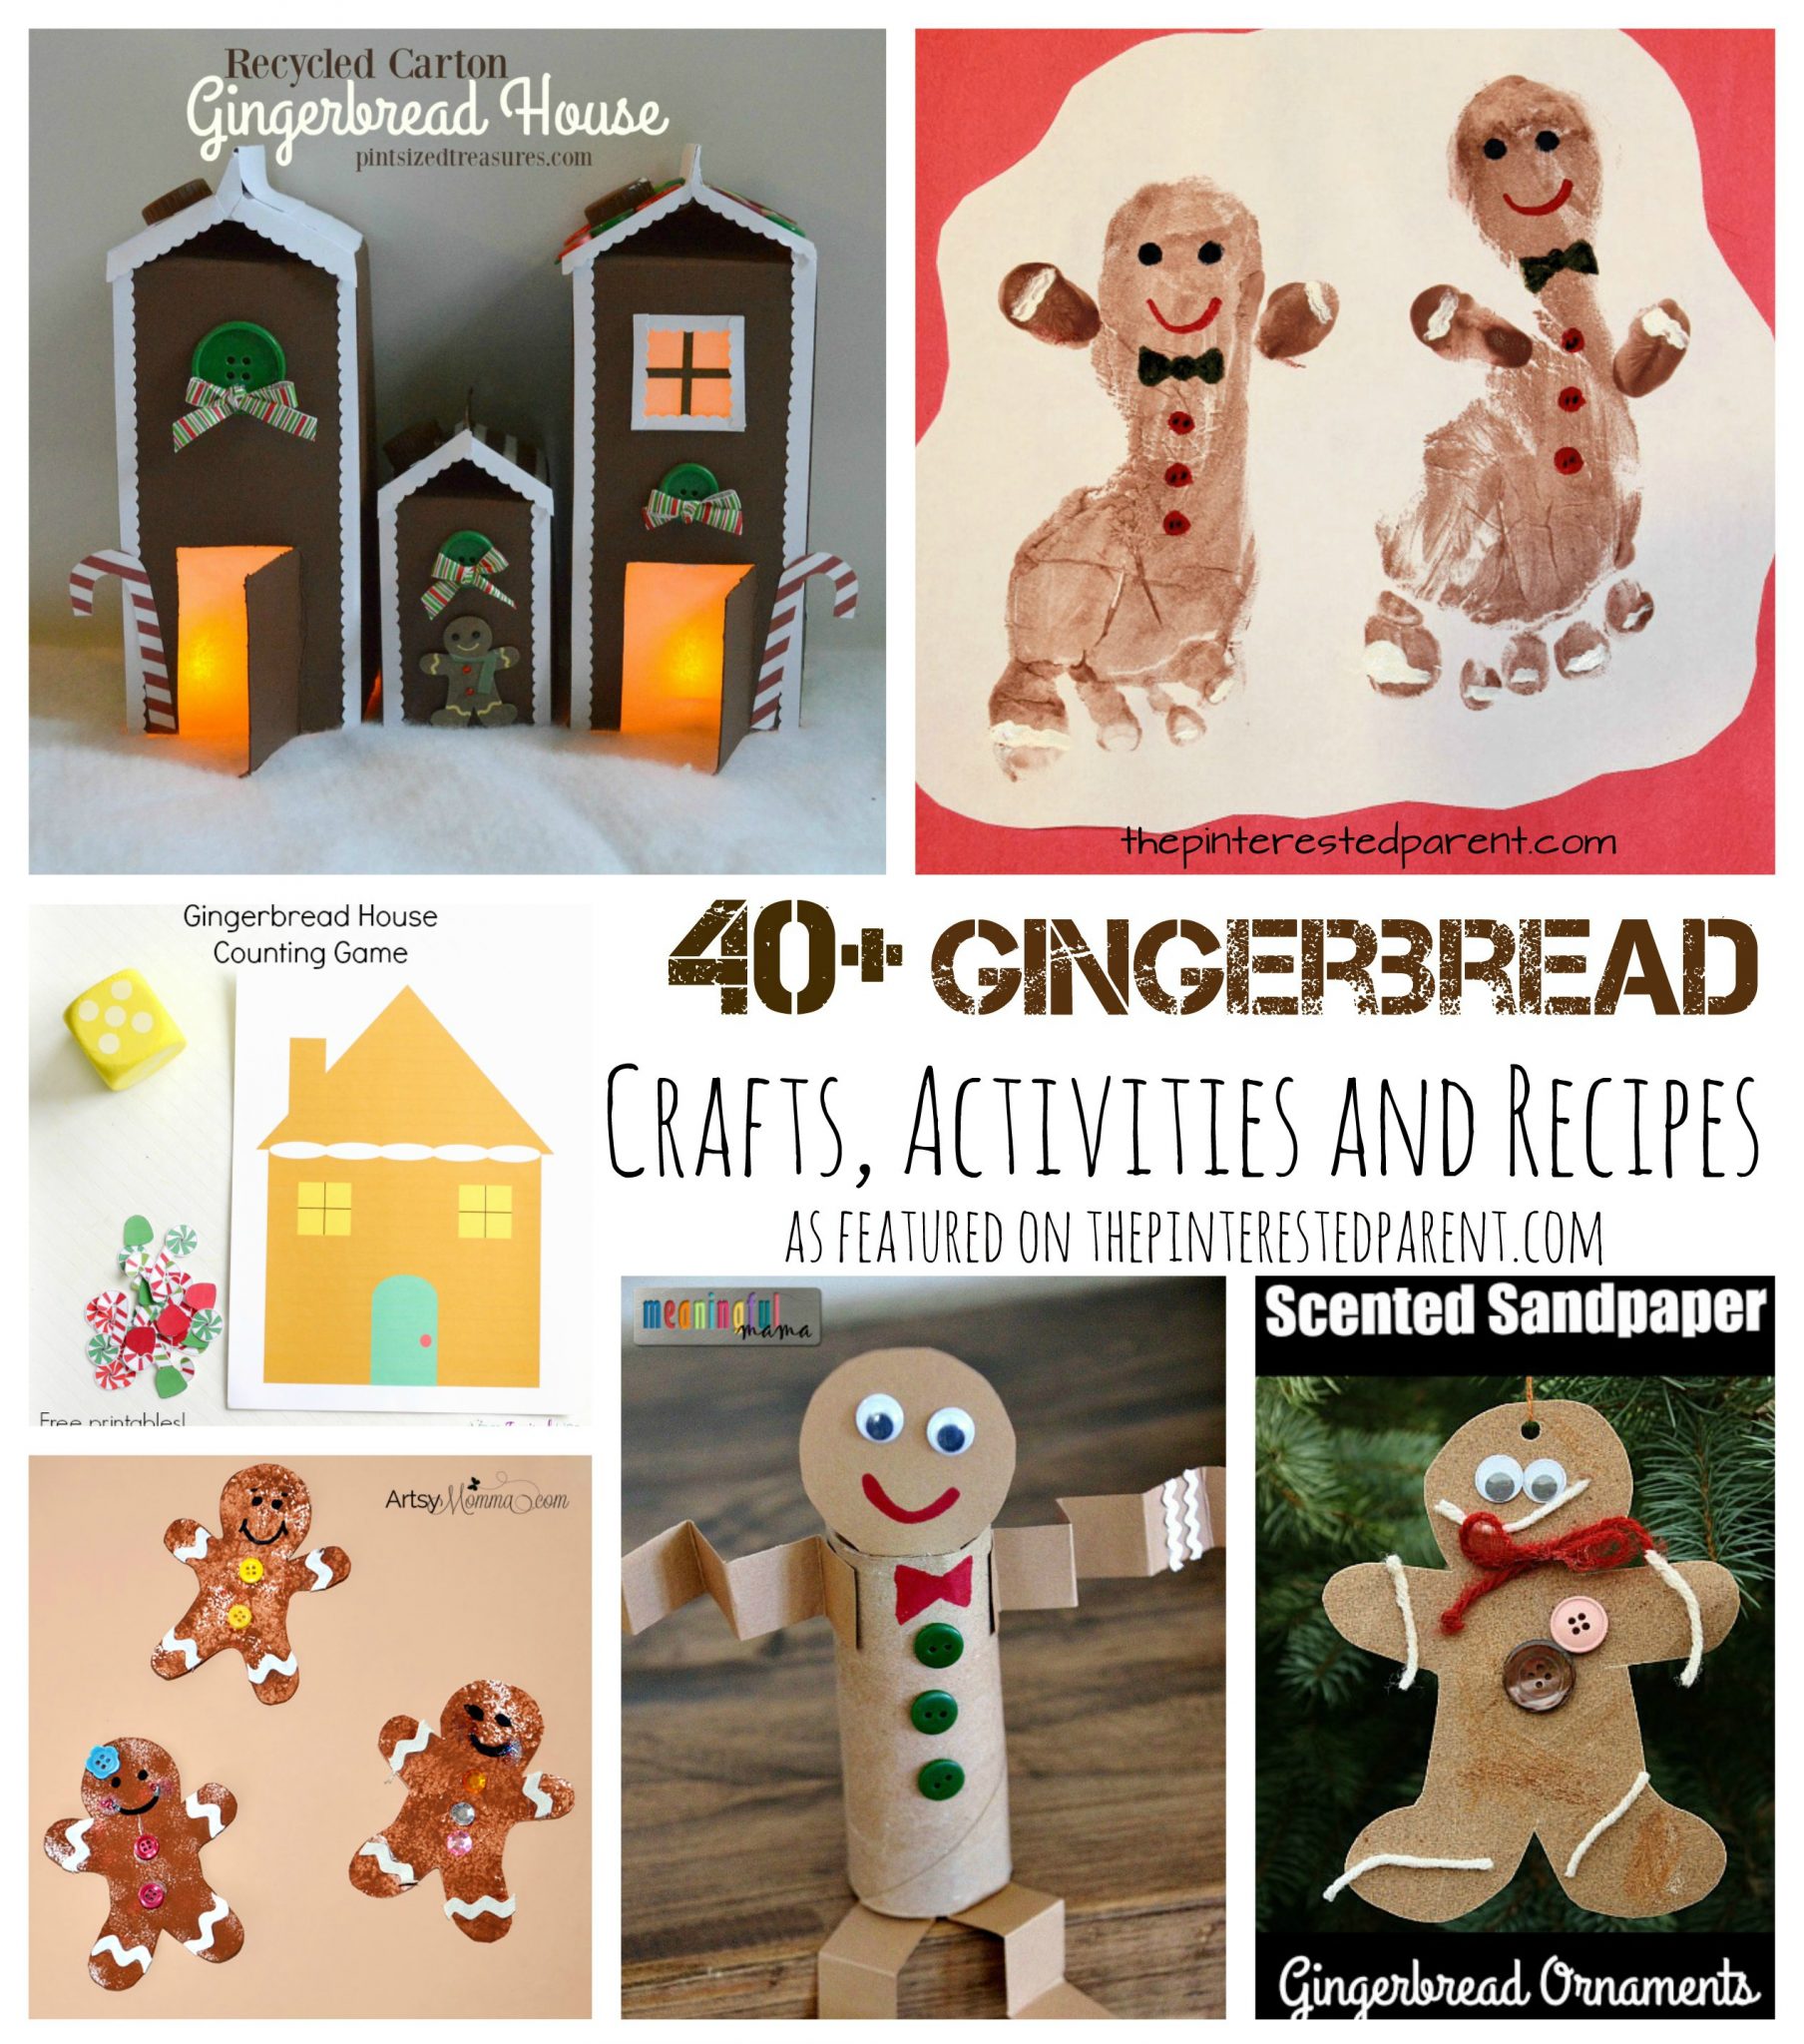
40+ Gingerbread Crafts, Activities and Recipes

Over 40 gingerbread inspired arts and crafts, activities, sensory and recipes. Gingerbread house and gingerbread men projects for kids for the winter & Christmas

I’m sure that I have mentioned it before, but I love gingerbread. It is one of my absolute favorite things about this time of year. I look forward to baking it, smelling it, eating it and my daughter and I have fun doing arts and crafts projects inspired by it.  Here are some wonderful gingerbread inspired ideas to welcome in the holiday season.

Continue Reading…

Celebration Pancakes

Cupcake shaped pancake. Fun breakfast food for kids. This is a perfect for a birthday or special occasions

*This post contains affiliate links for convenience*

If you follow us regularly, you probably already know that we love pancakes. Pancakes are one of the few foods that my daughter will always eat. We have gotten inventive with our pancakes over the last year & breakfast has never been more fun. Pancake art has become a favorite for us both on the weekends. Sometimes, she puts in a special request & it becomes a challenge to see what we can come up with. Even if they don’t come out right they are still delicious. Today, my little girl said that she wanted cupcake pancakes. Here is what we came up with.Cupcake shaped pancake. Fun breakfast food for kids. This is a perfect for a birthday or special occasion.

Start with a basic pancake recipe. We added a couple of Tbsps of chocolate powder to our recipe.

Use a mixer to blend the batter well. Make sure to get out all the lumps.

IMG_7301

Use a funnel to fill a squeeze bottle.

IMG_7302

Use the squeeze bottle to draw out your cupcake.

IMG_7313 IMG_7314 IMG_7315 IMG_7310

Let the pancake cook until bubbling & flip. Cook on the opposite side for a few minutes & put on a plate.

IMG_7316

Add whipped cream and sprinkles to finish your cupcake off. My daughter was so excited & the pancakes were a big hit.

Cupcake shaped pancake. Fun breakfast for kids. This is a perfect for a birthday or special occasions.. Recipes & food

Thank you as always for reading. Please visit us on our Facebook page as well.


\

Alphabet Pancakes

Breakfast is my favorite meal of the day. I love to eat breakfast & I love to make it, pancakes, french toast, omelettes. I love making them all.

Alphabet Pancakes - easy pancake art for kid's breakfast -fun food ideas

*This post contains affiliate links*

Pancakes are definitely my favorite. I have a lot of fun with pancake art.

Stained Glass Butterfly Pancake - the kids will love these colorful springtime - pancakes made with rainbow color sprinkles ballerina tutu pancakes - pancake art for fun kid's breakfast princess castle pancakes - pancake art for fun kid's breakfast

My daughter will put in special requests & mommy will try her best to make them. We have been working on reading & writing with our daughter. She has been trying to use her letters & form words. She puts letters together just to sound them out, even if they do not form an actual word. She has been working so hard that this weekend we made a special pancake treat to celebrate all the progress she has made. The great thing about these pancakes is that you do not need any artist skill to make them, you just need to be able to write your alphabet.

We mixed up our pancakes.

Ingredients:

1 cup of flour

1 tbsp brown sugar

2 tsp baking powder

1/4 tsp of salt

1 cup of milk

2 tbsp vegetable oil

2 tbsp unsweetened or sweetened cocoa powder

1 egg white

Directions: Mix all the ingredients together. Use a blender to mix the batter to get out any clumps. Mix well. Add more milk if needed.

IMG_7139 

IMG_7141

Use a funnel to funnel the batter into a condiment squeeze bottle.

Use the bottle to squeeze out the letters.  Let bubble as usual before flipping. Remember that some of the letters will need to be written mirrored so that when they flip they are not backwards. If the bottle clogs, just squeeze it off to the side. If it keeps clogging, it needs to be blended more.

IMG_7145

Alphabet Pancakes - easy pancake art for kid's breakfast -fun food ideas

As always, they were a big hit with my pancake loving girl. She spelled out her name, dog & then our dog’s name, Duke.

IMG_7165

Thank you as always for stopping by. Please follow us on Facebook as well.


Owl Shaped Breakfast

My daughter is a sweet girl most of the time, but mealtimes in our house are & have been a battle for quite some time. She is a very picky eater & mealtimes in our house are often very stressful. Over the years, I have found fun & creative ways to try to get her to eat. I have tried it all from reading to her while she eats to bite sized meals to fun food art.

Owl shaped breakfast - sunnyside up egg eyes, toast, cheese & bacon - creative food ideas for the kids

*The Pinterested Parent is a participant in the Amazon Services LLC Associates Program, an affiliate advertising program designed to provide a means for sites to earn advertising fees by advertising and linking to Amazon.com. In addition, text and image links in this post may be affiliate/referral links, which means we may be compensated if you make a purchase after clicking through these particular links* See full disclosure policy.

Continue Reading…

Chocolate Covered Pretzel Bunnies & Sunday’s Best Link Up # 13

Chocolate Covered Pretzel Rod Easter Bunnies


I took a poll on my Facebook page yesterday. I was curious about what people preferred, sweet or salty. My husband is salty & I am definitely sweet, but the truth is I love the two mixed together the best. One of my weaknesses is for chocolate covered pretzels.

With only one week left before Easter, I have a few more days of Easter inspired fun. Tonight we made some sweet & salty Easter treats in the form of our favorite Easter pal.


Melt white chocolate in the microwave. Put the chocolate in a microwave safe dish & heat for a minute. Check it & microwave in 30 second intervals, checking to see if it is melted before each interval. Be careful not to burn.

IMG_9986

When the chips are soft & shiny stir with a spoon.

IMG_9987

Dip pretzel dipper sized rods into the melted chocolate & lay out on wax paper. Lay two dipped pretzels side by side to form a V shape.

IMG_9988

With a spoon, spoon out a dollop of chocolate over the bottom in the shape of a circle. Be careful to not dribble chocolate over the top. It works best when the chocolate is smooth. Use a rubber spatula to smooth out any rough edges while chocolate is still hot.

IMG_9989 IMG_9991

Melt pink chocolate or in a pinch use white chocolate with just a touch of food coloring gel. Using a toothpick draw a line for the inside of the ears & add a dot for the nose.

IMG_9995 IMG_9996

Melt a small dish of milk or dark chocolate & add in eyes, mouth & whiskers. Let your chocolate cool & remove from the wax paper. If you have any imperfections, which I had a plenty, scrape the hardened chocolate with a knife to smooth out.

IMG_9998

Chocolate Covered Pretzel Rod Easter Bunnies

Now let’s hop on over to our main event. Welcome to week 13 of our Sunday’s Best Link-Up.


Welcome to Week 13 of  Mother 2 Mother’s Sunday’s Best Linkup This is the last week for our Spring Forward theme. We will be starting our April Showers theme next week. We will be looking for indoor activities, recipes, crafts, gardening and blogging tips for those rainy days.  


This week we’re celebrating the thaw across the country, so linkup Easter posts, crafts, recipes, gardening, decorating ideas, room makeovers, Easter tablescapes, spring cleaning and organizational tips. Blow the dust off your old posts and link those too. Don’t have posts that fit into the theme, link up whatever post you would like to share. We would love to have SEO, blogging, and parenting tips, DIY projects, homesteading, homeschooling, and your posts on life.  Your linkups and giveaways are welcome too. Anything goes here, as long as it’s family friendly and you may linkup as many as you would like. 

Each week your hosts will select their favorite post and it will be featured the following week. An image from your post will be used on my blog the following week with a link back to your blog. Be sure to check back to see if you’re a Sunday’s Best featured blogger. All Featured Bloggers will have their posts Pinned to the Sunday’s Best Pinterest Board.    

If you are interested in becoming a Sunday’s Best host, please contact me for details at rhonda@mother2motherblog.com  


                                             Your Sunday’s Best Hosts:


            Rhonda – Mother 2 Mother                Kim U. – Pinterested Parent         Kim M. – Life In A House of Testosterone


Here’s the rules, please connect with us on social media before you leave or subscribe/follow our blogs:  


Mother 2 Mother: Please like my 
Facebook Page, follow me on Twitter,  Google+, PinterestBlogLovin or subscribe/join my blog on the right before you leave.   


The Pinterested Parent: Please like Kim’s Facebook Page, follow her on Twitter, Google+, Pinterest, Bloglovin before you leave.  


Life In A House of Testosterone: Please like Kim’s Facebook Page, follow her on Twitter, Google+, Pinterest, Bloglovin, or Instagram before you leave. 


Mother 2 Mother Blog

Please help us grow by placing the Sunday’s Best button above on your sidebar or in your Link Party lists/directory. I appreciate your help in promoting the linkup with Re-tweets and shares. If you are selected as a Featured Blogger, let your readers and followers know that you were featured on Sunday’s Best.  Now lets party! 

The Sunday’s Best Posts are:


Kim U. selected Moss Covered Bunny from Pinterventures 


Sunday's Best Linkup, featured bloggers


I selected Pastel Deviled Eggs from Intelligent Domestications


Kim M. choose Keeping Up With the Joneses from Sequins In The South

All of the posts were great, and I appreciate each of you linking up. I would like to invite all of you back to linkup your post(s) again, it could be selected this week. While you’re here take a minute to visit these great blogs. It’s a great way to meet and connect with new bloggers. Be sure to PIN or share any posts that you like, we all appreciate a little love. 


Hershey Kiss Pancakes

HersheyKissPancakes.jpg

The battle at mealtime continues…

As most of you probably already know, I have a picky eater on my hands. I have tried doing everything. I have tried doing absolutely nothing as well. For those of you out there that also have a finicky child, you know how frustrating it can be. Luckily, there are a few mealtime gems that always win my daughter over.

Just like a typical woman, my little girl loves chocolate. For Christmas she got a plastic cane cane filled with Hershey Kisses, so we made some pancakes with them. They were a home run. This weekend my husband requested them & again they were a huge hit with the family. Mai of course helped make them. She ate all of hers & even stole some of daddy’s.

P1180371

Hershey Kiss Pancakes

Ingredients:

1 cup of flour

1 tbsp brown sugar

2 tsp baking powder

1/4 tsp of salt

1 cup of milk

2 tbsp vegetable oil

1 tsp vanilla

2 ripened bananas

1/8 cup peanut butter (this offers a subtle taste, if you are a peanut butter lover you may opt for more)

1 egg white

Hershey kisses (one kiss per pancake.)

Directions:

In a medium mixing bowl combine flour, brown sugar, baking powder, salt, vegetable oil  & vanilla. In a separate bowl, mash the ripened banana using a fork. (If you have an eager little helper, a potato masher works well for them to lend a hand.) Stir in the peanut butter until smooth. Add to the flour mixture & stir until evenly distributed. Stir in the milk & egg white. Heat a griddle or frying pan at medium – high heat. (Test with a few drops of water, the water should dance across the cooking surface for best results) Add 1/8 cup at a time. When the edges of the pancakes start to bubble and firm, flip them. Lightly press a Hershey kiss into the center of your pancake. Cook until the bottom is golden brown. We ate these plain, but of course top with butter & syrup if that is your preference. Enjoy.

P1180357

P1180361

P1180362

P1180363

P1180364

P1180377


Thank you as always for stopping by. Please follow us on Facebook as well.

Cinnamon Sugar Crescent Pretzels

CinnamonCrescentPretzels.jpg

Cookie monster is to cookies as my daughter is to Play-doh. She just can’t get enough of it. Her favorite of all Play-Doh creations is crafting baked goods. She makes cakes & cookies and asks mommy to join in as well. I got creative the other day and made Play-Doh pretzels. This got a giggle out of my daughter & also inspired her tummy with a pretzel craving. I thought it might be fun to make some soft pretzels with her & combine the fun of playing with dough and the deliciousness of getting to eat our creations after.

Once I suggested it though, my laziness kicked in & I looked for an easy way out. Hurray for crescent rolls. These are not exactly your classic soft pretzel, but they were a quick, easy and yummy treat.

Ingredients:

1 tube of low fat crescent rolls

1 Tbsp sugar

1/2 Tbsp cinnamon

1/2 Tbsp vegetable oil

Directions:

Preheat oven to 375. Unroll your tube of crescent rolls. Pinch the perforated seams together & roll out into a rectangular sheet. With a rubber spatula spread out the oil evenly over the sheet. Stir the cinnamon & sugar in a small bowl. Sprinkle the entire mixture evenly over the crescent sheet. Mai did the sprinkling for us, so it was not entirely even. Cut a 1/2″ wide strip lengthwise. Roll the strip just enough to form a rope like strip. Fold & twist into a pretzel. Place on an ungreased baking sheet. Bake for 8-9 minutes. Serve while warm.

IMG_6929 IMG_6930 IMG_6935 IMG_6937 IMG_6939 IMG_6940 IMG_6941  IMG_6944 IMG_6947 IMG_6959

Mai loved these. I gave her one pretzel, but our sneaky little girl smuggled a few extra when I wasn’t looking.

Pancake Battered Banana Bites

IMG_6775

For those of you that have been following me for a while, you know that I have had a long hard battle with my daughter over eating. She has been known to be a picky one. Not only is she picky, she doesn’t like to eat. She has much more important things to be doing & she will tell you. “Mama I don’t want to eat. I am so busy.” This is coming from my 2 year old. I am not sure what it is that could have my toddler so busy, but whatever it is, it has kept her from the dinner table on many occasions.

We have come a long way over the last few months and have seen great improvements. Her appetite has increased which is wonderful, but her variety of foods remains the same. Breakfast is one of her better meals. Thank goodness. And as luck would have it, it is my favorite meal to make. I love making bite-sized foods & if it is something that she can dip, it is usually a home run.

Pancake Battered Banana Bites

Ingredients:

6 ripe bananas

1 1/4 cup of all-purpose flour

1 tbsp of brown sugar

3 tsp of baking powder

1/4 tsp salt

1/2 tsp cinnamon

1 large egg

1 tsp honey

1 cup of milk

2 tbsp vegetable oil

Directions:

In a large mixing bowl add the flour, sugar, baking powder, cinnamon, salt, milk & vegetable oil and stir well. In a mixing bowl, beat the egg & add to the rest of the batter. Mix in the honey. Slice bananas into 1/2″ slices. Dip the banana in the pancake batter. Place on a hot griddle or frying pan set to medium heat. (Test with water, water drops should dance across the surface when added.) Cook until the edges are cooked & firm up. Flip & cook on the other side. Cook until the batter on the sides is firm & cooked.

We served ours with a peanut honey sauce, but you can also use maple syrup or eat as is.

Peanut Sauce:

2 tbsp peanut butter

2 tbsp water

1 tbsp honey

Heat the peanut butter & water for 20 seconds in a microwave safe dish. Stir well until smooth. Add the honey & stir well. Serve warm

IMG_6771 IMG_6772 IMG_6773

IMG_6774

These were a big hit with both my daughter & my husband. Mai loves to dip, so she had hers with peanut sauce & syrup.


IMG_6779


American Fried Rice

americanfriedrice.jpg

It is dinnertime & I don’t have anything planned. Let’s play a little game. What is in my fridge? We have thawed out ground turkey, leftover rice, 2 aging potatoes & a half of an onion that is getting ready to be trashed. Mmm mmm, sounds great doesn’t it? Nobody likes wasting food. My husband & I positively hate it. Some of our favorite meal creations come from simply cleaning out our fridge. The hubby asked me last week if I could make a batch of fried rice, so this seemed as good of a time as any since it requires day old rice & as luck would have it… This would not be our traditional fried rice though. This is our fried rice American style.

Ingredients:

1/2 pound of ground turkey or any ground meat

2 cups of day old cooked rice

2 cups of cooked diced potatoes (2 small potatoes)

1/2 cup of chopped onion

Half a can of corn

3 eggs

2 1/2 tbsp soy sauce (as always I recommend Green Mountain or Maggi)

2 tbsp olive oil

1 tsp garlic salt

Pepper to taste

Directions:

Brown your ground meat until no longer pink, drain & place aside. Peel & cube the potatoes, throw in the microwave for about 3-4 minutes until cooked in the center and set aside. In a large skillet set to 350 or high heat, add the oil & onion. Cook the onion until tender & toss in rice & potatoes. Add 1 1/2 tbsp of soy sauce over the top & stir until rice & potatoes are browned. Pour in half the can of corn & stir for a couple of more minutes. Add the ground meat, the seasonings & the last tbsp of soy sauce. Stir for a few minutes more & then transfer to a serving dish. Keep the skillet on. In a small bowl beat the eggs. Add to the hot skillet & toss around quickly until the egg is just barely firm & cooked . Remove from heat & throw in the the rice mixture.

IMG_5442 IMG_5443 IMG_5444 IMG_5445 IMG_5446 IMG_5448

Stay tuned for more fun with leftovers.

Thank you as always for stopping by. If you like us here, please follow us on Facebook.

Mashed Potato Puffs

LoadedMashedPotatoPuffs.jpg

A couple of weeks ago there was a sale on 10 pound bags of potatoes at the grocery store. I typically only buy half of that, but since the 10 pounder was cheaper than the 5, it was a no-brainer.

10 pounds of potatoes is a lot, even for a potato lover like me.  There are only so many days a person can eat mashed potatoes in a row. As you know, I love making recipes out of leftovers & anything that I am trying to get rid of in my fridge. Here is a delicious way to get rid of leftover mashed potatoes.

Ingredients:

1 cup of left over mashed potatoes

1 tube of crescent rolls or crescent sheet

5-6 bacon strips cooked to desired crispiness

1/4 cup sour cream

1/2 cheddar cheese

Directions:

Preheat the oven to 375. Put 1 cup of mashed potatoes in a medium sized mixing bowl. Add the sour cream. If the potatoes are lumpy, mash or whip them until they are smooth. Crumble or chop your cooked bacon & add to the potato mixture. Stir in the cheese. Unroll the crescent dough. If using crescent rolls, press seam together to form a sheet & then roll out with a rolling pin. With a knife, slice crescent into 1 1/2 inch squares. (If the dough is too soft to work with refrigerate for 10-15 minutes to firm up.) Scoop a heaping spoonful of mixture & place in crescent square. Pull each corner into the center. Roll the bottom & sides with your palm to seal the seams. Bake for 10-12 minutes.

IMG_5010 IMG_5011 IMG_5012 IMG_5014 IMG_5015 IMG_5017 IMG_5018IMG_5029

Mashedpotatopuffs.jpg
These were a huge hit. I have admit that I was pretty proud of these. My husband even asked me to make more.