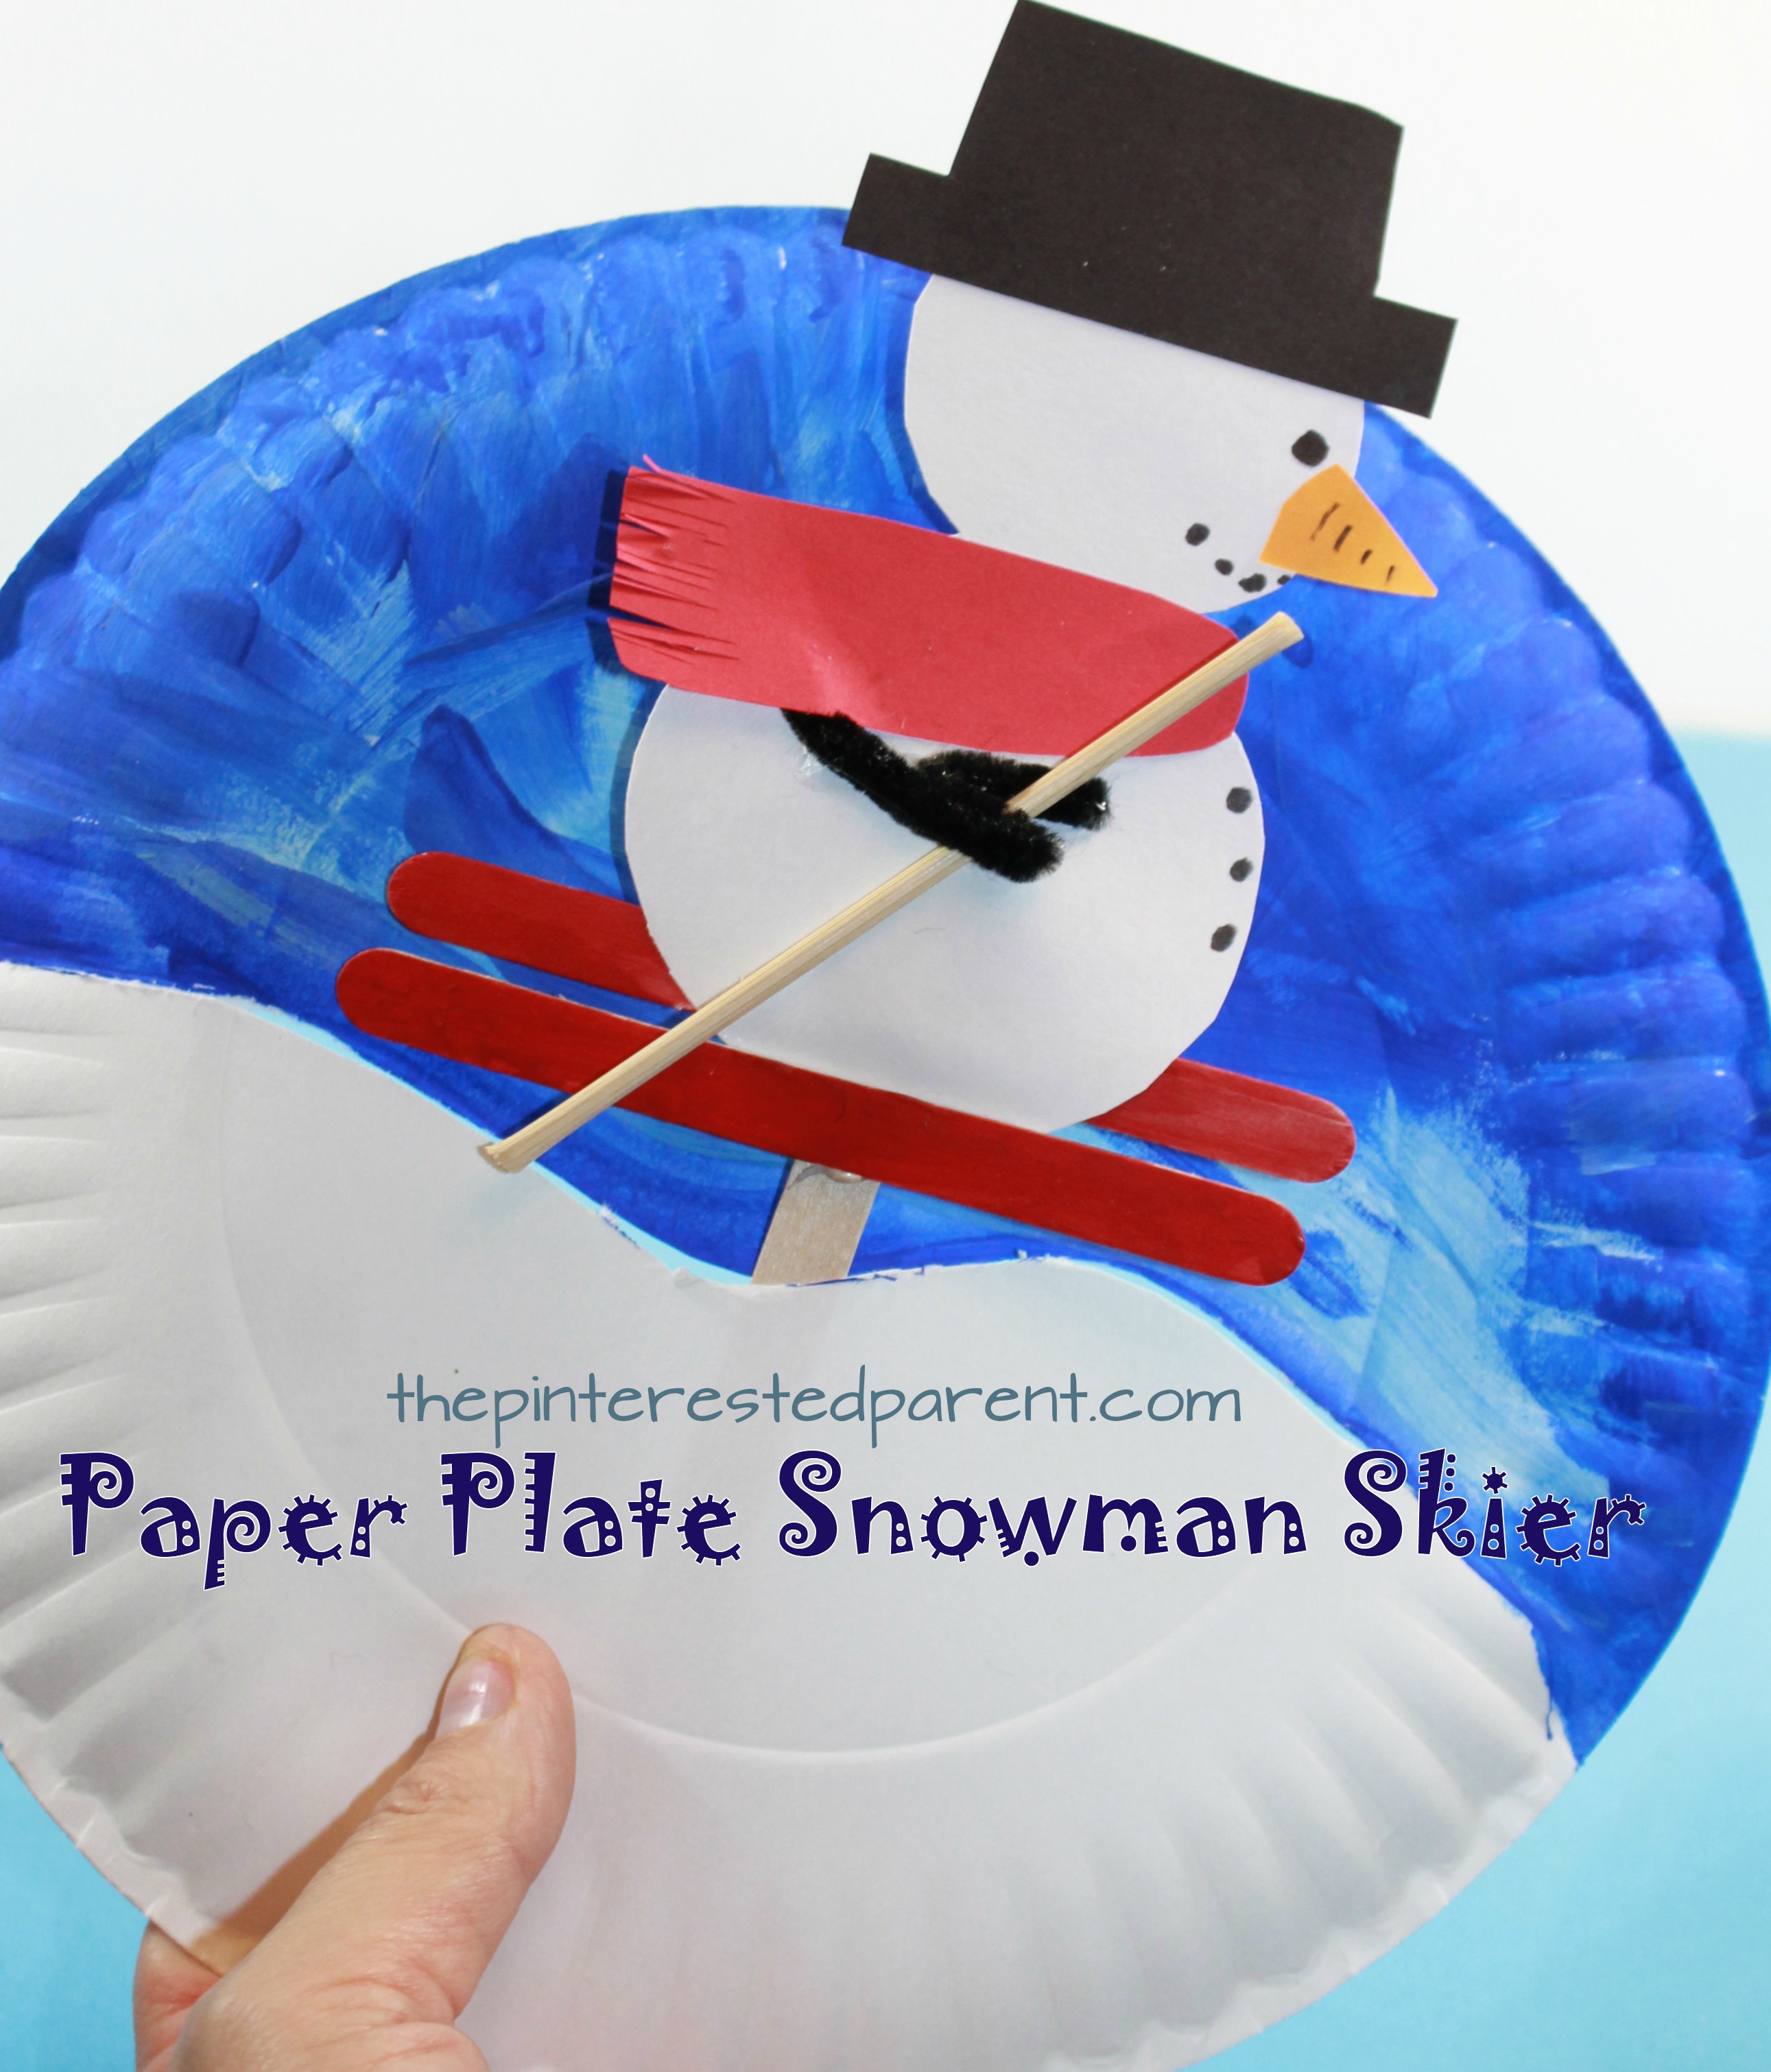
A couple of days ago we made a paper plate ice skating craft. It was a huge hit with our audience, but an even bigger hit with my little girl. She couldn’t get enough of it. She loved making the skater move around the “ice”(paper plate). Almost as soon as we finished making it, she said “I know what we can do next. We need to make a skiing craft.” She was so excited about this that she could not wait, so together we brainstormed and came up with this adorable snowman skier.
Tag
snowman
Stick and Stone Winter Crafts
The winter is officially here and we enjoyed a couple of snowy days this week to welcome the start of winter. We played outside in the snow all day yesterday and took in all of the beauty of the season. Watching the snowfall and looking at the snow-covered trees was enough to inspire some winter crafting.
We love working with clay and nature items. We have a collection of sticks and stones set aside for occasions just like this.

Coiled Yarn Snowman
Earlier in the fall, my daughter and I made autumn trees by coiling yarn and pipe cleaners. The trees came out so beautiful and were a wonderful fine motor activity for my little girl.
Heading into winter and with snow on its way this week, I wanted to try another coiled yarn project for the winter. Snowmen were a perfect idea for this method. Here’s how…
Marshmallow Painted Christmas Crafts
I know what you all are thinking. We have not even made it through Halloween yet, why are we already sharing Christmas crafts. Well, our first official snowfall just hit us in October. Our fireplace was lit for the first time this season and it was accompanied by hot cocoa with marshmallows.
*The Pinterested Parent is a participant in the Amazon Services LLC Associates Program, an affiliate advertising program designed to provide a means for sites to earn advertising fees by advertising and linking to Amazon.com. In addition, text and image links in this post may be affiliate/referral links, which means we may be compensated if you make a purchase after clicking through these particular links* See full disclosure policy.
While digging out our marshmallows, I found an old bag of jumbo marshmallows which were just too big and soft to resist. Marshmallows make wonderful paint stamps and are just fun to paint with because of their soft, bouncy texture.
Snow Man Ornament
This has been a crazy holiday season for us. If you are a regular follower, you know that we are in the process building a house. We have been staying with my husband’s aunt during the build. She has a finished basement that has become our temporary home. We realized the other day that it is very possible that we will not make it into our home before Christmas, which means we will not be able to put up our Christmas tree. This made me a little sad. My husband suggested that we purchase a small Charlie Brown Christmas tree & that Mai and I could make all the decorations ourselves. That sounded like a wonderful idea.
I had bought a few clear plastic bulbs for us a few weeks ago to use for homemade ornaments & last night decided to make our first one.
What you will need:
A small clear plastic Christmas ornament
A Styrofoam ball smaller than the ornament & another for crumbling
White paint
Any colored felt
Button
Black foam sheet
Glue gun (Always use caution when operating a glue gun)
Directions
Take a mini Styrofoam ball & crumble it up with your hand until it is in fine flakes.
Remove the top of the clear ornament & paint it with white paint & generously sprinkle the Styrofoam on the wet paint.
Stick a marker in the ornament & put it in a cup to let it dry.
Run a bead of hot glue around the opening of the painted ornament & press a Styrofoam ball into the ball as far as it can go. Then push the ornament top into the top of Styrofoam ball.
Cut a small piece of pipe cleaner for the nose & fold it in half & press into the middle of the Styrofoam. Cut out small round pieces of black foam for the coal for the eyes and mouth. Glue into place.
Cut a long piece of felt& snip the edges so the are frayed. Wrap around the neck & tie like a scarf.
Glue on buttons to finish it off.
This will make a lovely addition to our little tree. I can’t wait to make more ornaments today with my little girl to fill it.
Thank you as always for stopping by. Please follow us on Facebook as well.
Toilet Paper Tube North Pole Scenes
*This post contains affiliate links for convenience.*
This weekend my husband and I got out for a very rare date night. The movie Elf is a favorite of both of ours. They had a musical version of Elf in the city & we just had to go see it, so we called in Nana for the night and went out for a much needed date.
The musical was wonderful. The cast did a spectacular job. The songs were cute, catchy and well performed, but I was most impressed with the scenes. Maybe it is the Christmas lover in me, but the North Pole scenes & the Christmas in the city really got me. They also inspired some North Pole craft ideas that I couldn’t wait to do.
What you will need:
Toilet Paper Tubes
Egg Carton
Paper Bowl
Cotton balls
Sharpie
Glue
Ribbon
Pipe cleaner
Small regular pieces of cardboard
I had three North Pole characters in mind, Santa (of course), a snowman & a penguin. I painted all of the pieces first to allow time for all of them to dry, but here is a break down of each craft.
Penguin at the North Pole
- Paint a toilet paper tube in all black. I realized later that I needed to paint the inside as well. Let the paint dry.
- Squeeze glue on about 2/3 of the tube & spread cotton over it in an oval shape.
- Cut flippers out of black construction paper or use foam, as it is sturdier. Cut a beak and feet out of orange. Glue them into place & add googly eyes.
- Cut a small slit into the side of a paper bowl. Slide a Popsicle stick into it & glue into place. Cut a piece of cardboard into a small rectangle. Write North Pole on the sign & glue it to the top of the Popsicle stick. Glue the penguin to the bowl. Glue stretched out cotton balls all over the bowl & around the penguin and the sign. Add a small line of cotton to the top of the sign.
Santa at the North Pole
- Paint 3/4 of a toilet paper tube red & the rest in black. Paint the pointy separator of the egg carton red & let all dry.
- Glue the egg carton portion to the top of the red end of the tube.
- Glue a ring of cotton around the bottom of the egg carton & at the point right above where the red & black meet.
- Cut a small oval shape out of flesh-toned paper. Add googly eyes to the oval shape & paint in cheeks a small nose & a mouth. Glue it right under the hat.
- Glue stretched out cotton around the outside of his face and between his nose & mouth to form a mustache and beard. Add a small cotton ball to the top of his hat.
- Draw in buttons on Santa’s coat.
- Follow the steps in step 4 from the penguin craft above to finish off the craft.
Snowman at the North Pole
- Paint a toilet paper tube in white. Paint a piece of egg carton in black. Let them dry.
- Draw the snowman’s face in with a Sharpie & paint in the carrot nose with orange paint.
- Cut a black circle a bit larger than the egg carton piece out of black construction paper or foam & glue the egg carton to the the center of it. Let dry.
- Glue the hat to the top of the snowman.
- Cut a piece of ribbon to use as a scarf. Glue it into place.
- Glue pipe cleaners in place for the arms.
- Follow step #4 from the penguin craft to finish off your craft.
These were so much fun & cute to make, I wanted to make more.
Thank you as always for stopping by. Please follow us on Facebook as well.
Footprint Snowman Christmas Stocking
Happy Thanksgiving everyone. I hope that everyone is enjoying their day & having fun with their families. Tomorrow kicks off the beginning of the Christmas season and I could not be more excited. I love the holiday season. Everything about it, the sounds, the smells & the lights just make me happy.
The holidays for me are all about making memories. Before having my daughter, I had a perfectly coordinated tree with fancy holiday knick knacks. Those have slowly been replaced through the years with homemade ornaments & I adore it. Some of my favorites are made out of my daughter’s foot and hand prints. This year I wanted to make a special stocking for our new home & new mantle.
I purchased an inexpensive stocking for a couple of dollars. I am sure you could pick one up at the Dollar Store.
I painted my daughter’s foot in white & pressed it onto the stocking. I used black paint & dotted on the eyes & mouth.
I cut up some felt pieces for the hat & scarf. I used a Sharpie to stripe the hat and scarf and added glue and glitter for a little holiday sparkle.
I glued the hat and gloves into place and added a pom pom to the end of the hat. I glued on a nose and buttons.
We finished off our snowman with pipe cleaner arms.
It came out so cute. I can’t wait to hang it up.
Thank you as always for stopping by. Please follow us on Facebook as well.
Winter Window Scene
We have been reading a lot of books lately. On Sunday, I felt like we read about a hundred of them, though in actuality it was probable only about 5 or 6. In one of the books or magazines that we read together, there was a lovely illustration of children looking out the window. I love crafts in windows & I thought that a simple winter scene with the silhouette of children looking out would be a cute one.
Stained Glass Snowman
This was our last week in our home. Our new house will be under construction for the next 5 weeks & we will be living with my husband’s aunt while we wait for the completion of our new home. Life has been chaotic & a lot of things have had us in limbo these past few weeks. Even with all that has been going on, we still managed to squeeze in a few crafts in between packing & moving. We were all about snowmen this week. We made acorn snowmen the other night & kept it going with one more quick snowman craft.
Dressing Up Your Meals For the Holidays
I love decorating for the holidays. Nothing fills me up with Yuletide cheer more than surrounding myself with all things Christmas. It is not just the Christmas tree & mantle that gets adorned in our house, our meals get a makeover for the season as well.
Don’t let the cookies have all the fun. Here are some fun & easy ways to dress up everyday meals for the holidays.
Gingerbread Man Shaped French Toast
One of the quickest & easiest methods for adding a festive touch to ordinary foods are with cookie cutters. French toast can easily be transformed into the shape of a gingerbread man with one press of the cutter. Mai loved this. She thought they were cookies & gobbled her toast right up.
Snowman Mashed Potatoes
This was achieved with 3 russet potatoes. Peel, wash & cube potatoes. Add to a large pot of boiling water & cook until tender. Drain potatoes & add 1/2 cup of milk, I use 2 chicken bouillon cubes in lieu of the butter, mash ingredients together. Add 2 eggs & 1/4 cup of parmesan cheese, 1/4 cup of bread crumbs, 1/2 tsp of garlic salt & a 1/2 cup of cheddar cheese & mix well. Let cool slightly & roll out 3 balls of varying sizes. Roll formed balls into parmesan cheese & form your snowman shape & place on a greased baking sheet. Bake at 400 for about 15-20 minutes. Add carrots & peas as a garnish.
Candy Cane Spaghetti Bake with Meatballs
Cook spaghetti & add your favorite sauce. Use two tubes of seamless sheets of bread dough or crescent dough. Roll out both tubes blending together the sheets vertically. Cut out a candy cane shape about 3 inches wide. Using a fork, scoop out spaghetti & place on the dough. Spoon out extra sauce over the spaghetti to add the red to your candy cane. Roll out the excess dough & cut into strips and lay across the top of the pasta in a diagonal pattern to form candy cane stripes. Using a knife push the dough into the side of the cane & smooth out the sides of the dough. Bake according to dough directions.
Rudolph PB & J sandwich
This is a 2 minute meal that the kiddos will love. Use one piece of bread, cut out an oval shape for the head & spread with peanut butter. Add a rounded teaspoon of jelly to the add the nose. Use the rounded top of the bread as ears & spread with jelly. For the eyes use two chunks of banana & 2 raisins. Pretzel stick will finish off the reindeer as antlers.
Santa Pancakes
One pancake, topped with banana, icing & 2 M&M minis for eyes. Form a nose out of banana & the mouth and hat from strawberries. Top with whipped cream for the beard & fur trim for the hat.
Happy holidays! Enjoy.
Share some of your fun Christmas creations. We would love to see them.
Related Topics:
http://foodandeverythingelse.me/2013/12/16/candy-cane-cocktail/ http://basilandbaizel.wordpress.com/2013/12/16/crazy-christmas-cookie-sunday/ http://hooplapalooza.blogspot.com/2013/12/candy-cane-and-pinwheel-cookies.html http://www.adashofsanity.com/2013/12/snow-flake-peppermint-bark/