Category

Recipes

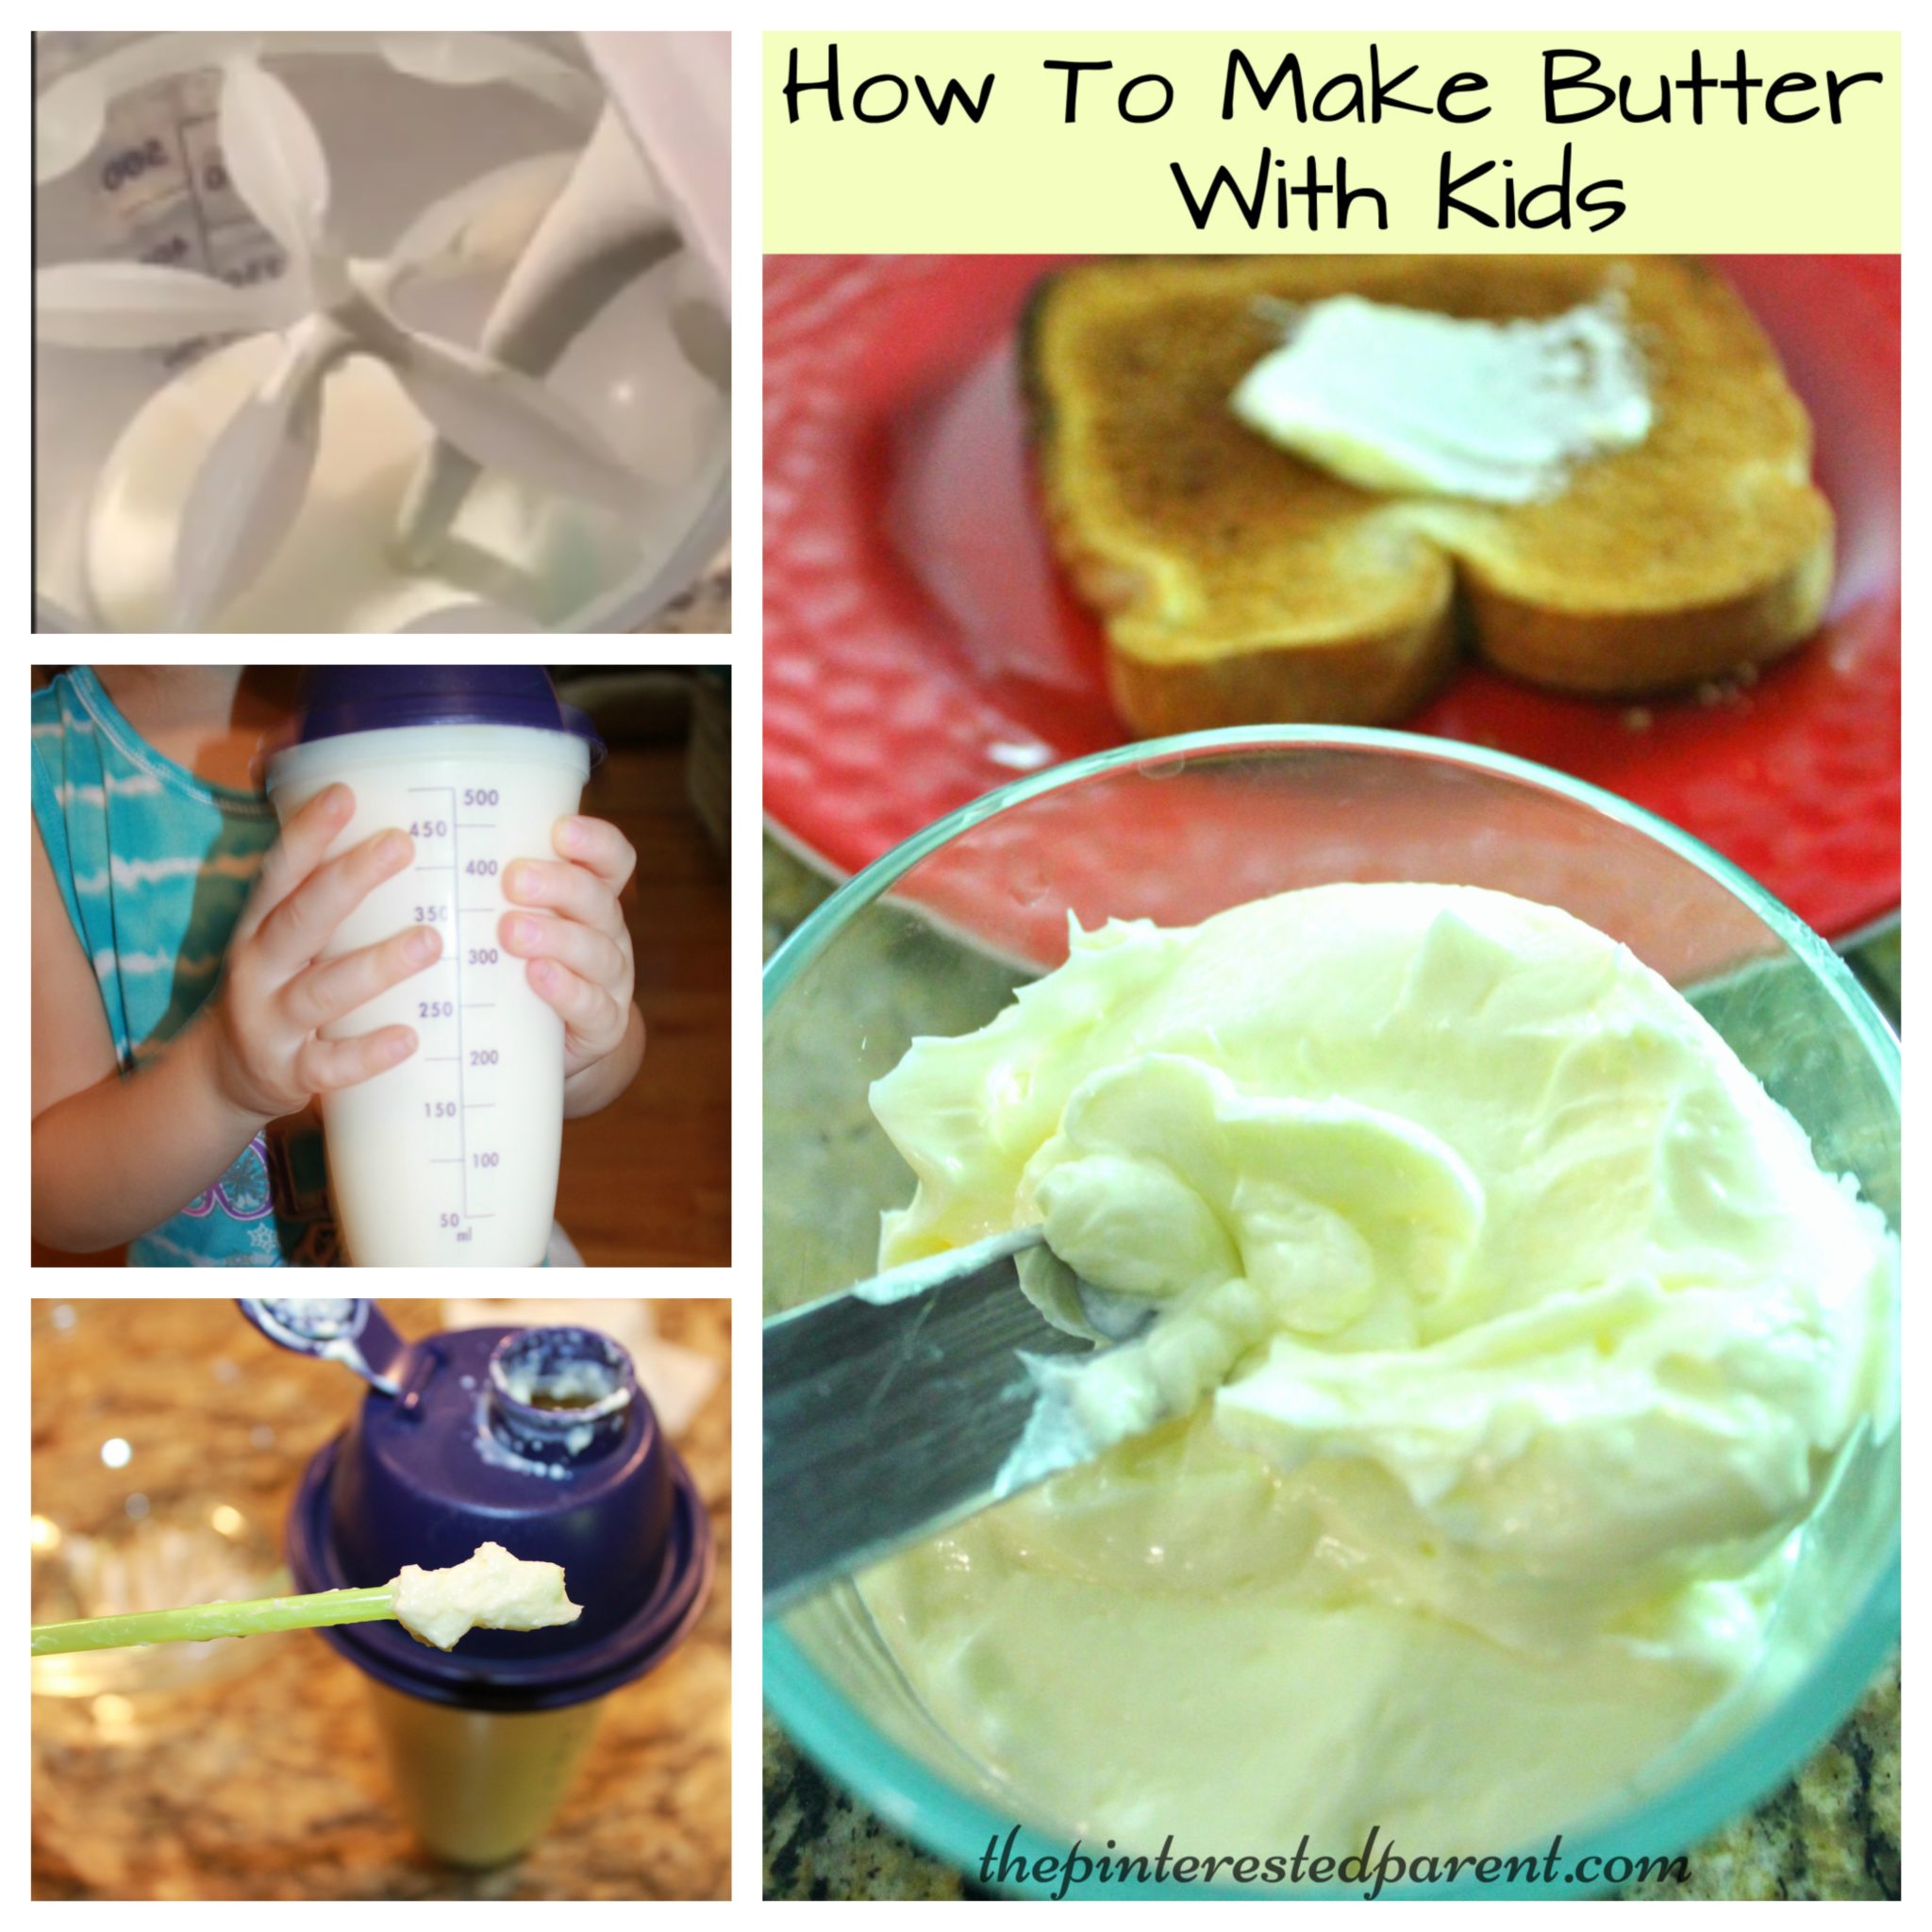
Homemade Butter With Kids

It was our wedding anniversary last weekend. We wanted to celebrate our anniversary weekend together with the whole family.

How to make homemade butter - Cooking with kids - easy & fun to make with the family. Butter recipe

*This post contains affiliate links*

We went away for a family weekend. We took our daughter to Old Sturbridge Village in Massachusetts. It was a lovely look at life in the 1800’s.

14095762_10208795971169875_630877002373588086_n

We got to take a horse-drawn carriage ride, see how yarn was made & pretend to churn butter. Our butter making play made me want to churn some butter for real. It reminded me of when I was little and churned butter on class field trips.

14040106_10208795972969920_5794196974182431876_n

I wanted to teach my daughter how to make butter too. Thank to Google & PBS Kids, I was able to find a simple way to make butter with my little. Did you know that you can easily make homemade butter by shaking cream in a jar? Well you can & it is delicious.

The recipe called for a jar, but we chose to use a shaker cup to make our butter.

We added a carton of heavy cream to our shaker & shook in a little salt. We put the lid back on & began to shake.

Snapshot 2 (8-24-2016 11-40 PM)

My daughter helped shake for a few minutes, but quickly got tired & handed it back to mommy. It is a lot of shaking, so if you are doing this with a few children, it would actually be perfect because each could take a turn for a few minutes.

The recipe that we saw said that it would take about 10 minutes, but ours did take a little longer than that, although we did stop many times throughout the process to make observations about the butter.

It was a great arm workout for this mommy. The shaking was fun, but what happened during the shaking was the most interesting part.

IMG_2836

The cream hit different forms during the shaking. We stopped & looked at our cream often to see what changes were made. It was fascinating. The first stage was foamy. The cream start foaming & expanding in the shaker cup.

IMG_2838

We shook a little longer & the butter started taking on the form of whipped cream.

IMG_2839

When it took on the whipped cream form, it became a little more difficult to shake, but after shaking a little bit longer, it began to sound watery again. We checked the mixture & could see the buttermilk & butter starting to separate. We kept shaking and then poured the buttermilk through a strainer into a bowl. We drained the butter well. The strainer will catch the butter, but we were able to scoop most of it out of our shaker with a spoon.

IMG_2842

I covered the butter & then refrigerated it until I was ready to use it. We made some toast & tried out our homemade butter. It was delicious. We also used the buttermilk to make fried chicken with later that same evening.

From what I understand, homemade butter does not last too long, so extend the life of your butter by mixing some water into it after the butter is already formed.

IMG_2845

The homemade butter is definitely worth making. It was wonderful. I will definitely make it again, but perhaps next time use a beater.

How to make homemade butter. Cooking with the kids - easy & fun to make with the family. Butter recipe.


Thank you as always for stopping by. Please follow us on Facebook as well.


Butter making with kids. Easy recipe that you can make with the family

Celebration Pancakes

Cupcake shaped pancake. Fun breakfast food for kids. This is a perfect for a birthday or special occasions

*This post contains affiliate links for convenience*

If you follow us regularly, you probably already know that we love pancakes. Pancakes are one of the few foods that my daughter will always eat. We have gotten inventive with our pancakes over the last year & breakfast has never been more fun. Pancake art has become a favorite for us both on the weekends. Sometimes, she puts in a special request & it becomes a challenge to see what we can come up with. Even if they don’t come out right they are still delicious. Today, my little girl said that she wanted cupcake pancakes. Here is what we came up with.Cupcake shaped pancake. Fun breakfast food for kids. This is a perfect for a birthday or special occasion.

Start with a basic pancake recipe. We added a couple of Tbsps of chocolate powder to our recipe.

Use a mixer to blend the batter well. Make sure to get out all the lumps.

IMG_7301

Use a funnel to fill a squeeze bottle.

IMG_7302

Use the squeeze bottle to draw out your cupcake.

IMG_7313 IMG_7314 IMG_7315 IMG_7310

Let the pancake cook until bubbling & flip. Cook on the opposite side for a few minutes & put on a plate.

IMG_7316

Add whipped cream and sprinkles to finish your cupcake off. My daughter was so excited & the pancakes were a big hit.

Cupcake shaped pancake. Fun breakfast for kids. This is a perfect for a birthday or special occasions.. Recipes & food

Thank you as always for reading. Please visit us on our Facebook page as well.


\

Alphabet Pancakes

Breakfast is my favorite meal of the day. I love to eat breakfast & I love to make it, pancakes, french toast, omelettes. I love making them all.

Alphabet Pancakes - easy pancake art for kid's breakfast -fun food ideas

*This post contains affiliate links*

Pancakes are definitely my favorite. I have a lot of fun with pancake art.

Stained Glass Butterfly Pancake - the kids will love these colorful springtime - pancakes made with rainbow color sprinkles ballerina tutu pancakes - pancake art for fun kid's breakfast princess castle pancakes - pancake art for fun kid's breakfast

My daughter will put in special requests & mommy will try her best to make them. We have been working on reading & writing with our daughter. She has been trying to use her letters & form words. She puts letters together just to sound them out, even if they do not form an actual word. She has been working so hard that this weekend we made a special pancake treat to celebrate all the progress she has made. The great thing about these pancakes is that you do not need any artist skill to make them, you just need to be able to write your alphabet.

We mixed up our pancakes.

Ingredients:

1 cup of flour

1 tbsp brown sugar

2 tsp baking powder

1/4 tsp of salt

1 cup of milk

2 tbsp vegetable oil

2 tbsp unsweetened or sweetened cocoa powder

1 egg white

Directions: Mix all the ingredients together. Use a blender to mix the batter to get out any clumps. Mix well. Add more milk if needed.

IMG_7139 

IMG_7141

Use a funnel to funnel the batter into a condiment squeeze bottle.

Use the bottle to squeeze out the letters.  Let bubble as usual before flipping. Remember that some of the letters will need to be written mirrored so that when they flip they are not backwards. If the bottle clogs, just squeeze it off to the side. If it keeps clogging, it needs to be blended more.

IMG_7145

Alphabet Pancakes - easy pancake art for kid's breakfast -fun food ideas

As always, they were a big hit with my pancake loving girl. She spelled out her name, dog & then our dog’s name, Duke.

IMG_7165

Thank you as always for stopping by. Please follow us on Facebook as well.


Owl Shaped Breakfast

My daughter is a sweet girl most of the time, but mealtimes in our house are & have been a battle for quite some time. She is a very picky eater & mealtimes in our house are often very stressful. Over the years, I have found fun & creative ways to try to get her to eat. I have tried it all from reading to her while she eats to bite sized meals to fun food art.

Owl shaped breakfast - sunnyside up egg eyes, toast, cheese & bacon - creative food ideas for the kids

*The Pinterested Parent is a participant in the Amazon Services LLC Associates Program, an affiliate advertising program designed to provide a means for sites to earn advertising fees by advertising and linking to Amazon.com. In addition, text and image links in this post may be affiliate/referral links, which means we may be compensated if you make a purchase after clicking through these particular links* See full disclosure policy.

Continue Reading…

Stained Glass Butterfly Pancakes

My daughter loves pancakes. We make pancakes together every weekend. Sometimes they are just plain pancakes, sometimes she wants apples in them & others it is chocolate chips and on occasion she asks for pancakes in the shapes of her favorite things, like princess pancakes.

Stained Glass Butterfly Pancake - the kids will love these colorful springtime pancakes made with rainbow sprinkles

*This post contains an affiliate link for convenience*

She had two requests this morning. She wanted butterflies & she wanted sprinkles. Challenge accepted!

Start with a basic pancake recipe or you can use ours.

Ingredients:

1 cup of flour

1 tbsp brown sugar

2 tsp baking powder

1/4 tsp of salt

1 cup of milk

2 tbsp vegetable oil

1 tsp vanilla

1 egg white

Directions: Mix all the ingredients together. Use a blender to mix the batter to get out any clumps.

Use a funnel to funnel the batter into a condiment squeeze bottle.

IMG_5788

Squeeze out the mixture to form the butterfly’s body, which is basically a line with a circle on top.

IMG_5789

Draw in the wings with the mixture. **Note: If the batter get stuck, squeeze it off to the side to clear any clumps.**

IMG_5790

Add lines to the inside of the wings.

IMG_5791

Sprinkle rainbow sprinkles into the empty spots between the wings.

IMG_5792

Squeeze batter over the sprinkles filling in the empty spaces.

IMG_5804

Cook the pancakes as usual until they begin to bubble & then flip and cook on the other side. Serve them up with syrup or plain.

Stained Glass Butterfly Pancake - the kids will love these colorful springtime pancakes made with rainbow color sprinkles

My daughter loved her pretty pancakes. We gobbled all of them up this morning. These were so fun to make & easier then they seem.

Thank you as always for stopping by. Please follow us on Facebook as well.

Stained Glass Butterfly Pancakes - the kids will love these beautiful and colorful spring pancakes made with sprinkles

White Chocolate & Peanut Butter Pretzel Bunnies

Easter is quickly approaching and with the holiday comes all of its delicious sweet treats.  White chocolate & peanut butter pretzel stick Easter bunnies recipe. These bunny treats were a huge hit & my kid loved to decorate them.

*This post contains affiliate links*

Last year I had experimented with pretzel bunnies. They were a big hit with my family, so I wanted to try them again with a little help from my favorite little helper. We had recently purchased a set of food markers & we both could not wait to use them.

White chocolate & peanut butter pretzel stick Easter bunnies recipe. These bunny treats were a huge hit & my kid loved to decorate them.

What you will need:

White chocolate melts

Pretzel sticks

Peanut butter

Confectioners sugar

Butter

Vanilla

Food markers

Directions:

Melt 3 Tbsp of butter. Mix it with 1/2 cup of creamy peanut butter, 1 cup of confectioners sugar & 1 tsp of vanilla. Mix it well. Scoop a heaping tsp of peanut butter mixture and roll into a ball. Place on a sheet of wax paper & use a spoon to flatten into a disc. Put them into the freezer for about a half hour or until they are slightly hardened.

IMG_5459 IMG_5460 IMG_5461 IMG_5462

Melt the chocolate according to package directions.

IMG_5453

Lay out another sheet of wax paper. Dip the pretzel sticks, two at a time into the melted chocolate. Let the excess chocolate drip off & place them on the wax paper in a V shape.

IMG_5463

Remove the peanut butter discs from the freezer a few at a time. Dip them one at a time making sure to cover the top, bottoms & sides & place over the pretzel, just covering about 1/4 of the bottom. Use a rubber spatula to fill in any empty space. Let the chocolate cool & harden.

IMG_5476

Then comes the fun part. Use your food markers to draw in the bunny faces. My daughter couldn’t wait to draw on her bunnies.

IMG_5472

Here was her favorite bunny that she made, complete with hair bow & scarf.

IMG_5474 IMG_5475

They were a huge hit again with my family and my friends at work.

Thank you as always for stopping by. Please follow us on Facebook as well.

Tutus & Tiara Pancakes

Tutu & Tiara Princess Pancakes


About a month ago, I started seeing these videos being shared all around social media of people making wonderful art out of pancakes. They used squeeze bottles to draw out the outline of the designs & then filled them in with more batter. I tried these at home because I was so curious. My first attempt was spring pancakes. I made a variety of flowers & butterflies. My daughter loved them. She loved them too much. Now she puts in special requests each weekend for pretty pancake pictures. Last week it was a sea horse, the week before it was ducks & today she asked for tutus. I am starting to get excited for weekend pancakes now, just to see what we can come up with. If my baby wants tutus, tutus she will get & some other princess related things.

IMG_0081

IMG_0084

IMG_0087 IMG_0090  IMG_0092IMG_0093

Thank you as always for stopping by. Please follow us on Facebook as well.


Tutu & Tiara Princess Pancakes


Chocolate Covered Pretzel Bunnies & Sunday’s Best Link Up # 13

Chocolate Covered Pretzel Rod Easter Bunnies


I took a poll on my Facebook page yesterday. I was curious about what people preferred, sweet or salty. My husband is salty & I am definitely sweet, but the truth is I love the two mixed together the best. One of my weaknesses is for chocolate covered pretzels.

With only one week left before Easter, I have a few more days of Easter inspired fun. Tonight we made some sweet & salty Easter treats in the form of our favorite Easter pal.


Melt white chocolate in the microwave. Put the chocolate in a microwave safe dish & heat for a minute. Check it & microwave in 30 second intervals, checking to see if it is melted before each interval. Be careful not to burn.

IMG_9986

When the chips are soft & shiny stir with a spoon.

IMG_9987

Dip pretzel dipper sized rods into the melted chocolate & lay out on wax paper. Lay two dipped pretzels side by side to form a V shape.

IMG_9988

With a spoon, spoon out a dollop of chocolate over the bottom in the shape of a circle. Be careful to not dribble chocolate over the top. It works best when the chocolate is smooth. Use a rubber spatula to smooth out any rough edges while chocolate is still hot.

IMG_9989 IMG_9991

Melt pink chocolate or in a pinch use white chocolate with just a touch of food coloring gel. Using a toothpick draw a line for the inside of the ears & add a dot for the nose.

IMG_9995 IMG_9996

Melt a small dish of milk or dark chocolate & add in eyes, mouth & whiskers. Let your chocolate cool & remove from the wax paper. If you have any imperfections, which I had a plenty, scrape the hardened chocolate with a knife to smooth out.

IMG_9998

Chocolate Covered Pretzel Rod Easter Bunnies

Now let’s hop on over to our main event. Welcome to week 13 of our Sunday’s Best Link-Up.


Welcome to Week 13 of  Mother 2 Mother’s Sunday’s Best Linkup This is the last week for our Spring Forward theme. We will be starting our April Showers theme next week. We will be looking for indoor activities, recipes, crafts, gardening and blogging tips for those rainy days.  


This week we’re celebrating the thaw across the country, so linkup Easter posts, crafts, recipes, gardening, decorating ideas, room makeovers, Easter tablescapes, spring cleaning and organizational tips. Blow the dust off your old posts and link those too. Don’t have posts that fit into the theme, link up whatever post you would like to share. We would love to have SEO, blogging, and parenting tips, DIY projects, homesteading, homeschooling, and your posts on life.  Your linkups and giveaways are welcome too. Anything goes here, as long as it’s family friendly and you may linkup as many as you would like. 

Each week your hosts will select their favorite post and it will be featured the following week. An image from your post will be used on my blog the following week with a link back to your blog. Be sure to check back to see if you’re a Sunday’s Best featured blogger. All Featured Bloggers will have their posts Pinned to the Sunday’s Best Pinterest Board.    

If you are interested in becoming a Sunday’s Best host, please contact me for details at rhonda@mother2motherblog.com  


                                             Your Sunday’s Best Hosts:


            Rhonda – Mother 2 Mother                Kim U. – Pinterested Parent         Kim M. – Life In A House of Testosterone


Here’s the rules, please connect with us on social media before you leave or subscribe/follow our blogs:  


Mother 2 Mother: Please like my 
Facebook Page, follow me on Twitter,  Google+, PinterestBlogLovin or subscribe/join my blog on the right before you leave.   


The Pinterested Parent: Please like Kim’s Facebook Page, follow her on Twitter, Google+, Pinterest, Bloglovin before you leave.  


Life In A House of Testosterone: Please like Kim’s Facebook Page, follow her on Twitter, Google+, Pinterest, Bloglovin, or Instagram before you leave. 


Mother 2 Mother Blog

Please help us grow by placing the Sunday’s Best button above on your sidebar or in your Link Party lists/directory. I appreciate your help in promoting the linkup with Re-tweets and shares. If you are selected as a Featured Blogger, let your readers and followers know that you were featured on Sunday’s Best.  Now lets party! 

The Sunday’s Best Posts are:


Kim U. selected Moss Covered Bunny from Pinterventures 


Sunday's Best Linkup, featured bloggers


I selected Pastel Deviled Eggs from Intelligent Domestications


Kim M. choose Keeping Up With the Joneses from Sequins In The South

All of the posts were great, and I appreciate each of you linking up. I would like to invite all of you back to linkup your post(s) again, it could be selected this week. While you’re here take a minute to visit these great blogs. It’s a great way to meet and connect with new bloggers. Be sure to PIN or share any posts that you like, we all appreciate a little love. 


Rainbow Rice Krispies Treats

Rainbow rice krispies treat


For those of you that have followed along with me for a while, you know our family has a soft spot for Rice Krispies Treats. Our wedding cake was even fashioned out of 3 tiers of solid Rice Krispies Treats.

44515_1463747926949_7909967_n


We have been eagerly anticipating spring here. It has been a week of rainbows in our home. We painted some spaghetti rainbows over the weekend.

IMG_8949IMG_8954IMG_8953


Then today we made some Rice Krispies Treats Rainbows. We have made these before for parties and such, but tonight the treats were just for us.

Ingredients:

5-6 cups Rice Krispies

About 40 Marshmallows

1 stick of Butter

Food coloring – red, orange ,yellow ,green ,blue & purple


Directions:

1. Slice a stick of butter into 6 equal parts.

IMG_9143

2. Line a small baking pan with wax paper. We used a 7X5X1.5. Spray the paper with cooking spray.

IMG_9142

3. In a small sauce pan, melt one pat of butter over low heat. Stir in 6-7 medium sized marshmallows cut up into smaller pieces. Stir until melted.

IMG_9144

4. Add a few drops of red food coloring until you get the achieved color. Stir in 3/4 cup of Rice Krispies until well coated.

IMG_9146

5. Press the mixture into the bottom of the pan, packing it well. Use fingers to press in well. Wet hands work best & keep the Krispies from sticking to fingers.

IMG_9147

6. Repeat steps 3-5 five more times with the remaining colors, layering each color on top of the last.

IMG_9148

IMG_9149

Let cool in the refrigerator for about 10-15 minutes and then lift the treats out by the wax paper. Peel off the wax paper from the treats.

IMG_9150

Use a sharp knife to slice the treats in to thin strips.

IMG_9151

Curve your strips into arcs to form rainbows.

IMG_9152


Thank you as always for stopping by. Please follow us on Facebook as well.