
Up on the housetop, click, click, click
Down through the chimney with good Saint Nick…
When I was a child my grandmother used to have a wonderful Christmas record of children singing. This was my favorite carol on the album. I have gotten into the holiday spirit a little bit early & have started singing Christmas carols around our house & even at work. Not everyone appreciates my caroling, but my little one loves mommy’s songs. I think this one is going to be a favorite of hers too. Our tissue box chimney craft is inspired by this wonderful song.
*The Pinterested Parent is a participant in the Amazon Services LLC Associates Program, an affiliate advertising program designed to provide a means for sites to earn advertising fees by advertising and linking to Amazon.com. In addition, text and image links in this post may be affiliate/referral links, which means we may be compensated if you make a purchase after clicking through these particular links* See full disclosure policy.
My husband is obsessed with tissues. We literally have a box of tissues in every single room in our house. Some rooms have multiple boxes. I have been wanting to do something with our empty boxes for some time. Luckily, all my caroling had me inspired.
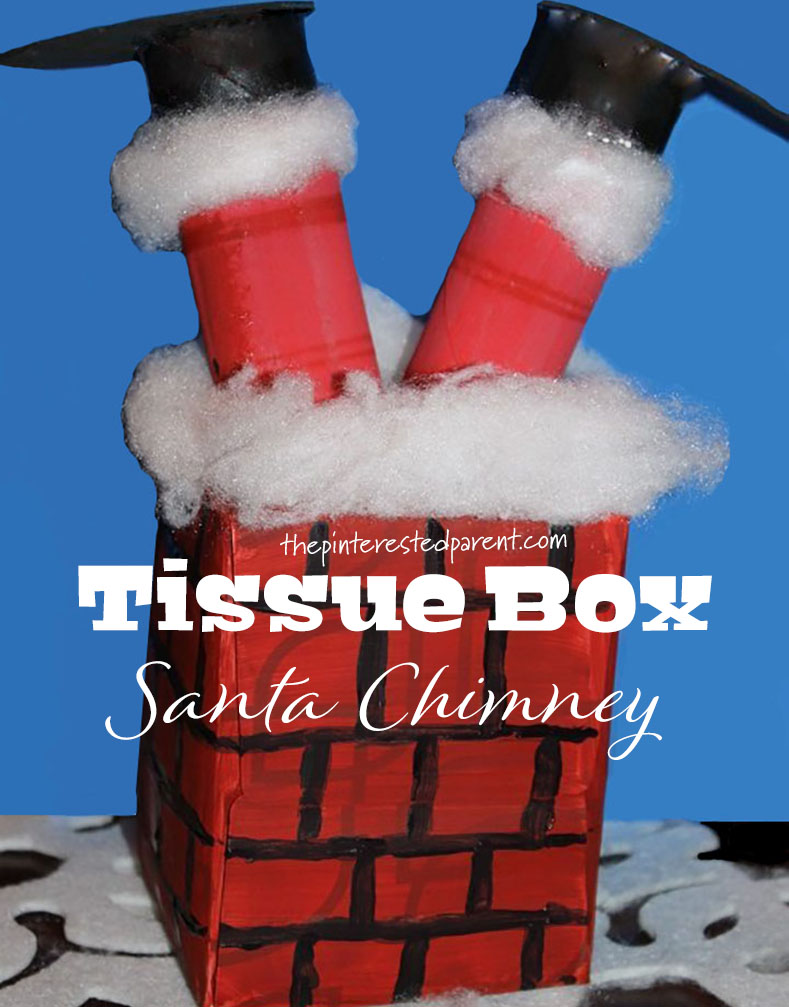
Tissue Box Chimney Craft
What you will need:
An empty tissue box
2 Empty toilet paper rolls or 1 paper towel roll cut in two
Black construction paper or a black foam sheet
Directions:
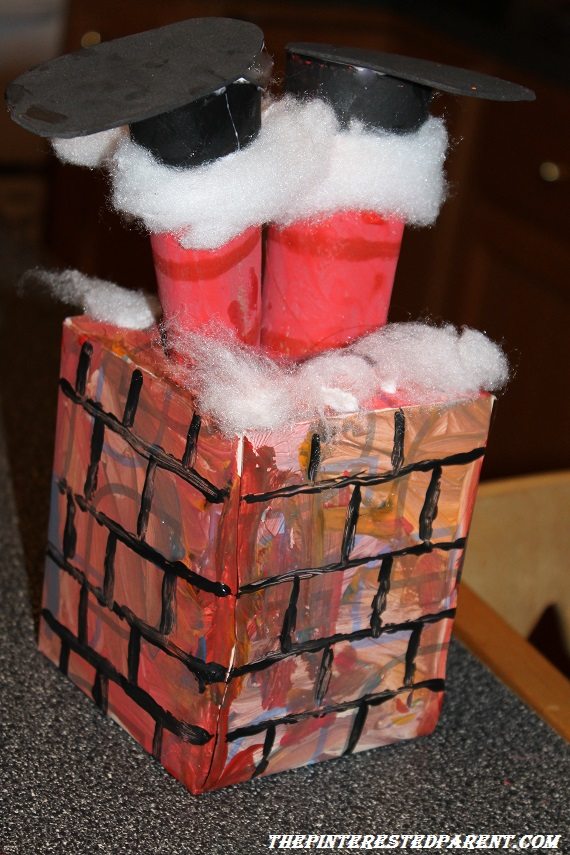
Paint your tissue box with the red paint & let it dry. You can put down a white base coat first to cover up any designs, but my kiddo wanted to get straight into painting. My daughter wanted more than one color for her chimney. She had a multi-colored chimney, but it still came out great.

Using black paint, line all 4 sides of the tissue box to make the look of brick. Depending on your children’s ability you may need to help with this part.


Paint 2 toilet paper rolls or 1 paper towel roll cut into 2 pieces in red. Paint 1/4 of one end of each piece in black. Let the paint dry.


Using glue, apply stretched out cotton balls to form snow. Leave the opening of the box uncovered.


Cut ovals out of construction paper or foam for the bottom of the boots

Glue the oval shape to the black side of the roll.


Add more cotton around the top edge of the black to form fur on the boot.

Let the glue dry & then tuck both Santa legs into the tissue box opening with the legs sticking up.
Here is my daughter’s creation…
And mommy’s too…

Thank you as always for stopping by and don’t forget to visit our Facebook page.


So very cute and love that this Christmas craft is easy enough for Mai to help with 😉
Thanks Janine. She thought this one was very funny. She did a great job with it too. She is a crafty one. 🙂
I LOVE this! Wouldn’t ya know I had been saving a few empty boxes of Tissues and just 2 days ago threw them out, blah!! Well, we’ll have more soon and this is a definite make for us! Adorable and clever!!
Thanks Susen.You are so sweet. I save everything. It is awful. I am a packrat. Lol