Tag

recycled

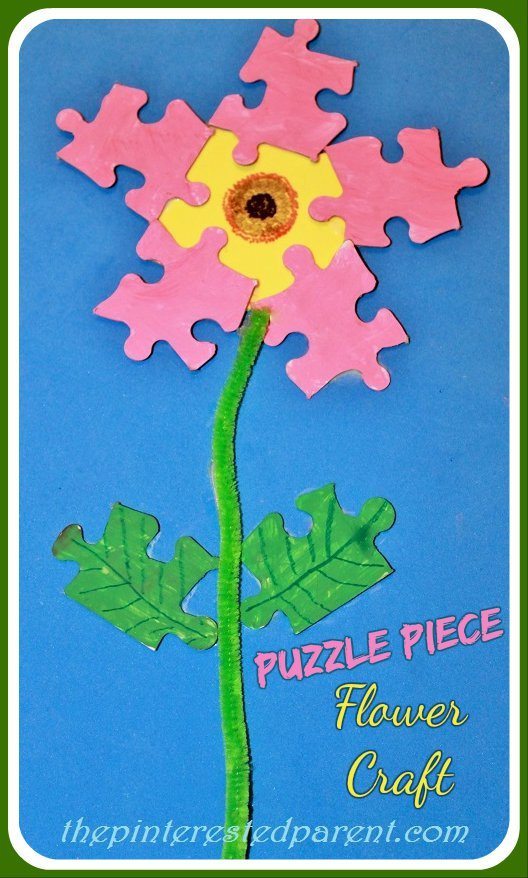
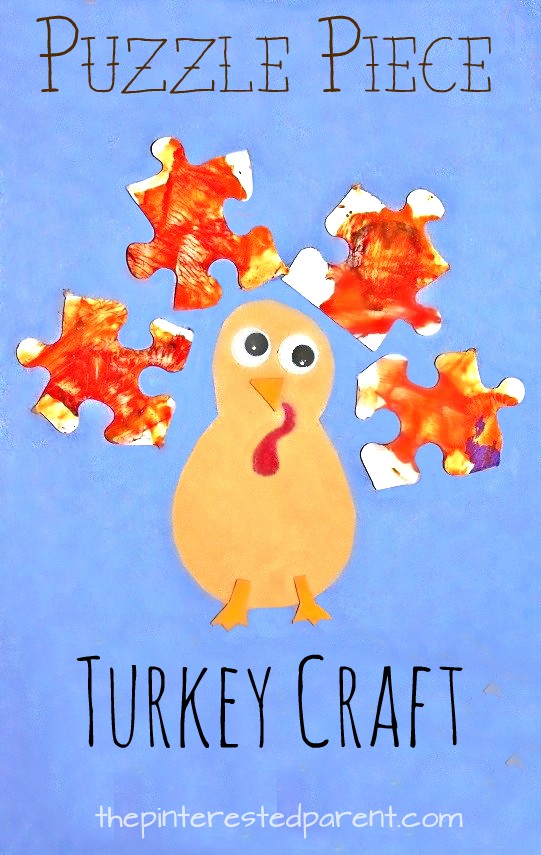
Puzzle Piece Turkey Craft

Puzzle piece recyclable turkey craft - Thanksgiving and fall arts and crafts for kids - preschoolers.

It has been a hectic of couple of weeks. Between moving out of our house, the construction on our new house not being finished, our daughter starting preschool & just the regular everyday stuff, I have barely had a moment to think. We have had to slow down on our regular craft routine because we have limited supplies with almost all of our home still in storage.

This morning before school, Mai asked if we could do a craft. I promised her that we would when we got home. With Thanksgiving nearing, we decided to make another turkey craft and dug through our supplies to see what was available. The first bag we came across had some old puzzle pieces in it & that is what we decided to use.

What you will need:

Old puzzle pieces

Paint

Construction paper

Googly eyes

Markers

Glue

Directions:

Paint your puzzle pieces in the color of your choice.

Mai wanted purple, I chose red & Ashley chose to mix her colors.

IMG_0443

IMG_0440

Ashley was so excited, she painted almost the whole bag of puzzle pieces.

IMG_0433

After you are done painting them. Let them dry.

Cut the turkey’s body out of brown construction paper. Also cut out a beak & feet.

IMG_0438

Glue the body onto a piece of paper. Glue on googly eyes, the beak & feet.

IMG_0445

IMG_0446

When your puzzle pieces are dry, glue them around the body to form the feathers. Draw in the wattle using a red marker.

Mai made her whole turkey by herself.

Puzzle piece turkey craft

I did the bodies for me & a tired little Ashley.

Puzzle piece Thanksgiving turkey craft for kids. Puzzle piece Thanksgiving turkey craft for kids

This was a quick and easy craft

Thank you as always for stopping by. Please follow us on Facebook as well.


Puzzle Piece & Q-tip Skeleton

Puzzle Piece & Q-tips Skeleton Craft - Halloween Crafts for kids

This time last year, we made pasta skeletons for Halloween.

pastaskeleton

I just re-shared it on Instagram last week. One of my Instagram friends recommended that I make a Q-tip skeleton. This sounded like a great idea, so I took her up on her suggestion. We made our skeleton using Q-tips & old mismatched puzzle pieces.

Puzzle Piece & Q-tip Skeleton

What you will need:

Puzzle pieces

Q-tips

Black & white paint

Black marker

Pipe cleaner

Glue gun (Use caution when using hot glue. Recommended for adult use only.)

Directions:

Pick out the puzzle pieces that you would like to use for your craft. We used 7.

IMG_9439

Paint the pieces black & let dry.

IMG_9440

Paint a skull & neck with white paint & let dry.

IMG_9441

Glue a Q-tip to the neck & then vertically across two more puzzle pieces like shown. Break a Q-tip in half & glue on either end of the first Q-tip for shoulders.

IMG_9442

Glue on the arm & leg bones as shown. Draw a face on your skull. Glue a pipe cleaner to the back to hang.

Puzzle Piece & Q-tip Skeleton - Halloween Kids Crafts

Thank you as always for stopping by. Please follow us on Facebook as well.

Recycled Puzzle Piece Fire Engine

Recycled Puzzle Piece Fire Engine


A few weeks back we made a butterfly craft out of an old Doc Mcstuffins puzzle that had missing pieces. We still have several other pieces left & you all know how I hate to throw anything away, so please excuse me if I go a little crazy on puzzle piece crafts until I use them all up.

My daughter may be a little princess, but she also likes to play like a boy as well. She loves dinosaurs, bugs, cars & trucks. She had been asking to make trucks the last few days, so tonight we finally did,

We glued two end pieces together & let them dry.

IMG_1384

We decided on a fire truck, so Mai painted the pieces red. We painted the blank back side of our puzzle pieces.

IMG_1383

After the red dried, we added in our windows & other details using paint & markers for the finer details.

IMG_1386

We glued our pieces to a piece of construction paper & painted in our wheels & a ladder. These would make a cute wall hanging in a child’s room.

Recycled Puzzle Piece Fire Engine


Thank you as always for stopping by. Please follow us on Facebook as well.

Bongo Drums Craft

BongoCrafts.jpg

There are days that I have a particular activity or craft in mind. I have all of our tools out and ready to go, when Mai changes the whole plan with her own ideas.

I have a set of wooden spoons that have seen better days. They were old & cracking and looking sad. My mother-in-law bought us a new set of bamboo spoons, so it was time to get rid of my old ones.

P1180647

As I hate to throw out anything, I had a craft in mind for me & Mai. We were going to make spoon dolls. We had all the paint out and were about to start painting when Mai grabbed the spoons & a few containers and showed off her drumming skills.
“Drums are my favorite instrument mama? What is yours?”
“Mama’s favorite is a guitar.”
“I like drums, mama. This is my drum set.”

P1180587

Far be it for me to try to argue with a toddler. I would hate to take her drum sticks away to make dolls out of them, so we will keep them as drum sticks & make her a set of drums instead.

What you will need:

Empty oat containers (any size)

Paint – Kid’s washable paints work fine or acrylics

Yarn

Construction paper or foam

Hot glue gun – ***Glue guns should be used by adults only***

Optional items – Gems, glitter, tissue paper, pom poms etc..

Directions:

Start with a clean & empty oat’s container. Peel off the label around the container.

P1180590

Remove the lids & paint your containers in a color of your choosing. The drums had to be pink for our little princess. Mai was very thorough & wanted to make sure she painted the inside as well. I helped her smooth out the paint and fill in the bare spots. Let the paint dry.

P1180595 P1180600

Paint your spoons and let dry.

P1180653

While your paint is drying, cut out some thin strips of construction paper or foam pieces.

P1180602

With a glue gun, glue the yarn into a zig zag pattern up & down on each drum. (Glue gun should be used by an adult.)

P1180642

P1180643

Put the lids back on the containers. Wrap the pre-cut strips around the top & bottom of the drums. Use a hot glue gun to hold it in place. Use a few pieces to add to the top & bottom of your spoon handles as well.

P1180644

We added a gem between the centers of our zig zags on each side. Use whatever craft materials you have available to decorate it in a design of your own choosing.

P1180650

P1180656

My little drummer rocked out both with her drum sticks and without. I think we have a future musician in our midst.

P1180661 P1180662

Thank you as always for stopping by. Please follow us on Facebook as well.

Creativity Is Cheap & Imaginations Don’t Cost A Thing

232323232-fp83232-uqcshlukaxroqdfv3-658-nu=335---53-;;7-WSNRCG=3;327;6;8-336nu0mrj

I just adore my how my daughter’s mind works. I never know what she is going to say or do. To look at life through her eyes is a daily adventure, with a new story every day.

Since the birth of my daughter I have become a pack rat. I never throw anything away because everything has some sort of creative potential. Things like empty paper towel rolls, tissue boxes & milk jugs are great for craft time. My daughter loves to draw and color and I have found that many things other than paper make for a great canvas. My home is cluttered with empty boxes, recycled ribbons & bows and other assorted odds & ends.

Mai’s birthday party is this weekend. This year, it is a Play-doh theme to pay homage to her favorite addiction. I have saved all of her old Play-doh containers in the hopes that I would be able to use them for her party. As I was washing out all of the containers, Mai saw a chance to grab the lids. My daughter played with the lids, pretending that they were various things. She baked Play-doh lid cookies, formed Mickey Mouse ears with them & cracked them open for scrambled eggs. For an hour, we played with them. I listened as she described to me every step in the Play-doh cookie lid baking process. She told me the flavor of each different colored treat. Some were sprinkled with sugar, some with cinnamon. She made sure that both of us had our oven mitts on before handling our freshly baked desserts. She is just fascinating to watch.

P1180351

With a glorious imagination like hers, remind me again, why we have a house full of toys.

For more free fun…Please check out my latest article in this month’s Seek.

Indoor Fun With Sheet Forts

fort

The Princess Phase Has Hit & So Have The Princess Crafts

IMG_8134

It has been building for a while. I knew it was coming. It was inevitable. After almost 3 years of living under the same roof with Elsa, Cinderella, Rapunzel & my personal favorite Merida, my daughter has become a princess. She tells me all the time. “Mama, I a princess.” Tutu skirts must be worn every day. She even puts them on over her sweats when she goes to gymnastics. She loves Elsa just like all little girls these days, but still her favorite princess is Rapunzel. Rapunzel towers are built out of Legos, blocks, Play-Doh containers & just about anything else that is stackable. I have a collection of paper towel tubes saved up for crafting. Mai will get into them sometimes. She likes to use them as robot arms. Today, she grabbed them. She stuck one in a Dixie cup & said “Look mama, I made Punzel’s tower.” That sounds like a great idea.

Princess Castle Craft

What you will need:

Paper towel rolls

Dixie bathroom cups

Tissue paper box

Paint

Pipe cleaner

Construction Paper

Optional: Glitter, gems or other embellishments

Directions:

Cut out castle tops around the top of paper towel rolls & cut out windows. Cut rolls into different lengths to add different sized towers.

IMG_8109 IMG_8110

Stick the bottom end of a Dixie cup into the bottom of the uncut end of your tube. This will give it balance. Paint your towers in whatever colors you choose. For Mai, it had to be pink. She is getting really good at painting every inch of her projects.

IMG_8113 IMG_8114

Cut out a door on your tissue box & also paint. Stick a pipe cleaner into one Dixie cup. You will use this pipe cleaner to attach a construction paper flag to later. Paint the cup.

IMG_8117 IMG_8135

Add designs in glue & then sprinkle with glitter. Add gemstones or other embellishments of your choosing. Let dry & shake off excess glitter.

IMG_8138 IMG_8137

You can make your castle as small or large as you like. Get creative & have fun.

princesscastle

Our princess has her castle, now she needs to look the part.

Paper Princess Hat

What you will need:

Poster board

Glue

A few drops of water

Tape or staples

Tissue paper

Ribbon

Optional: glitter & gems

Directions: Cut out two pieces in a fan shape.  Size will depend on the size of your child’s head & how high you want your hat. The pointed side will be the top. Overlap the two pieces facing each other until they form a cone. Leave a small opening at the top of your cone. If you have something conical, use it as a template to wrap around. Tape, glue or staple your hat into place once you have it positioned the way that you want it.

IMG_8142 IMG_8143

Rip up colored tissue paper. Mix up school glue with a few drops of water. With a paintbrush paint on glue in patches & place & overlap the tissue papers.

IMG_8145 IMG_8147

Overlap with tissue all the way around until the entire hat is covered. Let dry. Draw designs with glue & then shake on glitter. When glue dries, shake off the excess glitter.

IMG_8148 IMG_8149 IMG_8150 IMG_8151

Add ribbon pieces to the opening at the top of the hat. Glue, tape or staple your hat into place. We used a hot glue gun for our ribbon.

Princess Hat craft for kids