Tag

princess

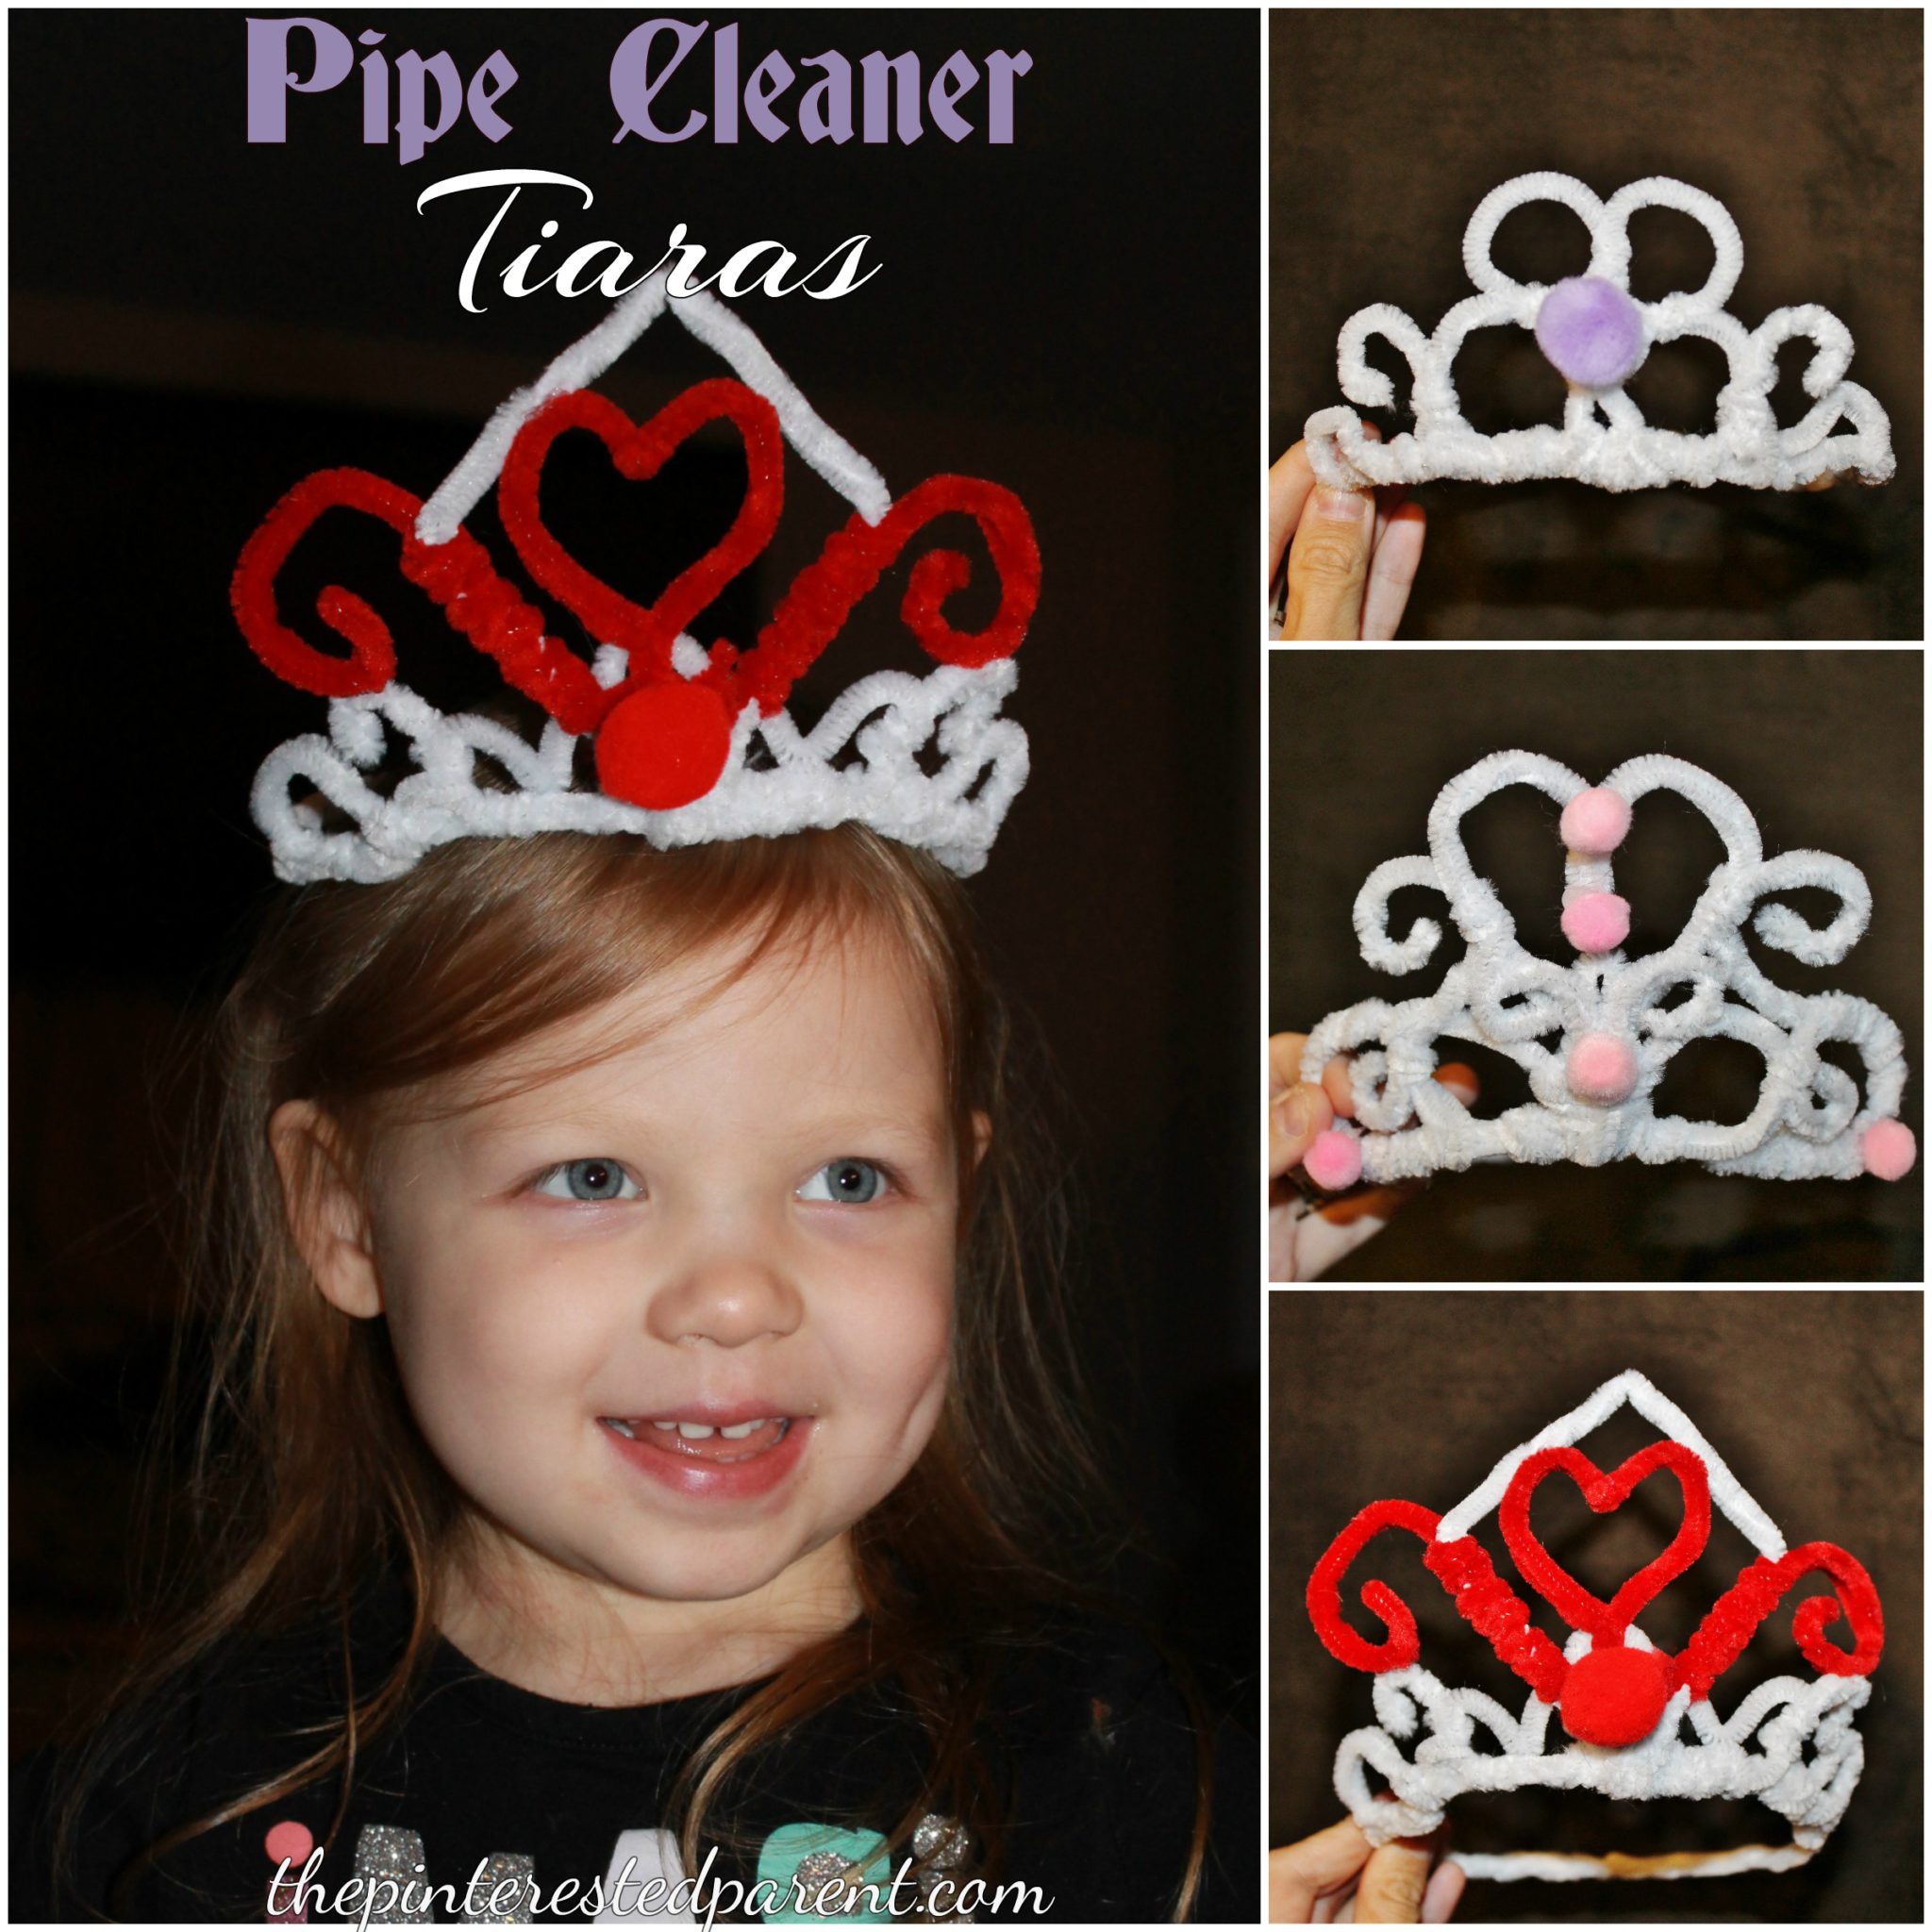
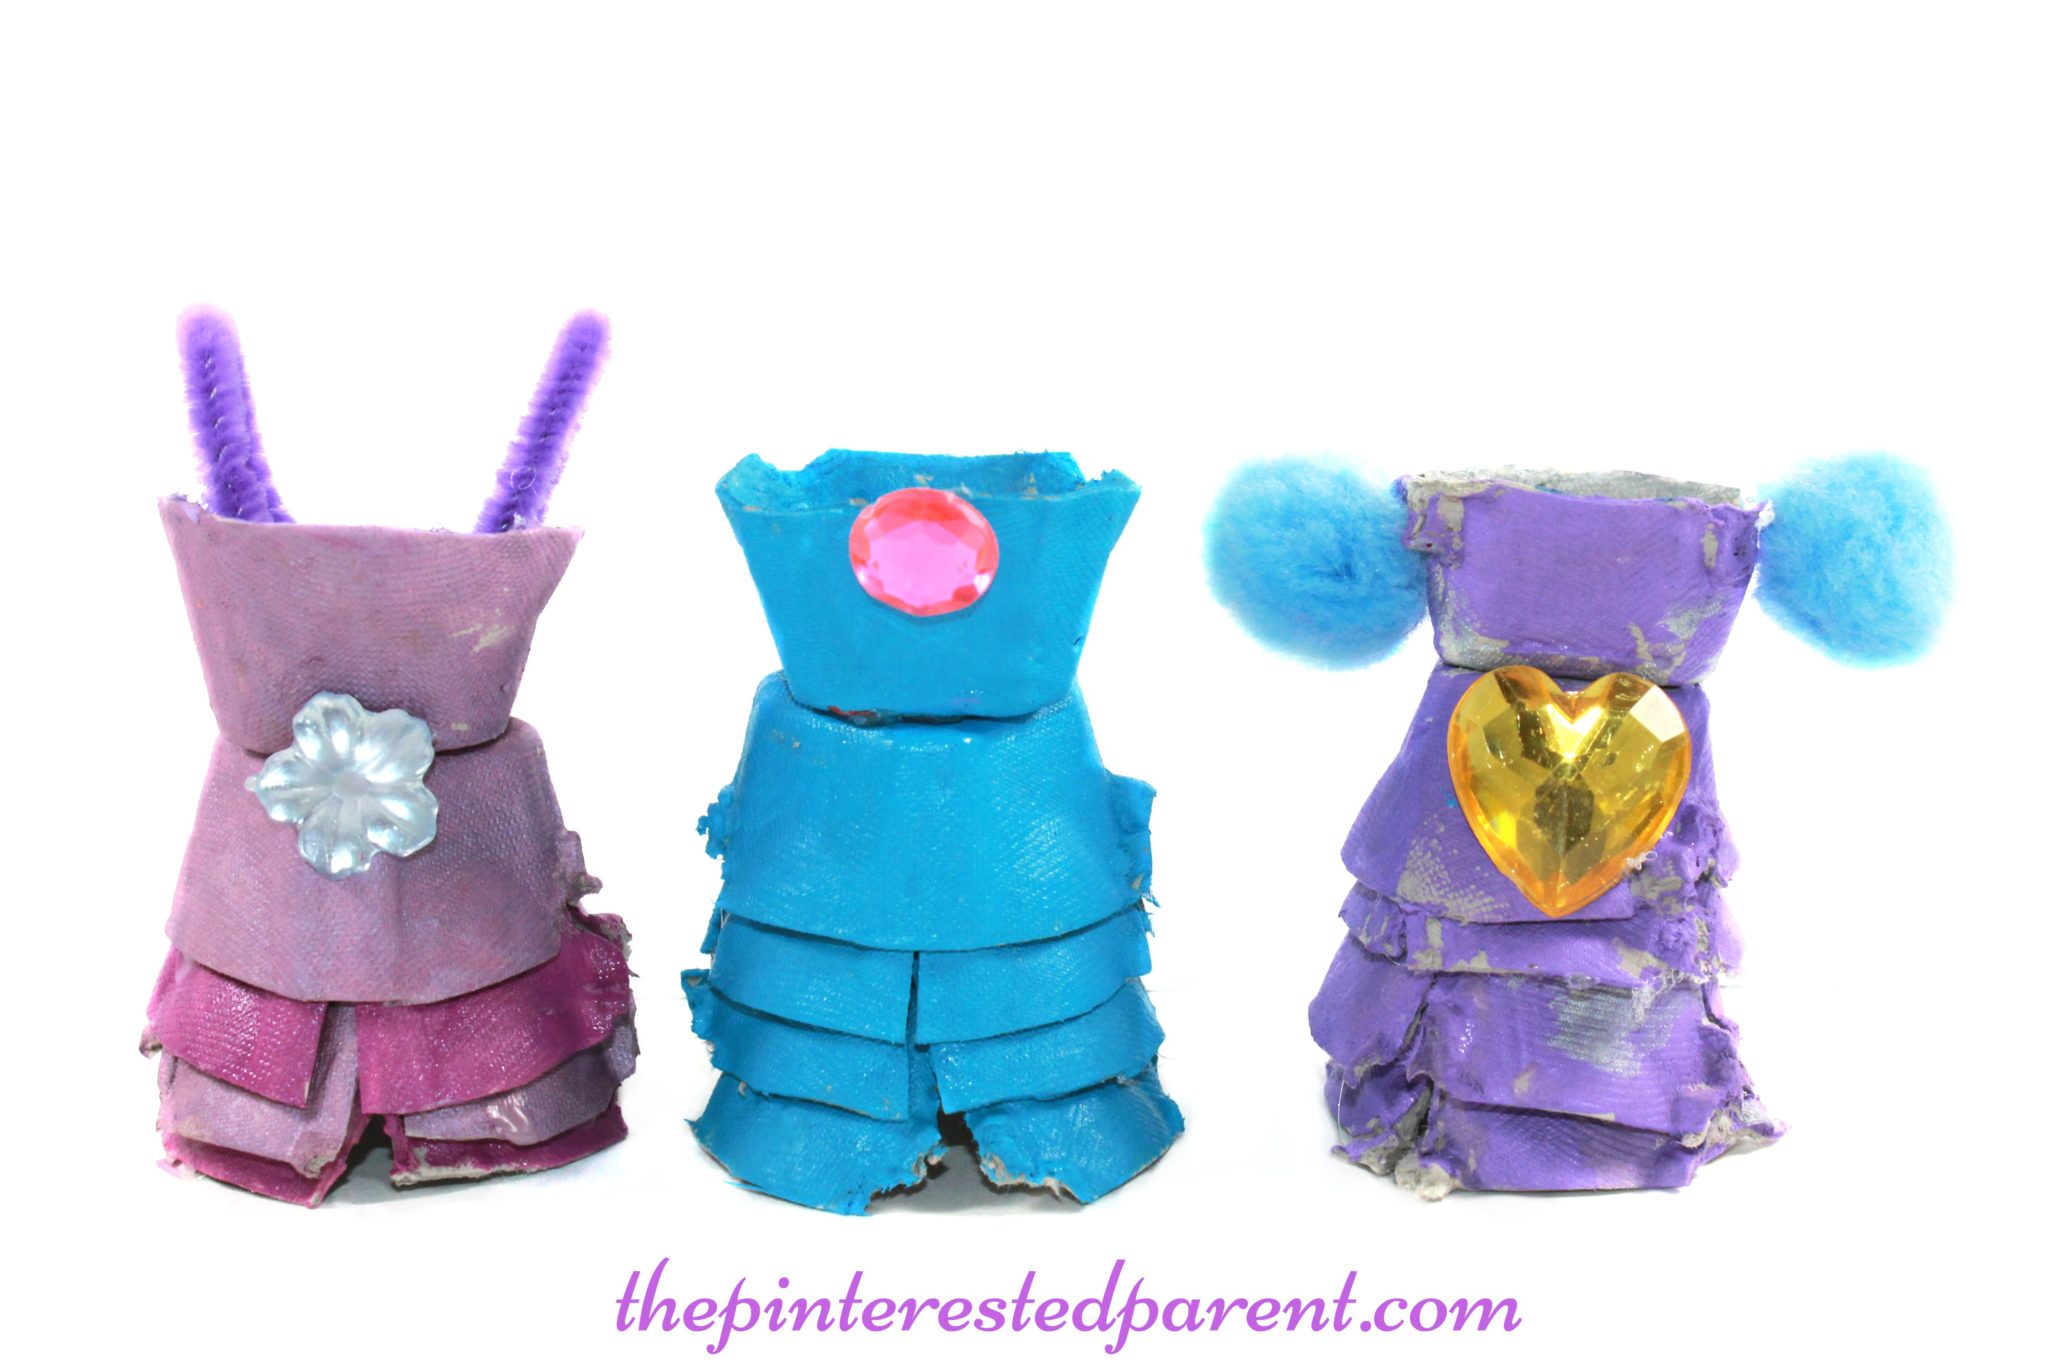
Pretty Egg Carton Dresses

            My little girl is indeed a princess at heart. She wears a tutu every day, even over her pajamas.  It is adorable.

Egg carton princess dress craft - arts and crafts for kids with recyclables.

*This post contains affiliate links for convenience.*

Last week, we were playing around with egg carton pieces & we came up with the perfect craft for our little princess.

Egg carton princess dress craft - arts and crafts for kids with recyclables

We used 5 egg carton pieces for each dress. We started by snipping 3 egg carton pieces for the dress tiers.

IMG_1568

We painted all of the egg carton pieces in the colors of our choice. My daughter wanted a silver & purple princess dress.

IMG_1571

IMG_1578

IMG_1580

We glued each of the snipped pieces one on top of each other. We glued another uncut piece over the top of the tiers. Next, we glued the last piece of egg carton to the top upside down. My daughter has a low temperature glue gun that she loves. She used her glue gun & I used my own.

*Please note that the tip on a low temperature glue gun still gets hot & burns may occur, so use caution & your best judgment as to whether your child is able to operate.*

IMG_1598

IMG_1604

My daughter glued a large gem stone to the front of the dress for a pretty little accent. She then added pom poms to the top of her dress to form puffy sleeves. I made a strapless dress & one with spaghetti straps.

IMG_1606

Egg carton princess dress craft - arts and crafts for kids with recyclables

When my little one finished with her dress, she gave it a clay head to finish it off.  We loved how our dresses came out & they were so fun to make.

IMG_1627

Egg Carton Princess Dresses. Kid's arts & crafts

Thank you as always for stopping by. Please follow us on Facebook as well.

Design Your Own Princess Dress

Design Your Own Pricess Dress Activity - With 4 free dress cut-out patterns

A couple of weeks ago, Mai & I made a footed pajama craft together.

Footed pajama craft

She had so much fun decorating her own footie pajamas & kept making me cut out more. She did not forget about the fun that she had that night. This week she asked me if we could make our own princess dresses. I made a few different princess dress designs & cut them out for her to decorate.

Click on the links below for dress cut-out templates.

Princess Dress 1

Princess Dress 2

Princess Dress 3

Princess Dress 4

I cut the dresses out on different colored construction paper & put them in a pile and let her choose which ones she wanted. We put out markers, crayons, ribbon, pom poms, yarn, buttons, cupcake liners, glitter and glue for decorating & embellishing.

IMG_2255 IMG_2256 IMG_2257 IMG_2258

We cut out print outs of my daughter’s head and glued them to pieces of construction paper & she glued the dresses on them . She wanted to draw her own head on some of them too.

IMG_2301IMG_2298 IMG_2291IMG_2294

I have to be honest, I think I had almost as much fun making these as she did. It turns out that big girls love princess dresses too.

IMG_2261

Thank you as always for stopping by. Please follow us on Facebook as well.

Design your own princess dress with markers, glitter, pom pom & ribbon. Free printable cut outs

Pipe Cleaner Tiaras

Pipe cleaner tiara for princess & pretend play

I have had a rough week. I have been sick this whole week. I left work early twice & yesterday stayed home all together. I lounged on the couch, slept a lot & binged watched Netflix, but then got very fidgety & bored. I had a big bag of shimmery white pipe cleaners that I had been wanting to make something out of, but I didn’t know what. I began playing with them & then knew what I wanted to make.

Pipe Cleaner Tiaras

So this is what happens when mommy stays home from work sick.

Grab two cleaners & twist them together. Do this again to another pair of cleaners.

IMG_1386

Take both twisted pairs & twist them together at the ends so that they formed a circle. Tuck in the sharp edges.

 IMG_1387IMG_1385

Make another twisted pair & formed it into a bow.

IMG_1388

With a single pipe cleaner, bind the bow to the circle by weaving it around the bow & the circle.

IMG_1389

Fold a pipe cleaner in half & then twist it. Roll the cleaner so that it forms a shape as shown below. Do this again with another cleaner.

IMG_1390

Use a pipe cleaner to bind each shape to the side of the bow & to the circle. Weave in and out. The better you bind it, the sturdier your crown.

IMG_1391

IMG_1392

Use another twisted pair. Fold it in half & then roll each end down & outward to form a shape like this.

IMG_1393

Bind it right above the center of the bow.

IMG_1394

Form a heart out of another twisted pair.

IMG_1395

Line up the point of the heart behind the center of the bow & bind in place with a single cleaner.

IMG_1396

Form two more curly shapes like shown & bind to each side of the heart and any other points that the shape meets. Weave in & out and always remember to tuck the sharp end in.

IMG_1390 IMG_1398 IMG_1399

IMG_1401

Add colored pom poms to your tiara with a glue gun to add color. (As always use caution when operating a hot glue gun. It is recommended for adult use only.) If you still have sharp edges from your pipe cleaners, try dabbing the edge with just a bit of hot glue to cover the end.

IMG_1419

I had so much fun with this one. I made a few more with different shapes & colors.

Pipe Cleaner Tiaras - For princess pretend play & dress up

Try your own designs. I surprised Mai when she came home from pre-school. She liked this one the best.


IMG_1531
Her animals really liked them too.

IMG_1449

Thank you as always for stopping by. Please follow us on Facebook as well.

Pipe Cleaner Tiaras

The Princess Phase Has Hit & So Have The Princess Crafts

IMG_8134

It has been building for a while. I knew it was coming. It was inevitable. After almost 3 years of living under the same roof with Elsa, Cinderella, Rapunzel & my personal favorite Merida, my daughter has become a princess. She tells me all the time. “Mama, I a princess.” Tutu skirts must be worn every day. She even puts them on over her sweats when she goes to gymnastics. She loves Elsa just like all little girls these days, but still her favorite princess is Rapunzel. Rapunzel towers are built out of Legos, blocks, Play-Doh containers & just about anything else that is stackable. I have a collection of paper towel tubes saved up for crafting. Mai will get into them sometimes. She likes to use them as robot arms. Today, she grabbed them. She stuck one in a Dixie cup & said “Look mama, I made Punzel’s tower.” That sounds like a great idea.

Princess Castle Craft

What you will need:

Paper towel rolls

Dixie bathroom cups

Tissue paper box

Paint

Pipe cleaner

Construction Paper

Optional: Glitter, gems or other embellishments

Directions:

Cut out castle tops around the top of paper towel rolls & cut out windows. Cut rolls into different lengths to add different sized towers.

IMG_8109 IMG_8110

Stick the bottom end of a Dixie cup into the bottom of the uncut end of your tube. This will give it balance. Paint your towers in whatever colors you choose. For Mai, it had to be pink. She is getting really good at painting every inch of her projects.

IMG_8113 IMG_8114

Cut out a door on your tissue box & also paint. Stick a pipe cleaner into one Dixie cup. You will use this pipe cleaner to attach a construction paper flag to later. Paint the cup.

IMG_8117 IMG_8135

Add designs in glue & then sprinkle with glitter. Add gemstones or other embellishments of your choosing. Let dry & shake off excess glitter.

IMG_8138 IMG_8137

You can make your castle as small or large as you like. Get creative & have fun.

princesscastle

Our princess has her castle, now she needs to look the part.

Paper Princess Hat

What you will need:

Poster board

Glue

A few drops of water

Tape or staples

Tissue paper

Ribbon

Optional: glitter & gems

Directions: Cut out two pieces in a fan shape.  Size will depend on the size of your child’s head & how high you want your hat. The pointed side will be the top. Overlap the two pieces facing each other until they form a cone. Leave a small opening at the top of your cone. If you have something conical, use it as a template to wrap around. Tape, glue or staple your hat into place once you have it positioned the way that you want it.

IMG_8142 IMG_8143

Rip up colored tissue paper. Mix up school glue with a few drops of water. With a paintbrush paint on glue in patches & place & overlap the tissue papers.

IMG_8145 IMG_8147

Overlap with tissue all the way around until the entire hat is covered. Let dry. Draw designs with glue & then shake on glitter. When glue dries, shake off the excess glitter.

IMG_8148 IMG_8149 IMG_8150 IMG_8151

Add ribbon pieces to the opening at the top of the hat. Glue, tape or staple your hat into place. We used a hot glue gun for our ribbon.

Princess Hat craft for kids

DIY Braided Hair Clip Holder

032

My little girl was born with very little hair. She, like her father had a receded hair line. (Sorry Honey!) There was no hair in the front, but there was quite a bit in the back. As time went on, the back of her hair continued to grow, yet the front stayed hairless. She started to take on a sort of baby mullet. I dressed her in pink as much as possible to avoid the “Isn’t he cute.” “Thank you, SHE is cute, isn’t she?”

414327_4698386790899_2108666029_o

So, when Mai was finally able to pull her hair back into pigtails, mommy was elated.

1003095_10200770292012912_1127054268_n

I bought hair clips & barrettes galore. Every time we left the house, I had to throw a pretty clip in her hair. The problem is I had no where to put all of these little hair pretties and they ended up all over the house and lost.

Braided Hair Clip Holder

What you will need:

A sturdy piece of cardboard

Elmers glue

Modge Podge

A print out of a pretty princess

Yarn

Glue gun & hot glue

Adhesive picture hanging strips

Directions:

Print out a picture of your favorite princess on your home printer.

019

Carefully adhere the picture to a piece of cardboard & cut around the cardboard to match the shape of your picture.

020

Paint the Modge Podge over the top of your picture.

021

Measure out your yarn. You want it long enough to follow the length of the hair in the picture.

023

Working in small sections, paint on the Elmer’s glue.

025

Add your strands of yarn, a strand at a time following the same pattern of the hair in your picture.

026

Continue, working strand by strand pushing the strands tightly together.

027

Fill in all areas & let your glue dry.

028

Using the yarn, form a braid to your desired length.

017

Using a glue gun. hot glue the braid around the back & sides, where ever the braid touches the cardboard.

031

Add your picture hanging adhesive strips & hang. Add your hair clips to the yarn strands in the braid.

032

Related Topics:

http://tadashop.com/2014/02/05/tress-tamer-hearts/

http://crochetingbykally.wordpress.com/2014/01/30/hair-clips/