Tag

paper mache

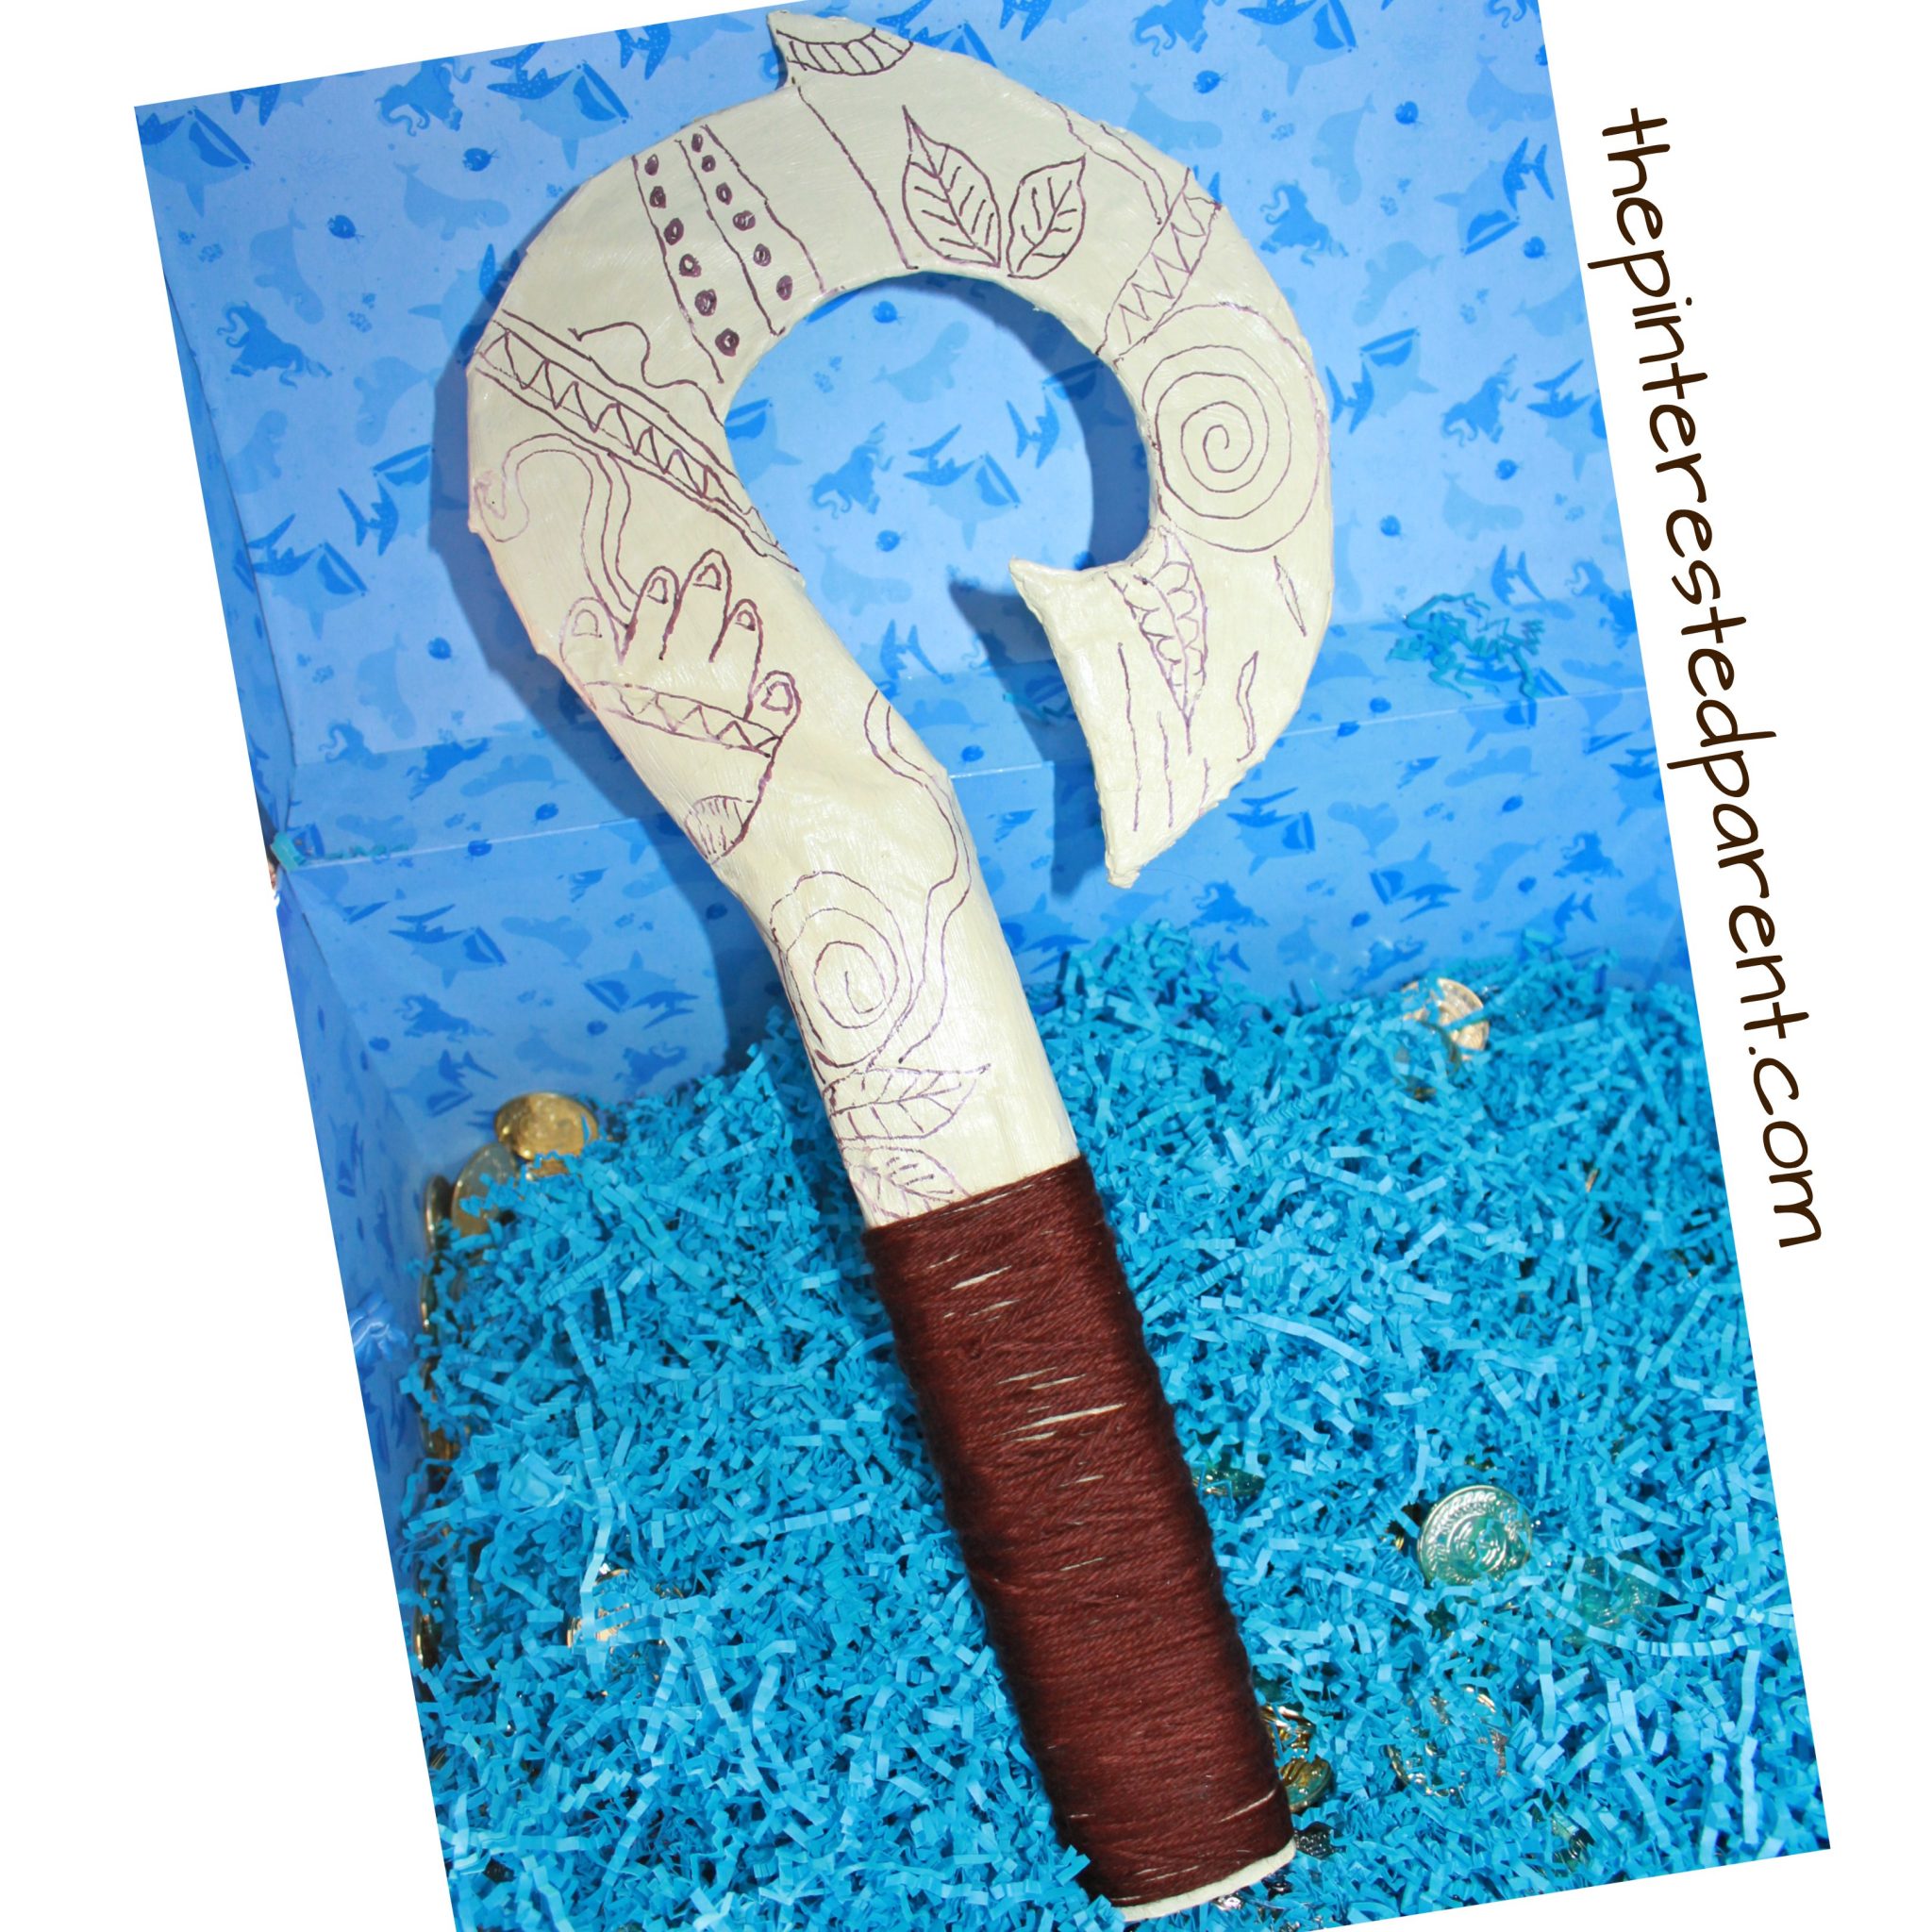
Moana Inspired Maui Fish Hook

Every Maui fan, needs a magical fish hook. Use recyclables to make this fun Moana inspired craft for pretend play.

Have your kids seen Moana yet? If they haven’t, I definitely recommend watching it. It is a great movie about a headstrong teen that is drawn to the ocean. The music in the movie is beautiful and so catchy. I find myself singing the songs all of the time. If your children have seen it, I am sure that you have heard Maui ‘s ‘You’re Welcome’ sung about a thousand times. Maui is my daughter’s favorite character from the movie. She loves him, but as Maui tells you himself, he is nothing without his fish hook. That is where all his magic is.

Moana inspired paper mache Maui fish hook. Use recyclables for a fun Disney inspired prop for pretend play. Kid's arts and crafts

Continue Reading…

Paper Mache Rocket Ship

IMG_18491Do you know the old saying about giving a child a new toy & all they want to do is play with the box? This is mostly true. My daughter usually likes what is in the box too, but she has been amused by a box for days on more than one occasion.

Last week we got her a new toddler trike. She had fun helping Mommy & Nanna put it together & she even rode it a little after it we put it together.

061

And then she spotted the box…

058

She wanted to play with the box, so I cut open the front to make her a door so she could play in it.

062


Mai climbed in & said, “Look Mama, my rocket ship.”

063

And that is how it all started.

What you will need:

A large box
A couple of cereal boxes
Tape
Newspaper
3 empty wrapping paper tubes
Paint

Paper Mache Paste:

1 part flour
2 parts water

Directions:

Cut the front fold down flap off the box to leave an opening at the top front of the box.
Cut the front fold down flap off the box to leave an opening at the upper front of the box.

066

Pull the remaining fold down flap up so the seams all touch and tape into place. This will lengthen the box on the sides & back.
Pull the remaining fold down flaps up so the seams all touch and tape into place. This will lengthen the box on the sides & back.
068
Use a cereal box & form into an upside down “V”. Tape it into place at the top of your box to form a roof.
070
Tape a wrapping paper roll to the center of each side and one in the back.
074
Wrap a full sheet of newspaper tightly across the roll. This will help round the sides.
071
Wrap both side & the back all the way up to the top.
073
Stuff crumbled paper through the top to help firm it up. Turn the box on it’s side & tape newspaper under the box & block the opening of our rounded section.
075
Wrap full pages around the whole project and tape securely in place.
IMG_1581
Tear strips of newspaper & set aside until you are ready to start forming your paper mache project.
IMG_1577
Mix your paper mache paste. I did one cup of flour & 2 cups of water at a time. Mix well.

IMG_1580

IMG_1582
Dip a strip of newspaper strip into the paste.
IMG_1583
Smooth out piece by piece across your project. Use smaller pieces to use in the edges an corners. Smooth well.
IMG_1584
A little helper makes things go quicker.
IMG_1585
To create the rounded areas along the upper sides, tape crumpled paper to the sides and paper mache over them until it protrudes to the desired amount.
Wrap paper mache strip around corners and edges. To smooth out lumpy areas use small bits of paper to fill in holes & crevices.
Wrap the paper mache strips around the corners and edges. To smooth out lumpy areas use small bits of paper to fill in holes & crevices. Be sure to paper mache along the inside as well to strenghten the bottom of the roof.
IMG_20140601_200735450
Use another cereal box to cut out side fins for your rocket. Tape them into place and paper mache around the fins, focusing on where the fin meets the rocket. Continue to add your paper strips & paste until you have reached the desired shape. More layers will offer a sturdier project. Do not forget to paper mache around the edges , the door & around the bottom. Let dry.
IMG_1847
After your paper mache has dried, paint in colors of your choosing.
IMG_1853
Let the paint dry & then it is time for blast off. “Look Mama, the moon.”


Paper Towel Roll Crafting

Papertoweltubecrafting.jpg For the past few months now I have been hoarding away empty paper towel rolls. I had built up quite the collection and the sight of the rolls piled up on top of my kitchen cabinet was starting to give me hives. It was finally time to put them to some use. Mai and I have been on a craft frenzy this week. We made a mess, had a few tantrums & a few laughs and smiles too. Each of these crafts that we made uses one of our paper towel tube.

Paper Mache Maracas

What you will need:

Plastic Easter eggs (1 for each maraca made)

An empty paper towel roll cut in half or two toilet paper rolls

Uncooked chickpeas or dried beans

Newspaper

Glue

Water

Masking tape

Paint

Directions:

Fill each Easter egg with chickpeas or beans

012

Use one or two full pages of newspaper & wrap in around the chickpea filled Easter egg. Form it into a ball shape.

023

Tape the edges in place to hold the shape tightly.

025

029

Enlist the help of your favorite little crafter to tear up strips of newspaper for you.

035

018

In a bowl, mix 3/4 glue and 1/4 water to form your paper mache adhesive.


024

Dip a strip of the paper into your glue mixture.

020

Wrap your strip of paper around your ball shape smoothing it out carefully as you work it around.

030

After you receive a desired shape, allow it to dry & then place your ball on top of the paper towel tube halve.

033

Adhere the ball to the tube using masking tape & then cover the tape with more newspaper strips.

034

Continue to wrap your project with the paper strips and glue until you reach the desired shape. Make sure that all areas are smooth and that edges are not sticking up. Let it dry.

038

Paint the handles of your maracas first in the color of your choice and allow to dry.

057

Once dry, continue to paint the rest. You may now use the handle to hold on to while you paint.

064

Papermachemaracas.jpg

Make beautiful music.

084

Mai thought these were rattles. As she was shaking them, she kept saying “Ooooooh, I’m a baby..so cute.”

086

Paper Towel Kaleidoscope

What you will need:

An empty paper towel roll

Colored beads

Thin plastic (I used old plastic packaging)

Heavy duty aluminum foil

Glue gun

Craft paper

Ribbon

Directions:

Cut out two pieces of plastic small enough to fit snuggly inside of the paper towel tube.

023

As deep in the tube as you can, use your glue gun and squeeze out a line of glue rotating until it meets the starting end.

002

Give it a few seconds to cool slightly and then press your plastic disk into the glue.

003

Pour the beads on top of the disk, leaving enough room for the beads to move around. Add hot glue to the top edge of tube over the beads and place the other disk in place.

008

Fold a piece of tin foil into a triangle. Push your triangle into the open end of the tube. Trim the end as needed. Make sure to reform the shape. It will work best if the triangle has crisp, hard edges.

018

Cut out another disk using cardboard or thick scrapbook paper. Poke a hole through the middle of it & glue it to the tin foil end.

043

I wrapped my kaleidoscope in craft paper, but you can decorate however you like, paint, crayon, beads, ribbon.

003

004


005

006

Papertoweltubekaleidoscope1

Not quite like the real thing, but it still is fun to play with.

045

Butterfly Craft

What you will need:

An empty paper towel tube

Foam sheets

Scrap book paper

Pipe cleaners

Craft pom poms

Glue gun

Elmer’s Glue

Directions:

This was a pretty simple one. You could also do this on a smaller scale with a toilet paper roll.

Cut out foam pieces in the shape of the wings.

040

Using different colored scrap strips, wrap around the tube and glue using the hot glue gun.

042

045

048

Run the glue gun along the edge of the wing where they should meet with the paper towel tube.

049

Pour some glue into a paper bowl and let your munchkin dip the pom poms in and glue to the butterfly.

051

Mai decides it is way more fun to stuff the pom poms in the tube than to decorate with them.

054

Glue one large pom pom to the top for your head & use pipe cleaners to make antennas. Let dry and your craft is done.

papertoweltubebutterfly.jpg