Tag

DIY

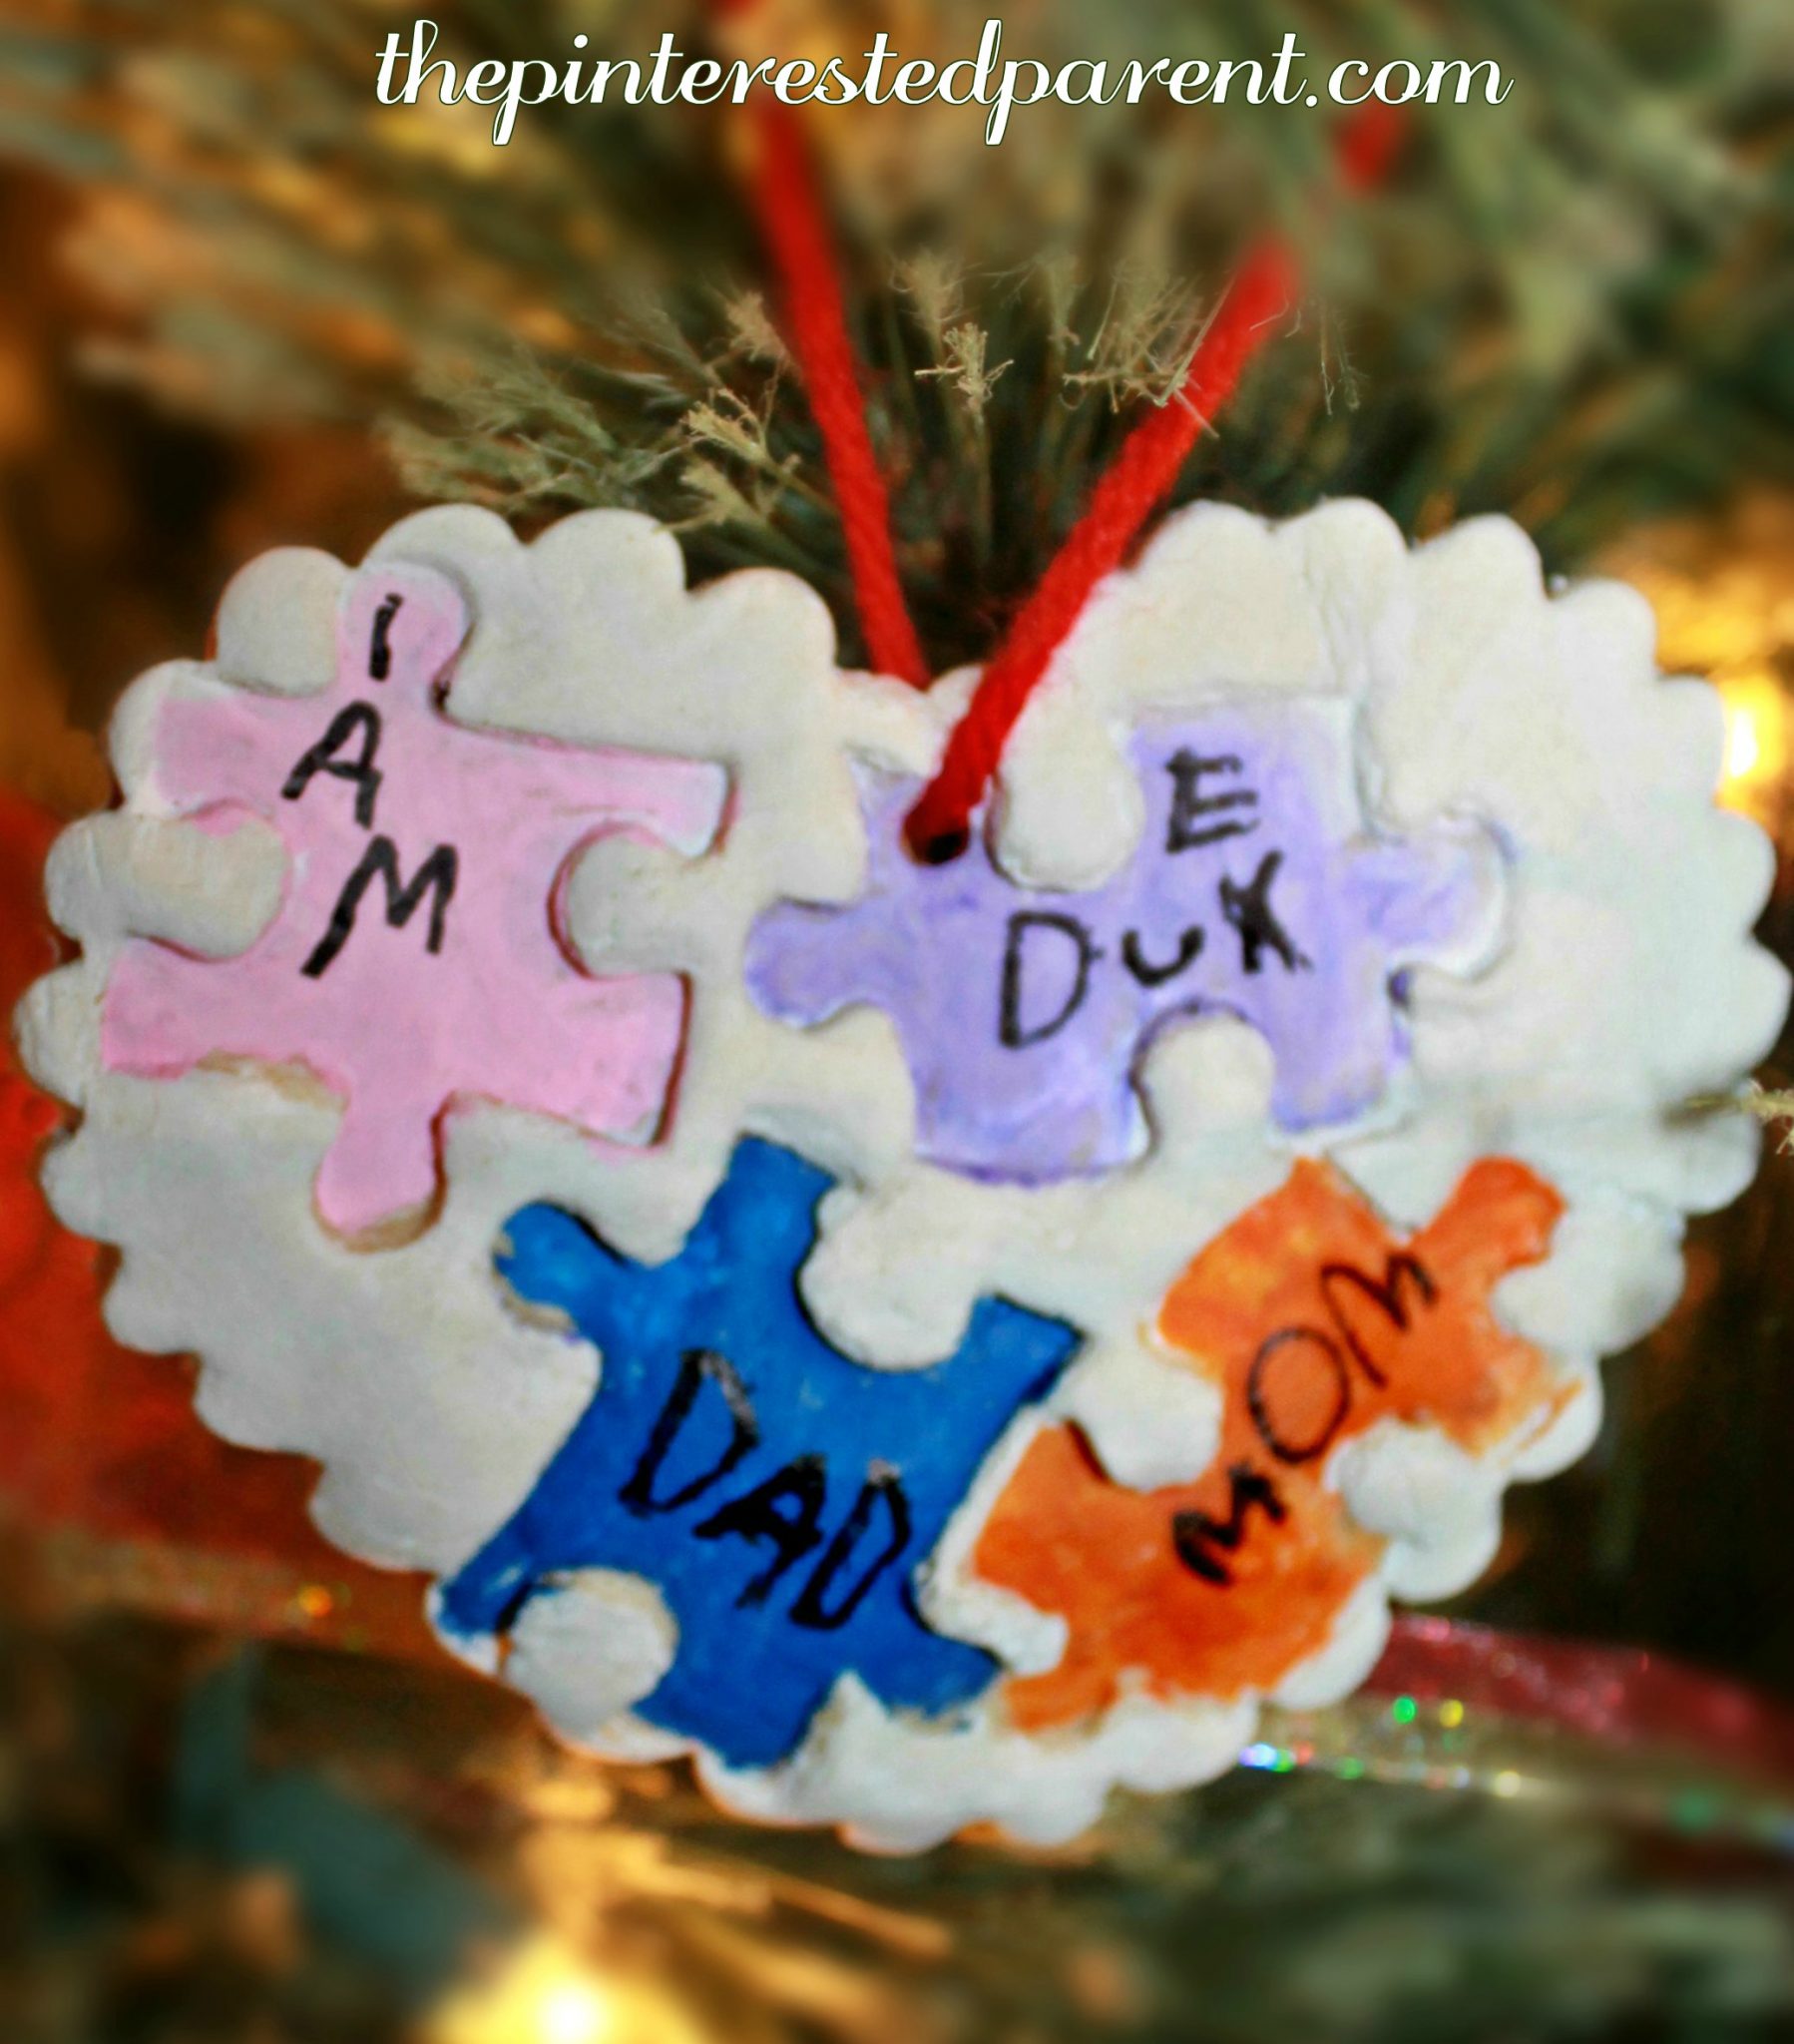
A Piece of My Heart Homemade Ornaments

Whenever I look at our Christmas tree, I have to smile. Slowly over the years, all of our beautiful glass bulbs have been being replaced one by one by homemade keepsake ornaments.  Our tree is filled with so much love and memories.

Pieces of my heart salt dough puzzle piece ornaments that kids can actually make. Christmas arts and crafts. This is a sweet handmade gift that your children can make for the family.

*This post contains affiliate links*

My daughter has been insistent that our tree doesn’t have enough ornaments this year, so we have been working on filling it up. Salt dough ornaments are our favorite. With cookie cutters and paint, there are a million possibilities. We had an idea to press puzzle pieces into our clay to make these “pieces of my heart” ornaments.

Continue Reading…

Potpourri Christmas Tree Craft

We recently inherited a large bin filled with potpourri fillers. My daughter & I were so excited at the opportunity to use them in our crafts. We started a few days ago by using them to make salt dough and nature wreaths. We also formed some lovely winter wonderlands. While making our wonderlands and playing around the potpourri, we came up with another idea for the season.

Pine Cone and potpourri Christmas tree. Simple craft project that smells lovely. This is one that you could do with the kids as well. Winter arts and crafts projects with nature

*This post contains affiliate links*

The potpourri that were used were cinnamon pine cones, cinnamon sticks, star anise,  pink roses and some other items that I am not sure of, but I am sure many potpourri fillers or herbs will work nicely.

Continue Reading…

Cork Train Craft

Simple Cork train craft - easy diy project. Cute and perfect for Christmas or for a kid's room. Easy arts and crafts projects

When you do arts and crafts as much as we do, friends and family will randomly give you materials that they think that you can craft with. I recently inherited a large jar of corks from my mother-in-law. We dug into them once already to make carolers for Christmas and then last night after watching the ‘Polar Express’, I dug into them once more to make a train.

Continue Reading…

Cute As A Button Picture Frame

Diy cute as a button picture frame arts & craft - a wonderful gift idea that adults or kids can make ..

*This post contains affiliate links*

Buttons, buttons, buttons…we love buttons. My daughter loves to string them on pipe cleaners & glue them down for crafts. I just bought my daughter her first low heat glue gun. She was so excited. She couldn’t wait to start gluing & working side by side with mommy. “Look! Me and mama are twins.”

She asked me to cut her out a heart & she grabbed our bucket of buttons. While she worked on her button craft, mommy had one of her own.

IMG_8336 IMG_8340

An old frame is perfect for this craft. Use a glue gun to glue a variety of different sized and colored buttons to the frame.

IMG_8330 IMG_8332

Cover the frame as best as you can using big buttons on the bottom & small buttons on top.

IMG_8335

Add a little message at the bottom if you choose.

Diy cute as a button picture frame arts & craft - a wonderful gift idea that adults or kids can make ..

My daughter made one of her own on her piece of cardboard. How sweet is that?

Cardboard & button easy craft frame for kids. A cute as a button gift idea for small kids to make

Thank you as always for stopping by. Please follow us on Facebook as well.

Popsicle Stick Art Journal

My little girl loves to draw, doodle & write. I have drawings and such all over the house. Very often, she will draw a series of pictures & have me staple them together to make little books & she loves to make up stories to go with all of them. I think this is amazing & just love how imaginative & creative she is.

We were playing with craft sticks the other day & came up with the perfect craft for my little artist.

Popsicle Stick Art Journal for the kids. This is an adorable craft idea made out of craft sticks.

*This post contains affiliate links for convenience.*

What you will need:

Jumbo Craft Sticks

Hot Glue Gun

White Copy Paper

Cardboard

Decorative Masking Tape

Buttons

Yarn

Directions:

Line up 7 craft sticks in a row & glue 2 sticks perpendicular as shown & then duplicate this process.

IMG_7780

Glue a stick to one end of each of the above. Use the masking tape to connect the two sticks as shown. You should be able to fold the two pieces together like a book.

IMG_7788  IMG_7791

Fold the two pieces with the taped portion inward. Add more tape to the opposite end of those same two sticks. Make sure that you are still able to fold the two pieces together like a book. Trim plain white copier paper so that it will fold & fit nicely inside of the Popsicle stick book. Add a bead of glue into the seam of each piece of paper & bind the pages at the crease.

 IMG_7792 IMG_7793

Cut a chunk of rigid cardboard & glue the pieces around the Popsicle sticks on the bottom side of the book. This will make it a easier surface to draw on. Glue the last page of the pages to the cardboard.

IMG_7795 IMG_7796

Fold the journal closed & glue a piece of yarn with a button over it to both the top & bottom of the journal. Glue the last page of the pages to the cardboard on the back.

 IMG_7797

IMG_7803

Close & tie the strings together to close your journal.

My little Picasso loves her new art journal. I hope you do too.

Popsicle Stick Art Journal for the kids. This is an adorable craft idea made out of craft sticks.

Popsicle Stick Art Journal for the kids. This is an adorable craft idea made out of craft sticks.

Thank you as always for stopping by. Please follow us on Facebook as well.

Popsicle Stick Art Journal for the kids. This is an adorable craft idea made out of craft sticks.

Salt Dough Mosaic Frames

Diy salt play dough mosaic frames - a great gift idea for the kids to make- clay crafts

We love clay & play dough projects in our house. My daughter just can’t get enough of it. We make new dough every week, sometimes even a couple of times a week. We are just about settled into our new home, but are still missing pictures on our walls. I thought it would be fun for us to make some homemade frames together.

We started with a simple clay recipe.

2 1/2 cup of flour

1 1/4 cup of water

1 cup of salt

1 Tbsp of oil

1 Tbsp of cornstarch

Mix all the ingredients together & then knead with your hands. My daughter always loves this part. You may need to add less or more water.

IMG_6215Diy salt play dough mosaic frames - a great gift idea for the kids to make- clay craftsIMG_6221

Roll out your clay.

IMG_6219

Cut a few long strips out of your dough & then cut into small squares.

IMG_6221IMG_6222

Cut out a shape for your frame & then cut out the inside window. Use a photo as a template to know how big to cut your window.

IMG_6224IMG_6223

Lightly wet the top of your frame. Press the squares on top until the frame is covered. Press the squares in enough so that they stick. For my frame, I etched designs in with a toothpick. Since Mother’s Day is nearing, I thought that a Mother’s Day themed frame would be a good choice. Mai chose to draw in her designs after.

IMG_6309IMG_6311

Preheat your oven to 250 degrees. Bake for 1 hour & then flip your frame & bake for another hour. Depending on the thickness of your frame, you might need more or less bake time. When hardened, remove from the oven & let cool.

Paint your squares with acrylics or glaze.

IMG_6322

After the paint dried, Mai used a marker to draw in her designs. She wanted to write letters & numbers on hers.

IMG_6326

Glue yarn or a ribbon to the back to hang & glue a picture to the back. (We used crazy glue. Let adults apply crazy glue.)

IMG_6314

Diy salt play dough mosaic frames - a great gift idea for the kids to make- clay crafts.

My daughter was so proud of her finished project. She asked that both be hung in her room.


Diy salt play dough mosaic frames - a great gift idea for the kids to make- clay crafts

Thank you as always for stopping by. Please follow us on Facebook as well.

DIY Cardboard Cash Register

Cardboard Cash Register for pretend play

We moved into a new house recently. We have been working on unpacking and setting up our home over the last couple of weeks.  It is hard to believe that we have so much stuff. The boxes seem endless. Mai has been enjoying playing inside of the empty boxes and we have been having fun repurposing our boxes into new fun creations.

My daughter loves to play store. She pretends that she is running her own Stop & Shop all the time. She often uses her calculator as a cash register, but I thought we could make her another one using one of our old boxes.

We used a medium-sized box.

Open both ends of the box.

IMG_3194

Cut the seams on one of the boxes sides. This will be the front of your register.

IMG_3195

Cut an arc shape on one side of the box  & then use the leftover cardboard as a template to cut the other side. This should remove the left & right top flaps of the box as well.

IMG_3196

Cut a slot out of the front of the register to add a drawer. Glue the bottom of the box back together. Bring the front part of the box up and curve it to the arc. Glue it into place.

IMG_3197

Trim the sides & fold the top front flap in half & then fold it down so that it is flat across the top. Fold the back flap in half & fold over so that the first fold is flat & that the second fold aligns with the top of the register.

(Note: I forgot to take a picture of this until after painting)

IMG_3222

Use the leftover piece cut from the arc to form a drawer by creasing the edges about an inch in on all four sides. Fold up the creases and glue the seams into place.

IMG_3199

Use the other leftover piece of cardboard to cut a rectangular piece that will fit on the register as its face. Paint your register & rectangular piece in the colors of your choice & let dry.

IMG_3202

Cut the keys & a register screen out of construction paper & write in the numbers with magic marker. Glue all the pieces into place.

DIY Cardboard Cash Register for pretend play - made with 1 box

This took very little time to make & put a big smile on my daughter’s face. Mai’s bakery is now open for business.

This was a spur of the moment project, so I apologize for the lack of photos. Please let me know if you need further instruction.

Thank you as always for stopping by. Please follow us on Facebook as well.

More Homemade Christmas Ornaments

Hello Kitty Ornament for Christmas

*This post contains affiliate links*

This year because of our living circumstances we will only be putting up a Charlie Brown Christmas tree. As all of our ornaments & decorations are buried in storage until after Christmas, my husband suggested that we hand make all of the ornaments for this tree. Challenge accepted. We already have made a few here & there throughout the season.

Last night we made a couple more for our tree. My daughter loves Hello Kitty & since she is such an easy figure to make, that was our first project of the night.

What you will need:

A medium-sized plastic Christmas ball

Cotton balls

White, yellow & black foam sheets

Red felt

Black pipe cleaners

Hot glue & school glue (Always operate caution when using. Not recommended for small children to use)

Directions

Stuff the inside of the ornament with cotton balls until jam-packed. My daughter loved this. This is a great fine motor skill activity too.

IMG_2420 IMG_2423

Cut two triangles for ears out of the white foam. Put glue on the front & back and cover in a light layer of cotton.

IMG_2425IMG_2426

Use the hot glue to glue ears into place. For best results apply glue to the ear not the ball.

IMG_2429

Cut 2 black ovals out of the foam & one yellow one. Cut a pipe cleaner into six equal pieces & cut a bow out of the red felt. Use a Sharpie to draw in detail on the bow.

IMG_2427IMG_2428

Glue all pieces into place using the hot glue. Buy hooks for your ornament or use a pipe cleaner or string to hang.

Hello Kitty Christmas Ornament

We made one more ornament.

Mai loves to draw & I adore her drawings. I wanted a hand drawn ornament for our tree.

For this ornament, I drew & cut out 2 identical ornament shapes out of an old cardboard food box.

IMG_2447

I glued them together with a loop of yarn in between.

IMG_2448

I painted the top portion silver & let it dry.

IMG_2449

I glued the ornament down onto a piece of red construction paper & then cut the excess off to form a circle. I did this for both sides.

IMG_2451

I cut two smaller white circles & gave them to Mai. I asked her to draw on both pieces.

IMG_2455 IMG_2454

While she drew, I added a bead of glue around the edge of the ball & sprinkled glitter on it. It gives it a lovely sparkly outline & covers up the seam where the cardboard & the paper meet.

IMG_2456

When she was done drawing, I glued her drawings on both ends. This picture is of the whole family looking out the window. I will treasure this one forever.

Kid Drawn Ornament for Christmas

Thank you as always for stopping by. Please follow us on Facebook as well.

Soda Can Magnets

Soda Can Magnets


We recently went on vacation. While on vacation we took a few days to visit with my husband’s uncle. During our stay at his uncle’s house, Mai was offered some magnets to play with. In the pile of magnets, I saw a magnet made out of a Coke can & thought it was extraordinary. I studied the magnet & it looked like an easy enough design. When we returned home, I went on the hunt for soda cans to see if I could make my own.

I managed to collect Coke, Diet Coke & Sprite cans thanks to my friends at work.

Here is all that you need to do. Rinse out the inside of your cans. Cut into your can and cut out the inside portion removing the top and bottom of the can.

IMG_2161

Wipe off any water or residue and lay your can cutouts out flat.

IMG_2162

Draw out the shape or design of your magnet on the inside of the can.

IMG_2164

Use the edge of a pointy object to stamp in details for your magnet. We used a skinny Phillips head screwdriver.

IMG_2166

Glue your can print side up onto a piece of foam sheet.

IMG_2168

Cut around your design again.

IMG_2169

Glue pieces of magnet to the back of your foam.IMG_2171

Thank you as always for stopping by. Please follow us on Facebook as well.

Soda Can Magnets