Tag

DIY

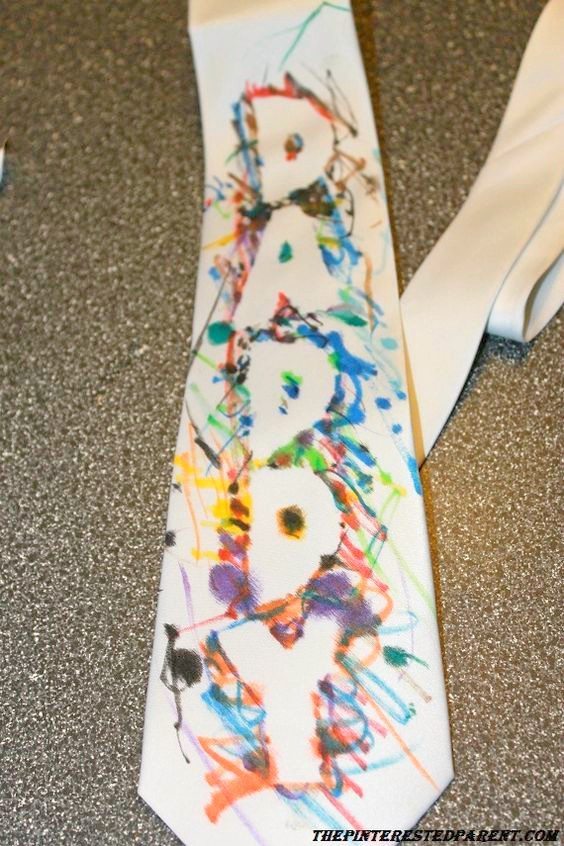
Father’s Day Tie For Daddy

Kid made gift for dad for Father's Day. Tape resist tie that the kids colored.

*This post contains affiliate links for convenience.*

My daughter is very much her father’s little girl. Not only does she adore him, she looks like him & she acts like him too. There are traces of me in there too, but for the most part she is daddy’s girl. From those beautiful blue eyes & dimples to the way she has to arrange her Fruit Loops by color she is her father through & through.
Yesterday was Father’s Day & Mai had made a special gift for her #1 guy.

This was a cute & easy project for my little one. All you need is a inexpensive white tie, fabric markers, duct tape or masking tape & a pair of scissors.

IMG_1987

With a marker draw out your letters one at a time on a piece of the masking or duct tape.

With a marker draw out your letters one at a time on a piece of the masking or duct tape.

Place the letters on the tie. Make sure they are flat & pressed firmly.

IMG_1989

Using fabric markers, let your little Picasso go to work coloring the tie.

Using fabric markers, let your little Picasso go to work coloring the tie.

IMG_1992

IMG_1995

Watch her demonstrate why she is just like her father by lining up all the marker caps in a row.

IMG_2002

IMG_2007

IMG_2003

Remove the letters slowly. If as you are removing them you see that the letter isn’t properly formed, replace it & give it a little bit of an outline.

Remove the letters slowly. If as your are removing them you see that the letter isn't properly form, replace it & give it a little bit of any outline.

IMG_2012

After it is complete, put in the dryer on high heat for about 5 minutes for the marker to set.

Kid made gift for dad for Father's Day. Tape resist tie that the kids colored.

Give Daddy your present & a kiss.

Give Daddy your present & a kiss.

Mai was very proud of her homemade gift & daddy loved it. I hope all the Father’s out there had a wonderful Father’s Day.

Thank you as always for stopping by. Please follow us on Facebook as well.

Paper Towel Roll Crafting

Papertoweltubecrafting.jpg For the past few months now I have been hoarding away empty paper towel rolls. I had built up quite the collection and the sight of the rolls piled up on top of my kitchen cabinet was starting to give me hives. It was finally time to put them to some use. Mai and I have been on a craft frenzy this week. We made a mess, had a few tantrums & a few laughs and smiles too. Each of these crafts that we made uses one of our paper towel tube.

Paper Mache Maracas

What you will need:

Plastic Easter eggs (1 for each maraca made)

An empty paper towel roll cut in half or two toilet paper rolls

Uncooked chickpeas or dried beans

Newspaper

Glue

Water

Masking tape

Paint

Directions:

Fill each Easter egg with chickpeas or beans

012

Use one or two full pages of newspaper & wrap in around the chickpea filled Easter egg. Form it into a ball shape.

023

Tape the edges in place to hold the shape tightly.

025

029

Enlist the help of your favorite little crafter to tear up strips of newspaper for you.

035

018

In a bowl, mix 3/4 glue and 1/4 water to form your paper mache adhesive.


024

Dip a strip of the paper into your glue mixture.

020

Wrap your strip of paper around your ball shape smoothing it out carefully as you work it around.

030

After you receive a desired shape, allow it to dry & then place your ball on top of the paper towel tube halve.

033

Adhere the ball to the tube using masking tape & then cover the tape with more newspaper strips.

034

Continue to wrap your project with the paper strips and glue until you reach the desired shape. Make sure that all areas are smooth and that edges are not sticking up. Let it dry.

038

Paint the handles of your maracas first in the color of your choice and allow to dry.

057

Once dry, continue to paint the rest. You may now use the handle to hold on to while you paint.

064

Papermachemaracas.jpg

Make beautiful music.

084

Mai thought these were rattles. As she was shaking them, she kept saying “Ooooooh, I’m a baby..so cute.”

086

Paper Towel Kaleidoscope

What you will need:

An empty paper towel roll

Colored beads

Thin plastic (I used old plastic packaging)

Heavy duty aluminum foil

Glue gun

Craft paper

Ribbon

Directions:

Cut out two pieces of plastic small enough to fit snuggly inside of the paper towel tube.

023

As deep in the tube as you can, use your glue gun and squeeze out a line of glue rotating until it meets the starting end.

002

Give it a few seconds to cool slightly and then press your plastic disk into the glue.

003

Pour the beads on top of the disk, leaving enough room for the beads to move around. Add hot glue to the top edge of tube over the beads and place the other disk in place.

008

Fold a piece of tin foil into a triangle. Push your triangle into the open end of the tube. Trim the end as needed. Make sure to reform the shape. It will work best if the triangle has crisp, hard edges.

018

Cut out another disk using cardboard or thick scrapbook paper. Poke a hole through the middle of it & glue it to the tin foil end.

043

I wrapped my kaleidoscope in craft paper, but you can decorate however you like, paint, crayon, beads, ribbon.

003

004


005

006

Papertoweltubekaleidoscope1

Not quite like the real thing, but it still is fun to play with.

045

Butterfly Craft

What you will need:

An empty paper towel tube

Foam sheets

Scrap book paper

Pipe cleaners

Craft pom poms

Glue gun

Elmer’s Glue

Directions:

This was a pretty simple one. You could also do this on a smaller scale with a toilet paper roll.

Cut out foam pieces in the shape of the wings.

040

Using different colored scrap strips, wrap around the tube and glue using the hot glue gun.

042

045

048

Run the glue gun along the edge of the wing where they should meet with the paper towel tube.

049

Pour some glue into a paper bowl and let your munchkin dip the pom poms in and glue to the butterfly.

051

Mai decides it is way more fun to stuff the pom poms in the tube than to decorate with them.

054

Glue one large pom pom to the top for your head & use pipe cleaners to make antennas. Let dry and your craft is done.

papertoweltubebutterfly.jpg

Yarn Embellished Initial Wall Hanging

yarninitial.jpgMy daughter as many of you may well know, is named after my mother. Mai is a less than common name, which is one of the things I love about it. She will always be unique. We have a lot of personalized & monagrammed things for her. I cannot see the letter M without thinking of my little munchkin. So when I was shopping at Michael’s and saw a giant wooden M for sale, I had to scoop it up. Her room is purple with golden & neutral tones, so I chose colors to compliment her room. What you will need: A wooden letter Different colored yarns Elmers glue Scissors Glue gun

Purchase a cheap wooden letter from a craft store or make one yourself.

023

Form a circle using the glue. Starting from the center begin circling the yarn around itself.

Form a circle using the glue. Starting from the center begin circling the yarn around itself.

Continue to circle around until you cover the glue circle.

Continue to circle around until you cover the glue circle.

Snip the end of your yarn off and form into the circle.

031

Working off the edge of the first circle add another glue circle and repeat the circling method.

032

For circles that are not full because off cut out edges, form half circles around each side cutting off the ends at the edge.

033

Continue this pattern, making circles as big or as small as you desire.

036

To fill in uncovered spaces around the circles, fill in with a different colored yarn following the same lines as your circles.

006

001

Line the edges of your letter with the accent yarn to smooth out your edges & add a more finished look.

004

Braid the different colored yarns together & knot each end.

015

With a glue gun add hot glue on the back of your initial where you would like your hanger.

017

Press your braided yarn into the glue & repeat on the other side.

018

Find a place to hang your craft.

yarninitial.jpg


Valentine’s Day String Art

IMG_20140208_0133301

String art has had me curious for a while now, but I was not brave enough to tackle it. It seemed so time consuming & difficult that I did not have the motivation to try it… until now. This was my first attempt, so I had a few crafting bumps & bruises along the way but all & all I was happy with the finished product. Here is what you need..

Supplies:

A square of solid cork board (You can substitute wood as well)

A box of small nails

Hammer

Embroidery threads of varying color. I used shades of purple with green as an accent

Lightweight paper

A pen, pencil or a marker

Tape

Glue


Draw the design of your craft project out on paper.

029

Tape it to your cork board or wood.

030

Using a hammer lightly tap your nails into the pattern. Only tap about halfway in, leaving room on the nail to wrap your string. Remove your paper template carefully by tearing it out from under the nails.

034

To start, tie a piece of the embroidery thread to the nail that you intend to start with. Use a dab of glue to secure in place & let dry.

040

Wrap your thread around the nails, weaving it back & forth between nails. You can weave it however you choose as long as you make sure to follow the design of your pattern. Keep an extra sketch of your drawing handy for reference. It is easy to lose your pattern in the nails after a while.

037

Continue to weave your thread around the nails following your pattern until complete. Tie off your thread at the end & use a dab of glue to secure. Be sure to tie off your thread in between colors too.

041

Hang up your finished product.

IMG_20140208_013330

This was a fun project. I think I might have the string art bug. I can’t wait to design my next project. It takes a little getting used to. I lost myself a little in my lettering but once I referenced my drawing I was able to decipher my pattern again. This is a very forgiving project. There is plenty of room for error & to go back.

Related topics:

http://smallestforest.net/2014/01/29/httpwp-mepeep9-1g9/

http://daisyanddaydreams.com/2014/01/30/valentines-day-decor/

Build A Felt Snowman

Buildafeltsnowman.jpgI’m a New Englander. Tonight, marks the first snowfall of the season for us. There is a love /hate relationship between snow with most New Englanders. Every year, I get excited when that first snowflake drops. It just does not feel like the holidays with out it. That first snowfall is so beautiful. It is perfect and untouched. It makes the ground & the trees glisten and it just invites you to come out & play in it. Then the problem is you do, then realize that it is also cold & wet and that you would rather be inside by the fireplace sipping your cocoa.

Last year was my daughter’s first winter. We couldn’t wait to take her outside & pull her around the yard in her sled, but once we got out there, I immediately began to worry about the cold. We pulled Mai around the yard a couple of times, took this happy family picture & then went back in the house where it was warm.

546398_4602443872386_1680925696_n

 I said to myself, “Next year will be better.” ” She will be older. We can build a snowman.”

Well the year flew by & here we are already into another winter. As the snow is touching down on the ground, I am already daydreaming about taking our daughter out in the snow again.

I know myself though & the paranoid mommy in me will probably do the same again this year. It made me think, I wish I could bring some of the fun of the snow into the warmth of our home.

I have seen a number of felt projects in my travels though Pinterest & other bloggers. I have seen the felt Christmas trees, advent calendars & a clever felt gingerbread house. Why couldn’t I make a felt snowman?

Let me just warn you ahead of time. I am not a seamstress. Sometimes I see some of the other posts on here, of recipes, family anecdotes, photos & crafts and it makes me feel a little inadequate. I am not a chef, I am not a writer, a photographer or a very good sewer.

I am a mommy, with big ideas, a tight wallet & all the best intentions, so occasionally my projects come out less than perfect. This would be one of those times.

FELT SNOWMAN

White Felt – I used about 2 yards

Black & orange felt (or colors of your own choosing)

Needle & thread

Sewing machine (optional, you may sew by hand if you do not own one)

Glue gun

Fiber fill (I used 2 30 oz bags)

Cardboard

Bean bags (I filled Ziplocks with rice)

FELT SNOWMAN

Decide how big of a snowman that you want. Draw out your circle on the felt.

0021
0031

Cut 2 of the same sized circles.

0181

Sew the two circles together by sewing around the edges. Do not sew all the way around. Leave a large opening unsewn.

0071

Stuff fiber fill in the open end.

0101

Here was mess up #1. I originally made the snowman just with the fiber fill stuffing thinking that this was going to be stable enough to stay upright. I was wrong. I reopened the bottom of the snowman & filled the bottom with homemade bean bags of Ziplock bags & rice.

0681

a piece of cardboard to fit the shape of the bottom of your snowman.

Cut a piece of cardboard to fit the shape of the bottom of your snowman.

Place inside the bottom of the snowman with the bean bags on top.

Place inside the bottom of the snowman with the bean bags on top.

Sew the bottom shut & then go and get a manicure because your nails look horrible.

Sew the bottom shut.

0172Repeat all steps except for filling with bean bags & cardboard to form a second ball.

Repeat all steps except for filling with beanbags & cardboard to form a second ball.

 0301Cut out circles using the black felt.

0211

Cut on thin white strips to glue into the black felt to make it look like a button.

0241

0271Cut out a carrot from the orange felt & make any other pieces that you would like for your snowman. Gather a hat & scarf.

0691

0771

If you are actually a seamstress, I am sure that you could bring a more polished look to this idea. The snowman is lumpy & I made a lot of sewing mistakes but my little girl loved her snowman. She was placing the button & coal pieces all over the place & thought that the scarf was his dress. She hugged him & tried to feed him some of her milk. Sometimes, imperfection can be beautiful…

0351 0381 0501 0491

                                                       Up next…Inside My Child’s Wild Imagination

Related topics:

http://perfectlyimperfectlovee.wordpress.com/2013/12/07/day-6-25-crafts-to-christmas/

http://kleckmusic.wordpress.com/2013/12/07/cotton-candycanes/

http://www.bloglovin.com/framehttp://handmadebysoo.wordpress.com/2013/12/08/traditional-christmas-tree-fairy-lights-hand-knitted/

?post=2021315991&group=0&frame_type=a&blog=10581179&link=aHR0cDovL3d3dy50aGlzb2xlbW9tLmNvbS8yMDEzLzEyL3RvaWxldC1wYXBlci1zbm93bWFuLmh0bWw&frame=1&click=0&user=0

http://alaskaknitnat.wordpress.com/2013/12/13/quick-craft-felt-christmas-tree/

Mommy’s night out

girlsnight.jpg

As much as I love being a mother, it can be exhausting & sometimes overwhelming. It is not very often that I get a night to myself to unwind, so when my husband offered to watch our daughter for the night, so that I could get a night out with the girls, I jumped at the chance.
It had been a while since I have been away from my family other than going to work. I was looking forward to it all week. Then when the day finally arrived, I found myself feeling guilty for going out. As my work day was ending, I was second guessing my decision to go out with my friends.
I haven’t seen my daughter all day

I have to wake up with her in the morning

What if daddy feeds her Doritos for supper?

These are the things that went through my head. As much as I always complain that I need a break, the truth is the second I leave my family, I miss them. Despite all these excuses, I pulled myself together and went out with a couple of other mommies, for a girl’s night out.

My girlfriend Maura has a knack for finding fun and original things to do. She found a spot called ‘Brush it off’. It is a group painting session, where they serve beer & wine. I might never leave.

They give you a subject to paint & take you through a step by step process to achieve a great piece of DIY artwork. Our subject was the Ferber daisy.

When you arrive, they have you put on your apron & gather your paint & brushes.

0021

Don’t forget to grab your drink. I made mine a Shipyard Pumpkin Ale.

0041

They took us step by step through each part of the flower. The instructions were detailed but simple.

0061

0071

0081

0091

0111

After two hours of painting, a few drinks & some laughs. My masterpiece was done.

0161

0191

0131

It was a fun night with good friends . All of us, off duty mommies had a great time & don’t all of us moms deserve that once in a while.

Thank you as always for stopping by. Please follow us on Facebook as well.

PUPPET THEATER part 1 DIY felt puppets

0241

It can sometimes be exhausting finding activities to fill your toddler’s day, especially when they are as curious as my busy baby. We try to fill her days with fun activities and books but sometimes (and don’t think me a bad mom) it is a nice break to sit her down in front of Disney Junior or a Baby Einstein video, so I can fix dinner or just grab a moment for ourselves.

Lately she has been requesting to watch television far more than I want to accommodate. Mommy created a bad habit. This worries me. She has a particular fondness to ‘Little Einstein’s’. “Stein, Stein” she asks, when she wants to watch them. She loves these characters. I came across a few different ideas for puppets the other day & it made me think, maybe I could give her those characters she loves without having to turn on the dreaded t.v.

Tonight’s inspiration… ‘Little Einsteins’s’ felt puppets.

If you have been following us, you know that I love working with felt. It is easy & fun to work with & fairly inexpensive.

                                                                                  What you will need

Felt

Glue Gun

Markers

Scissors

Needle & thread

Decide how large you would like your puppets. Trace out the shape of your characters. I used a white marker, so lines would be less visible if missed after cutting. Cut out the body of your puppet (front & back).

005

Use scissor to cut out facial details such as eyes and mouth & hair if needed.

007

Use your glue gun to secure details to the body of the puppet.

009

011

Use markers to draw in fine details such as eyelashes or eyebrows.

014

Sew around the outside of the body to secure the front & back of the puppet together.015

016

Repeat this process for all characters.

017 020 033

Here is our finished ‘Little Einstein’ collection…

0322

Up next…Puppet Theater part 2 the stage