Tag

cooking

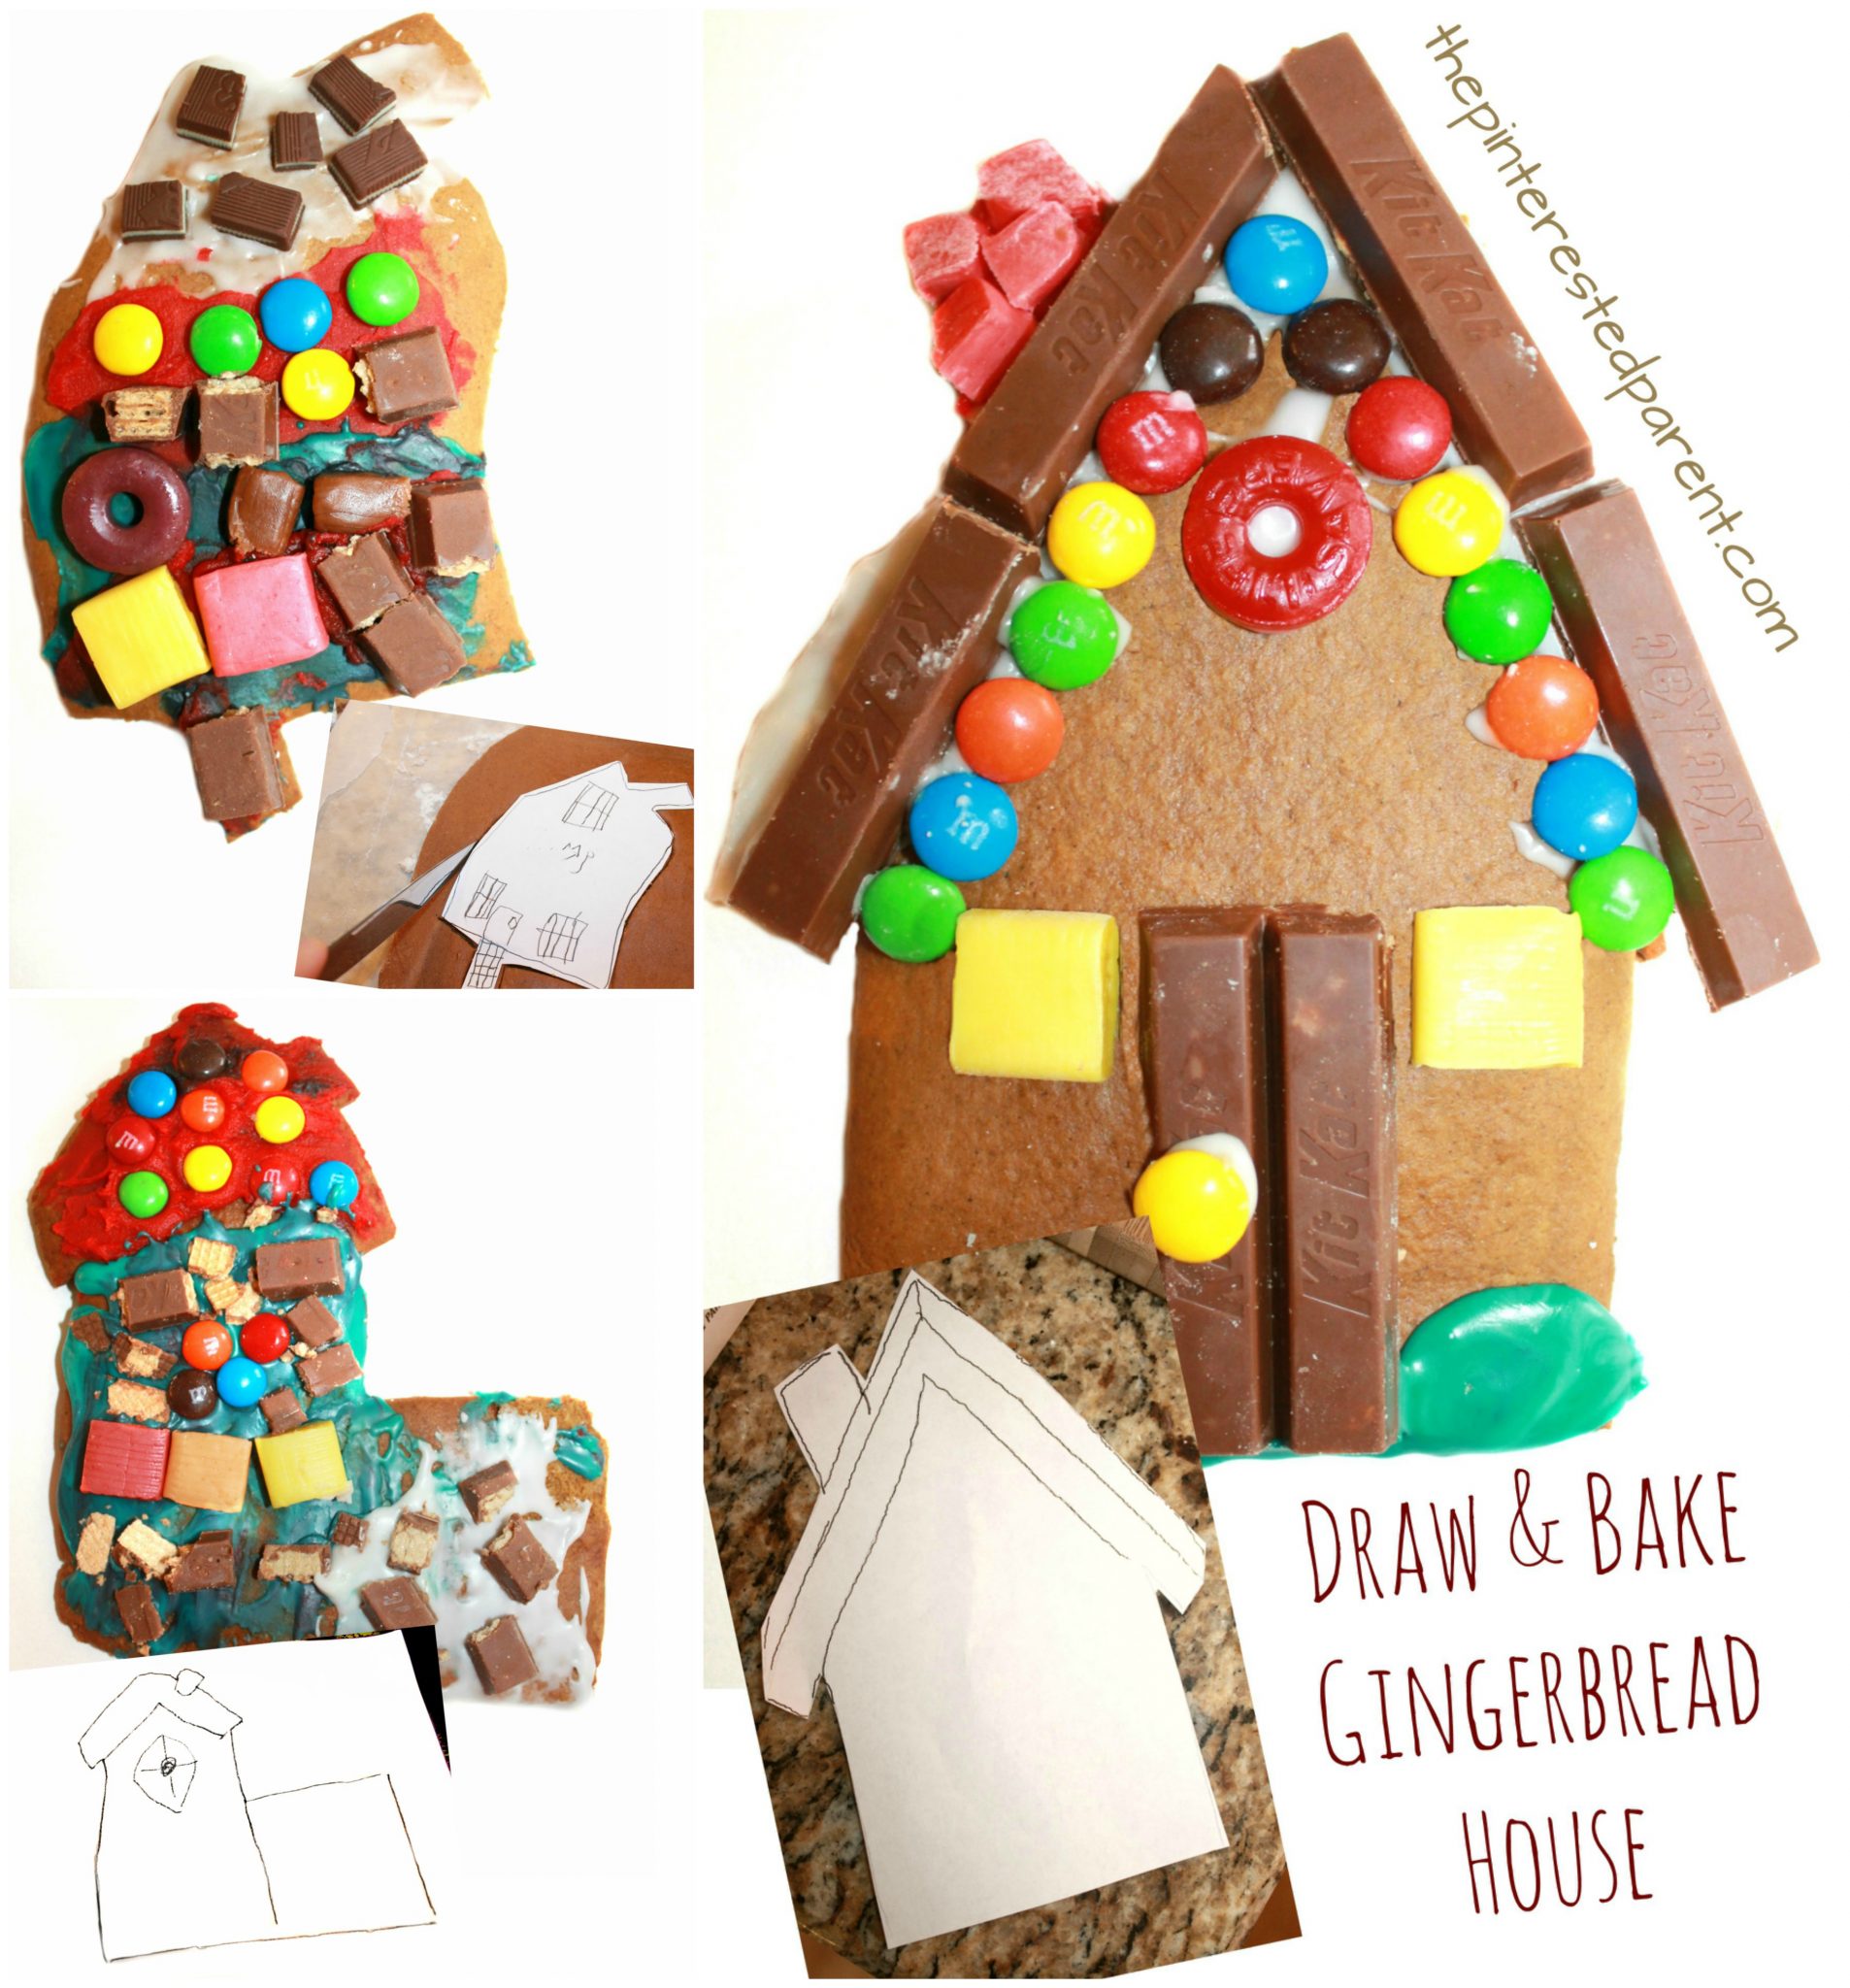
Design Your Own Gingerbread House

Every year, we bake and make a gingerbread house. This year would be no different. We baked for two days straight, making batch after batch of gingerbread for our house.Draw and bake your own gingerbread house. This is a fun idea for the kids for Christmas or winter. This would be great for a party. Holiday arts and crafts for preschoolers or kids. Baking, cooking with kids

*This post contains affiliate links*

Our gingerbread house is going to be a replica of our house and ended up being a larger undertaking than we expected.

14980792_10209514046361306_4970646486877986159_n

In between batches of gingerbread my daughter got antsy and made her own gingerbread out of construction paper. It came out so sweet and I loved her button accents.

Continue Reading…

Homemade Butter With Kids

It was our wedding anniversary last weekend. We wanted to celebrate our anniversary weekend together with the whole family.

How to make homemade butter - Cooking with kids - easy & fun to make with the family. Butter recipe

*This post contains affiliate links*

We went away for a family weekend. We took our daughter to Old Sturbridge Village in Massachusetts. It was a lovely look at life in the 1800’s.

14095762_10208795971169875_630877002373588086_n

We got to take a horse-drawn carriage ride, see how yarn was made & pretend to churn butter. Our butter making play made me want to churn some butter for real. It reminded me of when I was little and churned butter on class field trips.

14040106_10208795972969920_5794196974182431876_n

I wanted to teach my daughter how to make butter too. Thank to Google & PBS Kids, I was able to find a simple way to make butter with my little. Did you know that you can easily make homemade butter by shaking cream in a jar? Well you can & it is delicious.

The recipe called for a jar, but we chose to use a shaker cup to make our butter.

We added a carton of heavy cream to our shaker & shook in a little salt. We put the lid back on & began to shake.

Snapshot 2 (8-24-2016 11-40 PM)

My daughter helped shake for a few minutes, but quickly got tired & handed it back to mommy. It is a lot of shaking, so if you are doing this with a few children, it would actually be perfect because each could take a turn for a few minutes.

The recipe that we saw said that it would take about 10 minutes, but ours did take a little longer than that, although we did stop many times throughout the process to make observations about the butter.

It was a great arm workout for this mommy. The shaking was fun, but what happened during the shaking was the most interesting part.

IMG_2836

The cream hit different forms during the shaking. We stopped & looked at our cream often to see what changes were made. It was fascinating. The first stage was foamy. The cream start foaming & expanding in the shaker cup.

IMG_2838

We shook a little longer & the butter started taking on the form of whipped cream.

IMG_2839

When it took on the whipped cream form, it became a little more difficult to shake, but after shaking a little bit longer, it began to sound watery again. We checked the mixture & could see the buttermilk & butter starting to separate. We kept shaking and then poured the buttermilk through a strainer into a bowl. We drained the butter well. The strainer will catch the butter, but we were able to scoop most of it out of our shaker with a spoon.

IMG_2842

I covered the butter & then refrigerated it until I was ready to use it. We made some toast & tried out our homemade butter. It was delicious. We also used the buttermilk to make fried chicken with later that same evening.

From what I understand, homemade butter does not last too long, so extend the life of your butter by mixing some water into it after the butter is already formed.

IMG_2845

The homemade butter is definitely worth making. It was wonderful. I will definitely make it again, but perhaps next time use a beater.

How to make homemade butter. Cooking with the kids - easy & fun to make with the family. Butter recipe.


Thank you as always for stopping by. Please follow us on Facebook as well.


Butter making with kids. Easy recipe that you can make with the family

Gingerbread Christmas Tree

Gingerbread Christmas tree - a great baking and cooking project to do with the kids for the holidays. Preschoolers and food

I realize that it is not even Thanksgiving yet.  It’s not that I have anything against Thanksgiving because I have a lot to be thankful for, but I am overjoyed for this upcoming Christmas season. I understand that most do not like how early the holidays seem to come more & more each year, but for me I can’t wait, especially after having our daughter. Christmas is magical. The Christmas carols, the twinkling lights & the smells are all divine.

I am one of those people that have gotten into the spirit a little bit early, but I don’t care. My daughter doesn’t know any different. To her it is Christmas time already. This weekend we put on some Christmas carols & filled our house with the delicious smell of gingerbread. My daughter loves baking with mommy & she loves eating it too. One of the great things about gingerbread is it has the same consistency as Play-Doh. This of course made my Play-Doh obsessed daughter happy.

Gingerbread Christmas Trees

Bake your gingerbread. Here is the recipe that we used. Gingerbread Recipe

IMG_7185

IMG_7190IMG_7193IMG_7197IMG_7202

You will need star cookie cutters. Using different sized cookie cutters, cut out about 10 cookies. If you do not have 10 different cutters, you can improvise.
I had 5 cutters in various sizes. I cut two of each size, cutting one a little thicker than the other. I worked the thicker star out carefully using my fingers to make it a little bit larger than the first star.

IMG_7204 IMG_7207 IMG_7209 IMG_7214

On the smallest star I added a small point for the top of the tree.

IMG_7221

Bake your cookies according to the recipe.

IMG_7222

Make your icing while the cookies bake.

Icing:

1 cup of confectioners sugar

2 Tbsp of milk

1/2 Tsp vanilla

Stir your ingredients together until smooth.

IMG_7234

Stack the cookies from biggest to smallest. Use the icing to hold the pieces together. Stagger the star points so that they lined up every other cookie.

IMG_7235

IMG_7236

IMG_7244

Drizzle icing over the top of the tree & add M&M minis or another candy of your choice.

IMG_7245

IMG_7247

Gingerbread Christmas tree - a great baking and cooking project to do with the kids for the holidays. Preschoolers and food

As I said already the gingerbread dough has a similar consistency to Play-Doh. I let my daughter use the leftover dough to craft her own cookies.

She crafted these as birthday cakes for me & her. The birthday cakes looked a bit like a pile of something else that I don’t want to say, but otherwise they still tasted delicious. Mai iced up her cookies and they passed her taste test. The only problem was trying to wrestle away all of her cookie creations from her so that she didn’t eat them all.

IMG_7267IMG_7269IMG_7239

We also made these cute little trees imparting the same concept of stacking the stars as with the cookie tree.

Foam Christmas tree craft for kids

We cut out 10 different sized stars using foam sheets & cut out a hole in the middle of each big enough to fit around a toilet paper roll. Cut only a small hole in your top star & loop a pipe cleaner through it to for the peak of the tree. Attach 2 small foam stars to either end of the pipe cleaner. Paint a toilet paper roll & a Dixie cup (The Dixie cup will be used for your base. Let dry. Glue the toilet paper roll into the cup. Stack the stars from biggest to smallest over the toilet paper tube & glue the top star over the top of the toilet paper roll. Let dry & let your child decorate the tree with craft pom poms, yarn, cotton snow etc.


Cinnamon Sugar Crescent Pretzels

CinnamonCrescentPretzels.jpg

Cookie monster is to cookies as my daughter is to Play-doh. She just can’t get enough of it. Her favorite of all Play-Doh creations is crafting baked goods. She makes cakes & cookies and asks mommy to join in as well. I got creative the other day and made Play-Doh pretzels. This got a giggle out of my daughter & also inspired her tummy with a pretzel craving. I thought it might be fun to make some soft pretzels with her & combine the fun of playing with dough and the deliciousness of getting to eat our creations after.

Once I suggested it though, my laziness kicked in & I looked for an easy way out. Hurray for crescent rolls. These are not exactly your classic soft pretzel, but they were a quick, easy and yummy treat.

Ingredients:

1 tube of low fat crescent rolls

1 Tbsp sugar

1/2 Tbsp cinnamon

1/2 Tbsp vegetable oil

Directions:

Preheat oven to 375. Unroll your tube of crescent rolls. Pinch the perforated seams together & roll out into a rectangular sheet. With a rubber spatula spread out the oil evenly over the sheet. Stir the cinnamon & sugar in a small bowl. Sprinkle the entire mixture evenly over the crescent sheet. Mai did the sprinkling for us, so it was not entirely even. Cut a 1/2″ wide strip lengthwise. Roll the strip just enough to form a rope like strip. Fold & twist into a pretzel. Place on an ungreased baking sheet. Bake for 8-9 minutes. Serve while warm.

IMG_6929 IMG_6930 IMG_6935 IMG_6937 IMG_6939 IMG_6940 IMG_6941  IMG_6944 IMG_6947 IMG_6959

Mai loved these. I gave her one pretzel, but our sneaky little girl smuggled a few extra when I wasn’t looking.

Pancake Battered Banana Bites

IMG_6775

For those of you that have been following me for a while, you know that I have had a long hard battle with my daughter over eating. She has been known to be a picky one. Not only is she picky, she doesn’t like to eat. She has much more important things to be doing & she will tell you. “Mama I don’t want to eat. I am so busy.” This is coming from my 2 year old. I am not sure what it is that could have my toddler so busy, but whatever it is, it has kept her from the dinner table on many occasions.

We have come a long way over the last few months and have seen great improvements. Her appetite has increased which is wonderful, but her variety of foods remains the same. Breakfast is one of her better meals. Thank goodness. And as luck would have it, it is my favorite meal to make. I love making bite-sized foods & if it is something that she can dip, it is usually a home run.

Pancake Battered Banana Bites

Ingredients:

6 ripe bananas

1 1/4 cup of all-purpose flour

1 tbsp of brown sugar

3 tsp of baking powder

1/4 tsp salt

1/2 tsp cinnamon

1 large egg

1 tsp honey

1 cup of milk

2 tbsp vegetable oil

Directions:

In a large mixing bowl add the flour, sugar, baking powder, cinnamon, salt, milk & vegetable oil and stir well. In a mixing bowl, beat the egg & add to the rest of the batter. Mix in the honey. Slice bananas into 1/2″ slices. Dip the banana in the pancake batter. Place on a hot griddle or frying pan set to medium heat. (Test with water, water drops should dance across the surface when added.) Cook until the edges are cooked & firm up. Flip & cook on the other side. Cook until the batter on the sides is firm & cooked.

We served ours with a peanut honey sauce, but you can also use maple syrup or eat as is.

Peanut Sauce:

2 tbsp peanut butter

2 tbsp water

1 tbsp honey

Heat the peanut butter & water for 20 seconds in a microwave safe dish. Stir well until smooth. Add the honey & stir well. Serve warm

IMG_6771 IMG_6772 IMG_6773

IMG_6774

These were a big hit with both my daughter & my husband. Mai loves to dip, so she had hers with peanut sauce & syrup.


IMG_6779


American Fried Rice

americanfriedrice.jpg

It is dinnertime & I don’t have anything planned. Let’s play a little game. What is in my fridge? We have thawed out ground turkey, leftover rice, 2 aging potatoes & a half of an onion that is getting ready to be trashed. Mmm mmm, sounds great doesn’t it? Nobody likes wasting food. My husband & I positively hate it. Some of our favorite meal creations come from simply cleaning out our fridge. The hubby asked me last week if I could make a batch of fried rice, so this seemed as good of a time as any since it requires day old rice & as luck would have it… This would not be our traditional fried rice though. This is our fried rice American style.

Ingredients:

1/2 pound of ground turkey or any ground meat

2 cups of day old cooked rice

2 cups of cooked diced potatoes (2 small potatoes)

1/2 cup of chopped onion

Half a can of corn

3 eggs

2 1/2 tbsp soy sauce (as always I recommend Green Mountain or Maggi)

2 tbsp olive oil

1 tsp garlic salt

Pepper to taste

Directions:

Brown your ground meat until no longer pink, drain & place aside. Peel & cube the potatoes, throw in the microwave for about 3-4 minutes until cooked in the center and set aside. In a large skillet set to 350 or high heat, add the oil & onion. Cook the onion until tender & toss in rice & potatoes. Add 1 1/2 tbsp of soy sauce over the top & stir until rice & potatoes are browned. Pour in half the can of corn & stir for a couple of more minutes. Add the ground meat, the seasonings & the last tbsp of soy sauce. Stir for a few minutes more & then transfer to a serving dish. Keep the skillet on. In a small bowl beat the eggs. Add to the hot skillet & toss around quickly until the egg is just barely firm & cooked . Remove from heat & throw in the the rice mixture.

IMG_5442 IMG_5443 IMG_5444 IMG_5445 IMG_5446 IMG_5448

Stay tuned for more fun with leftovers.

Thank you as always for stopping by. If you like us here, please follow us on Facebook.

Peanut Butter & Jelly Pancakes

PBandJPancakes.jpg

Breakfast is definitely my favorite meal of the day. I love eggs, french toast, hash, home fries & pancakes. I am getting hungry just thinking about it. The best thing about breakfast is our daughter also loves it. It is the one meal that I can usually count on her eating. I will admit that we have made breakfast for lunch & dinner on occasion just to ensure that the kiddo would eat.

Pancakes are one of our daughter’s favorite foods & they are one of my favorite things to make. They are delicious, easy to make & a lot of fun to experiment with. Today we made PB & J pancakes.

Peanut Butter & Jelly Pancakes

Ingredients:

1 cup of all purpose flour

3 tbsp peanut butter

3 tbsp jelly

1 tbsp of brown sugar

2 tsp of baking powder

1/4 tsp salt

1 large egg

1 1/4 cup of milk

1 tbsp vegetable oil

Directions:

In a small mixing bowl, beat the egg & set aside. In a medium bowl combine flour, brown sugar, baking powder, salt & oil. Add the peanut butter & break up the clumps with a fork while mixing. Stir in the milk & stir well until smooth & peanut butter is broken up. Stir in the egg & jelly. Break up the jelly with a fork as well. It is ok if it is a little clumpy with the jelly. Pour 1/8 cup of batter per pancake onto a hot skillet set at medium-high heat. When pancake bubbles and edges start to firm flip & cook on the other side.

The pancakes were a hit. Next week we will try them Fluffernutter style.

IMG_4457

“ABC Soup” Water Play

IMG_3958It makes me laugh to think that in a house full of fancy toys & play sets, it is always the simplest things that hold on to our children’s attention the most.

Our daughter loves to paint & draw, so we got her an easel. She prefers to draw at the kitchen counter. She loves building and stacking, so we got her building blocks & Legos. She still is piling up Play-Doh containers & paint bottles.

She loves to cook, so when her cousin gave her a beautiful play kitchen filled with fake food and pots & pans, we thought she would be ecstatic. Instead of cooking up plastic chicken drumsticks & Velcro vegetables, Mai was more interested in mixing up a pot of alphabet magnets.

IMG_20140823_172922820 IMG_20140823_172924699 IMG_20140823_172947386

Here she is cooking up something delicious in our rice cooker.

After dinner last night, Mai was a little bit antsy & mommy was tired. I needed something to keep her occupied for a little while. I asked her if she wanted to play with some water. I already knew what the answer would be, because she loves water play. I filled up our ice bucket with some water & went to get her some measuring spoons and scoops to use with the water. When I came back she had poured all of her ABC magnets in the bucket & was whirling them around with her hand. We traded in our measuring spoon for a ladle & a handled sieve instead. Mai would use the ladle or sieve to fish out the letters. “I making soup.” Yes you are. It looks delicious.

We made a little game out of it.

“Mai, can you find me the “P””?

“Right there!”

“P is for penguin.”

“Yes it is. Great job.”

IMG_3953 IMG_3959 IMG_3964

Like I said, it really is the simple things. She played happily up until bath time, while I got a chance to sit down for a bit & just enjoy watching our happy little girl.


Lessons From The Kitchen

LessonsFromTheKItchen.jpg-200x300
I always found it humorous that children love doing the things that we as adults hate to do & vice versa. They fight naps & taking a baths while these are things that I dream about. Doing dishes & sweeping the floor are not my favorite activities in the world, but yet my daughter can’t wait to get her hands wet & pick up a broom. Children like to emulate what they see their parents doing. My daughter like many little girls has a play kitchen. She spends many hours a week cooking up delicious meals for mommy & daddy.

I used to find it difficult to prepare meals & clean up the kitchen with Mai running around. I realized the easiest way to get things done was just to involve my daughter. Cooking with my daughter is not only a fun bonding activity that we can share, but it also has a lot of learning opportunities as well.

IMG_3450

1. Measurements –  From as young as I can remember one of our daughter’s favorite toys has been our measuring cups & spoons. Now that she is older, she has learned that they are also used for other things. Show your child the different size cups & spoons & explain to them what each one is.  Let them scoop and measure. Assist them for accurate measurements. Let them pour the measured substance into the mixing bowl or dish.

2. Following Directions – Toddlers are not always the best at listening or following directions. Our daughter is no different, but when we are engaged in an activity such as cooking or baking, she is surprisingly attentive. Explain what needs to be done in each step & let them help with anything that she can do safely. Offer them encouraging pointers along the way.

3. Hand eye coordination – All of that pouring & measuring requires a little bit of dexterity. It may take some time, but with practice you will see their abilities grow. Our daughter has become great at pouring.

4. Counting – This is an especially fun side activity while you cook. If you are working with items such as chick peas, lentils, pasta or chocolate chips ask them to count out a small number of them for you. My daughter loves counting and separating.

6. Teamwork – A lot of toddlers wrestle with asserting their independence. This is a wonderful thing, but it also important for them not to lose sight of being able to work together as a team. Cooking and baking is also a great bonding moment for you & your child or your whole family.

7. Reading labels – Reading does not always have to be in just your children’s bedtime stories. Take every opportunity that you can to read to your toddler and point out new words. If you are following a recipe, read it aloud and point out the words and pictures.

8. Home Economics – Let’s not forget the main task at hand which is to cook or bake something fabulous. At an early age your child is learning basic principles in cooking. Hopefully this will encourage a love for cooking and maybe someday they will be fixing you gourmet dinners & desserts.

9. Responsibility – Making a mess in the kitchen is the fun part, the clean up after leaves something to be desired. Throwing away trash, wiping down the counters and doing the dishes are chores that I could do without, but like I said before our children seem to love this part. That sets a good foundation for chores in the future.


Crescent Roll Breakfast Muffins

Crescentrollbreakfastmuffins.jpg

The battle at mealtime continues… Here are few funny things about my daughter and food. She will not eat a plate of macaroni because she says it is disgusting but she will dip Frosted Flakes in ranch dressing and tell me “Mmmm Mmmmm, it is so delicious.”  She boycotts certain foods because she says they are “Too cheesy, but will ask for a slice of cheese each and every time we go the deli department at the grocery store.” and then a food that was her favorite last week, she will push a way from her this week with the claim “I do not like this.” Siiiiiiigh! 

Mealtimes are tough. Our daughter rather be doing anything else in the world than eating. We entertain her during meals with books and talking about our day, but most of the time she just wants to jump down and play. I also have noticed the larger variety of foods given to her on one plate the more she scoffs at it. We try to keep it simple. Bite sized foods work best & of course whenever I can throw something into a muffin tin or roll it into a ball, I do it.

When Mai first started her path into pickiness, there was one thing that usually never failed, wrapping her food in a crescent. I made crescent stuffed everything for a little one. I had almost forgotten about this. We had a can of crescent rolls in our fridge & I thought we could re-visit our old trick & see if it could still work it’s magic.

Ingredients:

On can of crescent rolls or crescent dough

4 eggs

1/2 cup of ham finely diced 

1/2 cup of finely chopped broccoli

1 tbsp of parmesan

1 tsp of water

Pepper to taste

Cheddar cheese optional

Directions:

Preheat oven to 375. In a medium mixing bowl beat the eggs & water. Add the parmesan, ham, broccoli & pepper. Stir well. Roll out the crescent dough (If using crescent rolls, pinch the seams together & join into one sheet. Slice into 24 squares about 1 1/2 on each side. Push each square into a mini muffin tin opening working it around to form a cup. Pour the egg mixture into each cup filling almost to the top. Sprinkle with cheddar cheese if you desire. Bake for about 10-15. Cooking times will vary.

IMG_3316

IMG_3317

IMG_3319

IMG_3320

IMG_3321

IMG_3322

IMG_3327

IMG_3324

IMG_3335

Mai made mommy very happy by gobbling up my muffins & daddy liked them so much he started a list of different varieties we could use to make for football parties.

IMG_3284


Thank you as always for stopping by. Please follow us on Facebook as well.