Tag

crafting

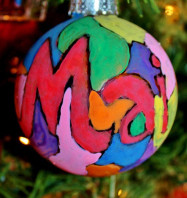
Easy DIY Personalized Ornament

IMG_8034

This weekend was filled with Christmas parties & breakfasts with Santa. We were on the move all weekend long trying to make sure that the big guy knew that Mai really wanted that train set for Christmas.

The parties had a ton of great activities and projects for the kids to do and as we all know my daughter loves her projects. There was a cookie making station that Mai took full advantage of. They had assorted sugar & gingerbread cookies for decorating along with colored icing and assorted candies & sugars.

IMG_7989IMG_8000IMG_8002

There was also a watercolor station, a sticker station & an ornament making one. The crafts just kept coming. My artsy little girl was in her glory. She brought home several cookies, a few new crafts & a new dolly from Santa. The ornament making reminded me that I had bought a couple of cheap clear plastic Christmas balls at the beginning of the season. I had completely forgotten about them. We kept our craft momentum going when we got home with our quick & easy personalized ornament.

What you will need:

Clear plastic Christmas bulb ornament

A black sharpie

Kid’s paint (We use Crayola’s water based non-toxic paint)

Directions:

With a sharpie draw on the name of the person you are making the ornament for. We made two, one for Mai & one for her Nana.

IMG_8018

After you write in the name, draw random lines & closed shapes all over the whole rest of the ornament.

IMG_8019

Paint each shape in a different color. Mai chose to just mix her colors for her ornament for her Nana because “Nana likes a rainbow.”

IMG_8020  IMG_8025

Let the paint dry & hang your ornaments on your tree & admire. I touched up the Sharpie lines on Mai’s Nana ornament after it dried.

IMG_8031 IMG_8107

Gingerbread Christmas Tree

Gingerbread Christmas tree - a great baking and cooking project to do with the kids for the holidays. Preschoolers and food

I realize that it is not even Thanksgiving yet.  It’s not that I have anything against Thanksgiving because I have a lot to be thankful for, but I am overjoyed for this upcoming Christmas season. I understand that most do not like how early the holidays seem to come more & more each year, but for me I can’t wait, especially after having our daughter. Christmas is magical. The Christmas carols, the twinkling lights & the smells are all divine.

I am one of those people that have gotten into the spirit a little bit early, but I don’t care. My daughter doesn’t know any different. To her it is Christmas time already. This weekend we put on some Christmas carols & filled our house with the delicious smell of gingerbread. My daughter loves baking with mommy & she loves eating it too. One of the great things about gingerbread is it has the same consistency as Play-Doh. This of course made my Play-Doh obsessed daughter happy.

Gingerbread Christmas Trees

Bake your gingerbread. Here is the recipe that we used. Gingerbread Recipe

IMG_7185

IMG_7190IMG_7193IMG_7197IMG_7202

You will need star cookie cutters. Using different sized cookie cutters, cut out about 10 cookies. If you do not have 10 different cutters, you can improvise.
I had 5 cutters in various sizes. I cut two of each size, cutting one a little thicker than the other. I worked the thicker star out carefully using my fingers to make it a little bit larger than the first star.

IMG_7204 IMG_7207 IMG_7209 IMG_7214

On the smallest star I added a small point for the top of the tree.

IMG_7221

Bake your cookies according to the recipe.

IMG_7222

Make your icing while the cookies bake.

Icing:

1 cup of confectioners sugar

2 Tbsp of milk

1/2 Tsp vanilla

Stir your ingredients together until smooth.

IMG_7234

Stack the cookies from biggest to smallest. Use the icing to hold the pieces together. Stagger the star points so that they lined up every other cookie.

IMG_7235

IMG_7236

IMG_7244

Drizzle icing over the top of the tree & add M&M minis or another candy of your choice.

IMG_7245

IMG_7247

Gingerbread Christmas tree - a great baking and cooking project to do with the kids for the holidays. Preschoolers and food

As I said already the gingerbread dough has a similar consistency to Play-Doh. I let my daughter use the leftover dough to craft her own cookies.

She crafted these as birthday cakes for me & her. The birthday cakes looked a bit like a pile of something else that I don’t want to say, but otherwise they still tasted delicious. Mai iced up her cookies and they passed her taste test. The only problem was trying to wrestle away all of her cookie creations from her so that she didn’t eat them all.

IMG_7267IMG_7269IMG_7239

We also made these cute little trees imparting the same concept of stacking the stars as with the cookie tree.

Foam Christmas tree craft for kids

We cut out 10 different sized stars using foam sheets & cut out a hole in the middle of each big enough to fit around a toilet paper roll. Cut only a small hole in your top star & loop a pipe cleaner through it to for the peak of the tree. Attach 2 small foam stars to either end of the pipe cleaner. Paint a toilet paper roll & a Dixie cup (The Dixie cup will be used for your base. Let dry. Glue the toilet paper roll into the cup. Stack the stars from biggest to smallest over the toilet paper tube & glue the top star over the top of the toilet paper roll. Let dry & let your child decorate the tree with craft pom poms, yarn, cotton snow etc.


Exciting News

logo1


A couple of months ago, I was contacted by my blogging friend from the lovely blog From Palmetto Pride To Pad Thai.  She told me about a new online parenting magazine focusing on child and human development that she was starting. Seek Magazine was inspired by her son and his social and language delays that were brought on during a period of regression. All proceeds of the magazine will go to the non-profit organization they created. It is a scholarship fund for children in need of therapy to help with developmental delays. I am excited be contributing to the Activities section. Please check out my latest post ‘Crafty Glue Peels’ This is a crafting favorite in our home.

Craftygluepeels.jpg

Please tune in to Miss Mai & I while we share our favorite crafts & activities. http://www.seekmagazine.org/kim-uliana/

25 Things To Do With Your Kids In The Fall


I hate to sound like a broken record, but I can’t help it. My favorite season is here & I am not afraid to gush about it. Being a New Englander, I just can’t help but love the fall. One of the great things about it, is there are so many fun things to do with our daughter. Some we have done already this season & some are still on our to-do list waiting to be checked off. Not everything on this list applies to every region, but I am sure that you can find a thing or two that you can do together.563544_10201276819155774_680005_n

Continue Reading…

Gingerbread Haunted House

IMG_4734

My child has very little concept of time. It is hilarious because she knows the names of the days of the week and she will use them with no real understanding of when that day actually is. She will reminisce about a something that happened weeks ago & retell it saying that it just happened yesterday. It is no surprise then that she does not have much of a grasp on the seasons or when the holidays fall. Most of the summer Mai had been asking me to make a gingerbread house. Trying to explain to my daughter that we were in the wrong season for gingerbread is pointless. Last week she was especially insistent, so what is a mommy to do?  I promised her that we would make gingerbread houses. To keep with the theme of the season, we made haunted houses. I found this great recipe for pumpkin gingerbread online.

http://www.instructables.com/id/Pumpkin-Spice-Bread-Halloween-House/?ALLSTEPS

We doubled the recipe for our house.

I measured out the ingredients & handed them to Mai. She sang Patty Cake as she mixed & rolled out her dough. My girl loves to cook.

IMG_4681 IMG_4683 IMG_4688

We drew out templates earlier in the day, stocked up on candy & made our icing.

Royal Icing

2 eggs whites

1 box of confectioners sugar

Beat eggs until frothy & mix in the sugar until smooth. Add the icing to your piping bag.

As we were working with raw egg, I also used store bought icing for Mai to use when she decorated.

IMG_4693 IMG_4696

IMG_4685

With the leftover gingerbread I rolled out a haunted tree.

IMG_4687

After you have baked your gingerbread, be sure to trim and straighten edges. Cut out any windows or doors.

 IMG_4700 IMG_4690

Generously apply icing & assemble your house. Use items around your house to hold your pieces upright and pushed together.

 IMG_4698 IMG_4699

IMG_4701 IMG_4702

Once your house is assembled, you can start decorating. We used After 5 thin mints for our roof eaves

IMG_4704 IMG_4707 IMG_4708

Mai helped out by decorating the tree with some M & Ms.

IMG_4709 IMG_4713

We added orange gum drop slices, gummy worms, candy corns, licorice whips, Hershey kisses, pumpkin Peeps, M&Ms & mini Kit Kats to our house.

IMG_4711 IMG_4716

While mommy was in charge of decorating the front, Mai got to do the sides. She hid M&M’s & gummy worms in the house through the windows. We gave her a bowl of icing to dip her candy in to make it easier. She dipped the candy in the icing & then decorated her face more than the house.

IMG_4724 IMG_4727 IMG_4738 IMG_4739

It was a lot of work, but it was a fun project for me & the munchkin. I can’t wait for Christmas now to do it again.

IMG_4734

Felt farm forms

I found inspiration for this project from a pin that I found on Pinterest a while ago.

It was felt Christmas tree, with movable decorations.I remember thinking what a fabulous idea, a felt Christmas tree that my toddler can decorate herself. It reminded me of the Colorforms from my childhood. I loved this idea but did not think that it would appeal to my daughter, as she does not understand the concept of a Christmas tree yet. I wanted to take this idea and apply it to something that would peak her interest now.

Felt play farm - fun activity for toddler & kids - felt arts & crafts

Mai is a lover of animals, so I could not think of anything that would grab her attention more than a farm.

Supplies that I used for this project..

Different colored felt

Glue gun

Scissors

Cotton balls

Fabric markers

I use felt on a lot of projects, so luckily I had almost everything I needed already.

I started with a 36″ X 36″ of green felt for my background. I added blue felt to the top for the sky, attaching it with the glue gun. I then applied glue to the sky and dragged cotton balls across it to form the clouds.

001

I added a barn with a dirt road to complete my background.

003

Mai & Duke helped too.
019

006

I then drew and cut out all of the movable pieces. Our farm included a pond, tree, horse, duck, sheep, pig, cow & a rooster. Mai was quick to point out after I finished, that there was no hop, so I quickly made a bunny.
015

Our farm was now complete. Felt sticks to felt, so you can also hang this on the wall and the movable pieces will stick.

The verdict: It was a hit. She loved pointing out all the animals to mommy and daddy and moving the pieces around.

013
009

Since I was still in a crafty mood and had alot of felt left over, I made one more project.

037

033

These should keep my busy little toddler occupied for at least 5 minutes. Sigh!