Tag

ornament

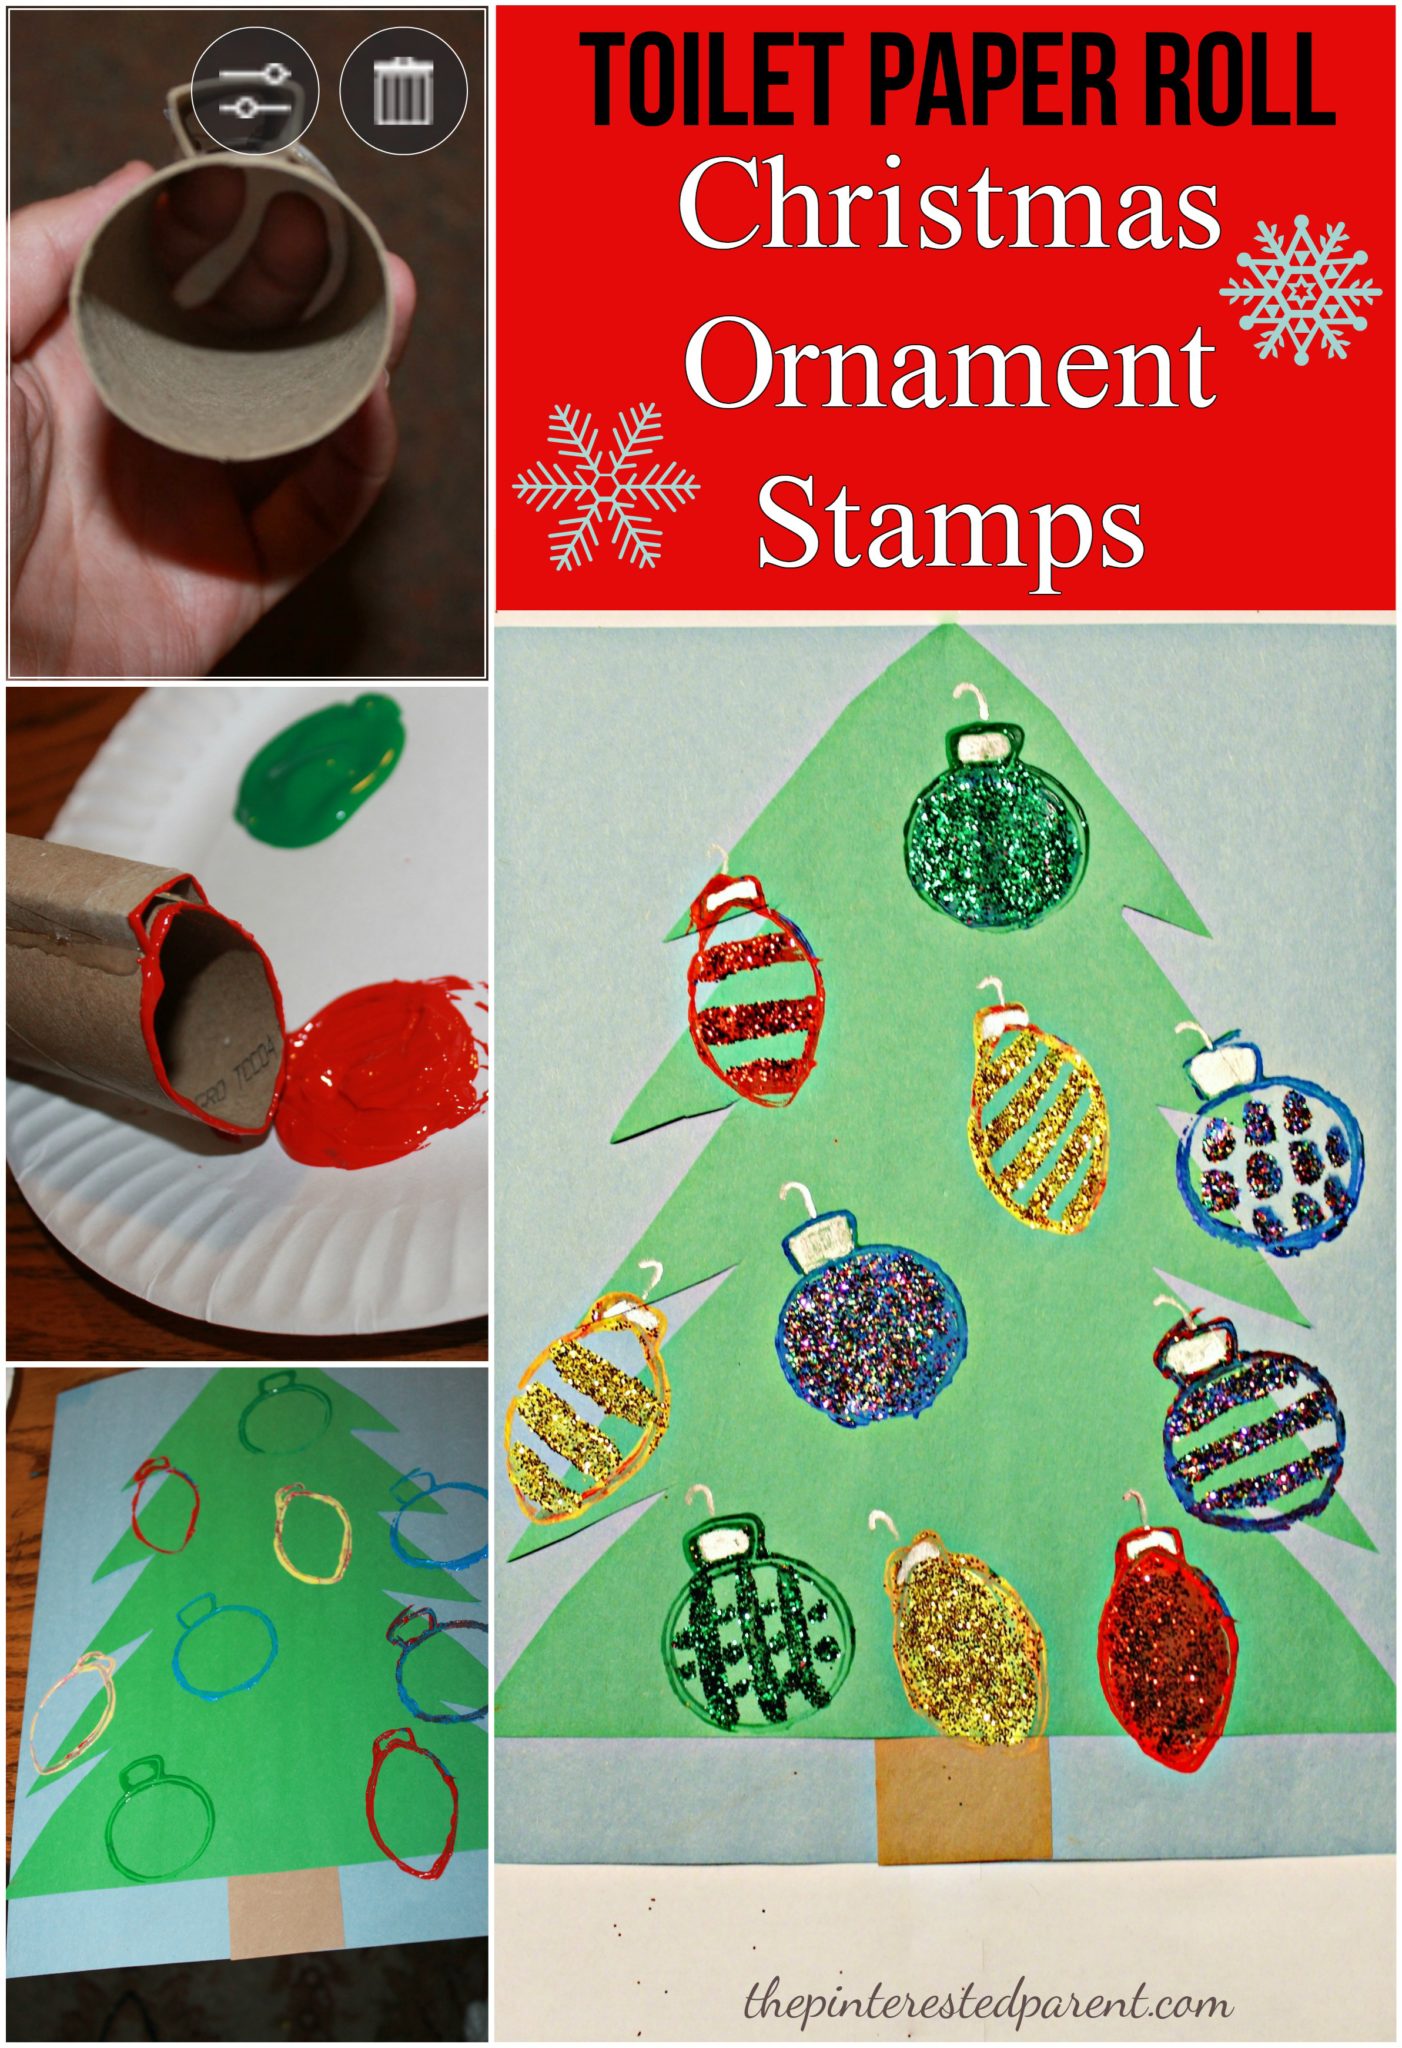
Simple Kid Made Ornaments

It is that time of year. It is time to put up your Christmas tree, your twinkling lights and carefully unwrap all of your beautiful ornaments to decorate the tree. For me, there are none more beautiful than the ornaments made by my daughter. They will be the ones that I cherish and that make me smile for years and years to come.

What would be better on your Christmas tree than a hand drawn ornament made by your child. Christmas and winter arts and crafts. Easy kid made ornaments with Sharpie and tissue paper..

*This post contains affiliate links*

These hand drawn ornaments are the perfect keepsake. They would be fun to make each year. Be sure to date each one to be able to compare.

Continue Reading…

Clay Fingerprint Keepsake Ornaments

    These clay fingerprint ornaments are perfect for any occasion. They make a great keepsake gift for grandparents and mom and dad.Clay Fingerprint Keepsake Ornaments for the family - a sweet and easy arts & craft idea and keepsake that the kids or the whole family can make together

*This post contains affiliate links* Some photos have been updated since original post.

My daughter has inherited a lot of hand-me-down books. We have so many that we don’t even know what we own. For a very long time, my daughter has only read a few of these books. Many just sat there collecting dust, but recently she has been diving into them all. We came across a few art books the other day. We found a few great “how to draw” tutorials and also came across a cute book filled with fingerprint crafts.

Continue Reading…

Melted Crayon Hearts

Melted Crayon Hearts. This art & craft for kids is perfect for Valentine's Day

*This post contains affiliate links*

My daughter received a new book from her cousins on Christmas. It has since been promoted to her favorite book.

51HoHYJv6TL._SX258_BO1,204,203,200_

The Day The Crayons Quit‘ is a funny book about a group of frustrated crayons that air their grievances to their owner with individual letters to him. In only a short couple of weeks, my daughter has memorized the book from cover to cover. We read it every day, sometime multiple times a day. It made me realize how neglected her own crayons have been. Mai is much more interested in paint & markers these days, but I had a project that I thought might change her mind.

Melted Crayon Hearts

This is a messy project. Lay down paper or a drop cloth for easier clean up.

We started with a piece of cardboard.  I cut the cardboard into heart shapes & used a paper hole punch to poke a hole in the hearts to be able to add ribbon or string to later.

IMG_3389

We grabbed any unwrapped crayons that we had in our collection to start. We tried a number of different methods to achieve our final projects. We started by holding the crayon on the cardboard & using the blow dryer on a low-speed, high heat setting. Mai needed assistance with this because our dryer to too heavy for her to hold with one hand. I held the hair dryer for her as she worked the crayon around. *Operate caution as hair dryers can get very hot on the skin*

IMG_3391

Next we cut small chunks of crayon and laid them a couple of pieces at a time on the heart. I let Mai operate the hair dryer using 2 hands. This created a different effect as the melted crayon ran on its own pattern. I would suggest putting your project into a box or something contained if using small pieces as they do blow around a bit.

IMG_3395

My daughter came up with another idea as well. She grabbed a paint brush and pushed around her melted crayon and painted it on. The crayons cooled quickly, so she had to use the dryer often.

IMG_3397

When the crayon cooled & dried, we wrapped a ribbon through the holes.

Melted Crayon Hearts - process art & crafts for kids

This was a fun project. Mai loved watching the crayons melt. When the crayons got shiny, she knew that they were melting and that she could use them. “Mama, it melts just like an ice cube.” When we finished, she even asked if we could melt more crayons tomorrow.

Thank you as always for stopping by. Please follow us on Facebook as well.

Melted Crayon Hearts for Valentine's Day - process art for kids

Toilet Paper Roll Christmas Stamps

Toilet Paper Roll Christmas Ornament Stamps

Last Christmas, we made Christmas ornament stamps out of potatoes. These were a big hit with my daughter. She loves stamping projects & we are a big fan of potato stamps. I have seen many people using toilet paper rolls as stamps by bending them into various shapes such as leaves, hearts & pumpkins and I thought what a wonderful idea.

We used our tubes to form two different shaped ornaments. I cut one tube and bent it to form the top of the ornament.

IMG_2708

I used a glue gun to glue the tops in place like shown. Make sure the top piece is flush with the tube.

IMG_2711 IMG_2709

The ornaments are then ready to stamp with. I cut out a Christmas tree shape for Mai to stamp on, but she was not interested in the tree. She just wanted to stamp on a plain piece of paper.

IMG_2717

IMG_2720IMG_2721

IMG_2723

Mai did not want to use the tree, but mommy did. I stamped the ornaments on the tree & let the paint dry.

IMG_2724

I used paint & glitter to decorate the ornaments & my daughter chose to use scissors & cut hers out for a project of her own.

Christmas Ornament toilet paper roll stamps

Thank you as always for stopping by. Please follow us on Facebook as well.

Cardboard & Yarn Craft Ornament

IMG_6234

Since Mai has started daycare our craft collection has doubled itself. We have a collection of home crafts & now the take home ones as well. Our kitchen island has a pile of them. This week, we hung up a few of our favorites to display them. This weekend we decided to make some crafts that were meant to be hung. Since Halloween is over & Christmas is everywhere, now was as good a time as any to make our first ornament.

What you will need:

Cardboard

Paint

Yarn

Glue

Directions:

Cut out your desired shape

IMG_6133

IMG_6134

Cut out notches in the cardboard.

IMG_6135

IMG_6136

IMG_6129

Paint the cardboard shape.

IMG_6131

IMG_6132

Wrap yarn around an empty toilet paper roll to make it easier for little hands.

IMG_6210

Pull the end of a piece of yarn through one of the notches. Pull tight around another notch & continue until you achieve the look you like. Younger toddlers may need a hand with this.

IMG_6211

IMG_6214

Pick a side that you like better. Glue a string to the opposite side.

IMG_6219

IMG_6229