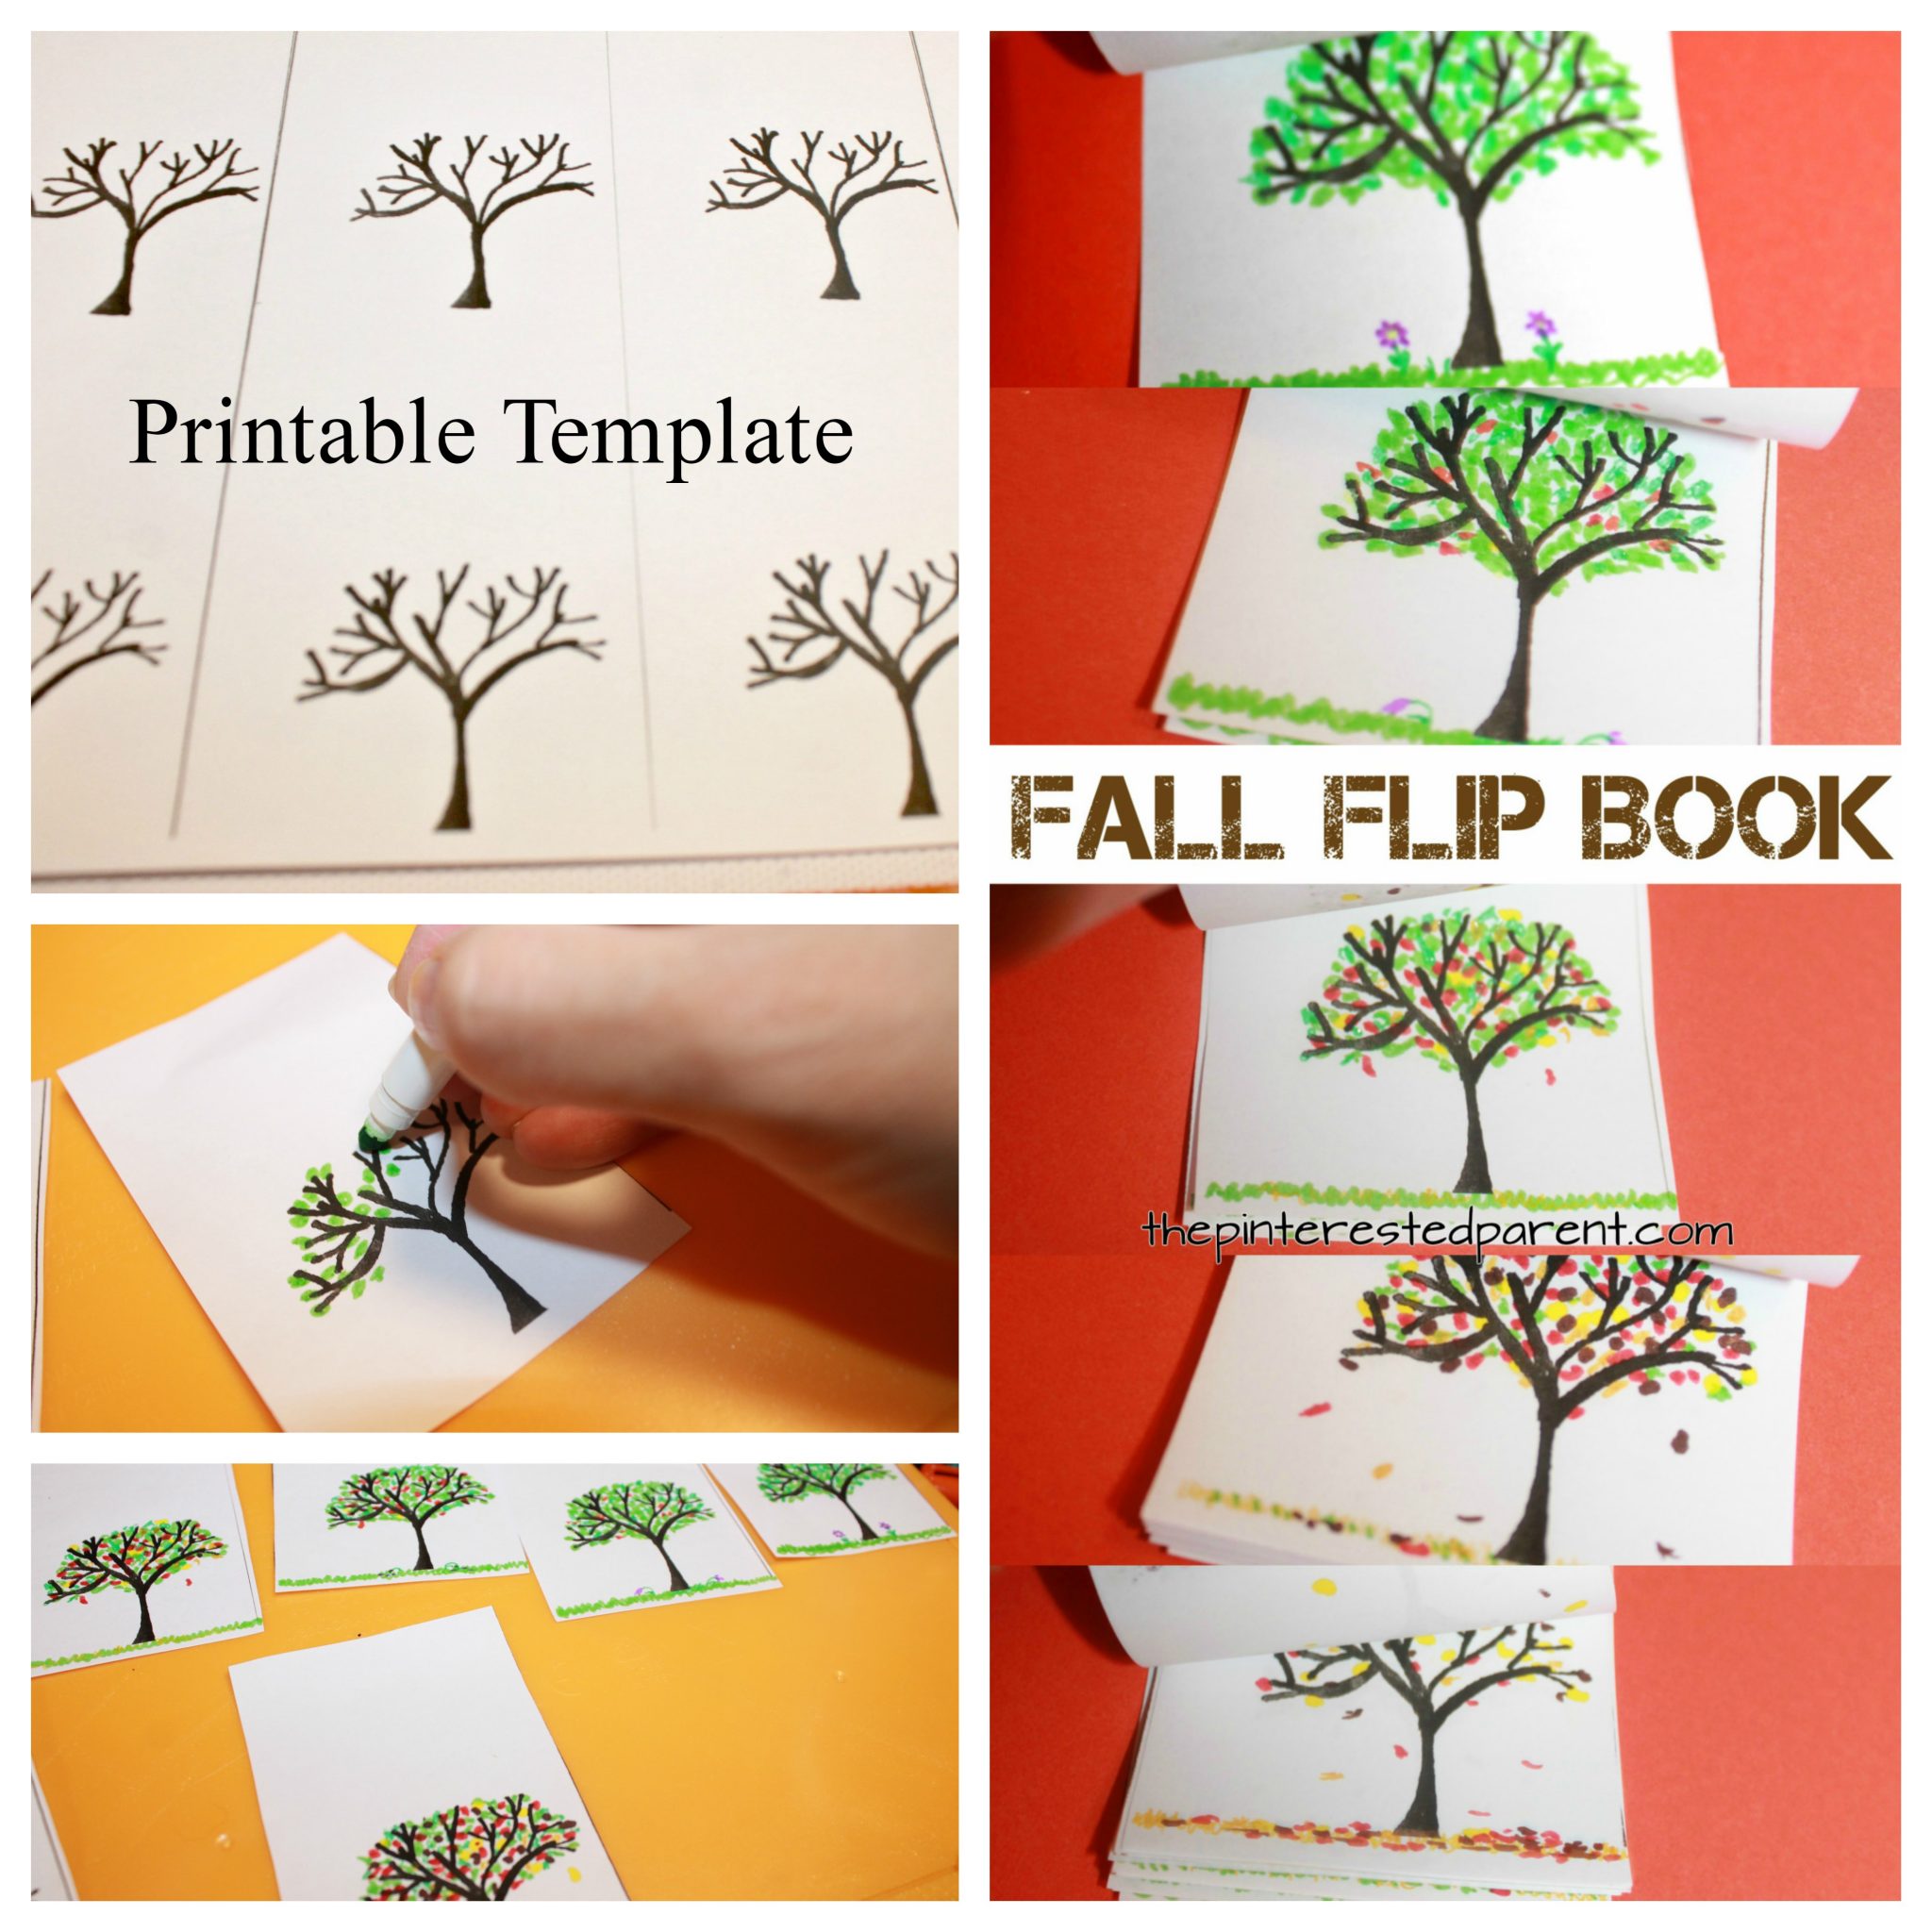
My daughter’s favorite series of chapter books is the Captain Underpants series. In this series of books, there is a mini section called the Flip-o-rama. It is a mini flip book within the existing story. My daughter loves this and has made several flip books of her own over the last few months. We have played around with them quite a bit and they have become a little bit of an obsession in our house. They are just so much fun to make. With fall on the way, we had a little fun with some fall themed flip books and we just had to share them with you. We have included printable tree templates to help get you going. These would be great to use for all seasons.
Tag
activity
Trim Santa’s Beard Cutting Activity
My daughter loves using scissors. She got her first pair of safety scissors when she was two. She loves cutting activities and crafts. Among some of her favorites were a simple paper plate hair cutting activity and a trim the Christmas tree one.
*This post contains affiliate links*
Working on scissor skills is great for your child’s fine motor skills and their hand eye coordination. Scissors are also a useful tool and if your child is anything like mine is, it is also a fun activity.
Salt Dough and Nature Winter Wonderlands and Wreaths
I just joked the other day about how when you are a crafter it seems as if friends and family are always giving you random materials to craft with. A lovely woman that works with my husband recently gave us a huge bin full of assorted potpourri. My daughter has been dying to get her hands into it.

Yarn Wrapped Broomsticks
Halloween is a favorite holiday in our house. My daughter is very theatrical and loves to play dress up and, of course, she loves the candy as well.
*The Pinterested Parent is a participant in the Amazon Services LLC Associates Program, an affiliate advertising program designed to provide a means for sites to earn advertising fees by advertising and linking to Amazon.com. In addition, text and image links in this post may be affiliate/referral links, which means we may be compensated if you make a purchase after clicking through these particular links* See full disclosure policy.
Last year, my daughter was a witch and while she outgrew her costume, she still uses her witch’s broom and hat all of the time.
As she played with it the other day, it gave me a fun idea for a Halloween craft for us.
Pizza Making Play Dough Activity
My daughter is obsessed with Play-doh. She just loves it. She loves mixing the colors together, sculpting with it & she even loves those Play-Doh videos all over Youtube. *This post contains affiliate links*
Last year we even made her a Play-doh themed birthday party. Last night while playing with a new variety pack, she asked me for a paper plate. I grabbed her one & asked her what she was planning on making. She said she wanted to make a pizza. “Can you help me, mama?”
Of course! This sounded like a fun project.
Start by pressing a light tan color into the center of the plate & then using a rolling pin to spread the dough out.
Next , pinch the edges of your rolled out dough to make the crust.
Smooth on your sauce with your fingers, utensils or use the rolling pin.
Tear off small pieces of white dough & drop onto your pizza. Add pepperoni or any other toppings. As you can see by my silly girl’s face, she had a ton of fun making her pizza. Here she is rolling out broccoli for her pizza.
My daughter had a brilliant idea. The play dough pizzas were the perfect recipe for a fun evening together.
Thank you as always for reading. Please visit us on our Facebook page as well.
Paper Plate Hair Cutting Activity
*Contains affiliate links for convenience*
I cut my daughter’s hair. If you have ever tried to cut a 3 year old’s hair, you should know that it is not an easy feat. I had to pretend that we were playing hairdresser in order to get her to stay still. While I was cutting, she kept asking if she could have the scissors and cut her own hair. When I was done, she asked if she could be the hairdresser now & cut mine. I had to say no to both, but it did give me an idea.
We have been working on using safety scissors lately. She likes to practice cutting & is still trying to find her comfort level in holding them. I thought that we could make a hair cutting activity for her.
All you will need is:
A paper plate
Glue
Googly eyes
Safety scissors – My daughter actually wanted to use scrapbook scissors for this activity. (Use caution & supervise your children when working with scissors.)
Directions:
Cut strips of paper in the color of your choice to form the hair. We made our hair wavy, so we cut wavy strips.
Glue a piece of construction paper of the same color around the back of the paper plate & trim any excess that hangs over the plate. Glue a flesh-toned piece of paper to the front & trim the excess as well. Add ears. Glue the strips of paper to the back to form the hair in the back.
Glue googly eyes onto the front & draw in the nose and mouth. Glue on a couple of strands of hair to the front & add long bangs for them to trim as well.
I gave Mai a few different pairs of scrapbook scissors & let her cut away. She is still trying to figure out the best way to hold her scissors, so I demonstrated on a separate piece of paper.
She had a lot of fun with this one & even told me that she has the most fun doing projects with me. Awwww. She is getting better each time with her scissors. Practice does make perfect after all.
Thank you as always for stopping by. Please follow us on Facebook as well.
Button Gumball Machine Craft
We have bags of buttons in our craft bins at home. My daughter loves to play with them. She separates them by color & lines them up into rows. She studies the different sizes & textures on the buttons & if I give her a glue bottle & some paper, her face lights up. Last night when she saw me pull out the buttons & construction paper, her face did just that. She pulled up her chair & sat down next to me.
“Mama, what are you doing?”
“Making a gumball machine. You can decorate it with your buttons”
She was thrilled.
Button Gumball Machine Craft
Cut out the shapes to make your gumball machine out of construction paper & glue down to another piece of paper with a glue stick.
Draw & color in the dispenser & dial with crayon.
Instruct your child to glue the buttons into the white circle.
She even named her buttons as she placed them. The purple button was Mai & the brown one was her friend Henry.
Thank you as always for stopping by. Please follow us on Facebook as well.
Cardboard & Yarn Craft Ornament
Since Mai has started daycare our craft collection has doubled itself. We have a collection of home crafts & now the take home ones as well. Our kitchen island has a pile of them. This week, we hung up a few of our favorites to display them. This weekend we decided to make some crafts that were meant to be hung. Since Halloween is over & Christmas is everywhere, now was as good a time as any to make our first ornament.
What you will need:
Cardboard
Paint
Yarn
Glue
Directions:
Cut out your desired shape
Cut out notches in the cardboard.
Paint the cardboard shape.
Wrap yarn around an empty toilet paper roll to make it easier for little hands.
Pull the end of a piece of yarn through one of the notches. Pull tight around another notch & continue until you achieve the look you like. Younger toddlers may need a hand with this.
Pick a side that you like better. Glue a string to the opposite side.
Teaching The Value Of Money
They say “Money can’t buy you happiness.” This may be true, but it sure can buy you a lot of things that make you happy. People love money. Even at an early age the love of money begins. My daughter may not comprehend the value of money, but she sure does know that she likes it. Whenever there is spare change lying around, her face lights up & she hoards it for her piggy bank.
Mai is in her “I want that” phase. We can barely leave the house without it. At the grocery store I hear it echoing down every aisle. “I want the Goldfish crackers.” “I want the funny juice box.” Alright, but you’re buying today. It is funny, she never does.
Children’s brands are clever. They advertise everywhere. Luckily, we do not watch much television that contains commercials, but those marketers find a way to sneak in a ad anywhere. While reading to Mai ‘If You Give A Mouse A Cookie’, she noticed the back book jacket with the author’s other books on it.
“Mama, I want the pig with the pancake.”
“I’m sorry honey. We don’t have that book.”
“Mama, you go to the store & get the pig with the pancake?”
Siiiiiiiigh! Thank goodness for the library.
I can remember at a young age my mother telling me “Money doesn’t grow on trees.” My smart ass remark back was always “Yes it does. Money is made out of paper & paper grows on trees.” Oh how, I wish I could go back in time & smack the crap out of myself.
We want Mai to grow up understanding the value of money and how to spend responsibly, but for now we will just start with her being able to differentiate between those coins that she loves to hoard. Here is an easy coin sorting activity.
What you will need:
2 paper plates
A couple of markers
Glue
Scissors
Assorted change
Directions: Money is dirty, so be sure to clean your change first. On one plate, slice 4 slits on the back just long enough to fit each coin. Use a marker & write the value of each coin to the side of the slit. On the other side of the slit, attach the coin with glue or with tape. Write the coin name underneath. Place the other plate down normally. Staple or glue the paper plate with the coins to the other one so that the coins are on top. It will form a little container to insert & catch the coins in.
“Mama, now we put them in the piggy bank?” The kid is no dummy.
Thank you as always for stopping by. If you like us here, please follow us on Facebook.
Mining For Gemstones
*This post contains affiliate links*
I can still remember the first time I made my daughter a sensory box. It was last year & it was just a large Rubbermaid storage bin filled with colored rice, rubber insects & some scoops & cups. Mai went crazy for it. I could not believe this simple idea could hold my daughter’s attention for so long. She played with it for hours. It was the first time since she was born that I was able to peacefully cook a full meal without her attached to my hip. I was even able to clean up after too. It was amazing.
As amazing as it was though it was also very messy. I accepted this as long as it kept Mai happily occupied. A year later I will still find a stray grain of colored rice every once in a while. We continued with the sensory play, making holiday themed boxes, fossil brushing & her favorite which is water play. All of these activities were fun & all of them were very messy.
With the warm weather here, I am delighted to be able to move the messy play outdoors for a change.
Mai recently became obsessed with these little crafting gems that I have. She carries them all around & like the rice, I find them everywhere. I had an idea to make a sensory treasure hunt for her using some of these gems that she is so fond of. We recently bought her a sand & water table and this fit in perfectly with our plan.
What you will need:
A sensory or water table, an old pool or a large storage bin. Any of these will work fine.
Play sand
Water
Colored crafting gems
A sand sieve, shovels or scoops
We have a sand/water table, so I used this for our activity, but it would just as easily work in a large Rubbermaid storage container or an old pool. Throw your gems into the bottom of your container, add sand & water. Let your child dig out the gems using scoops or shovels, a sand sieve or even just their hands.
As with all of the sensory play, this kept my munchkin amused for quite some time. I sat on the grass, enjoyed the sun and watched Mai digging out her gemstones. She would dig them out, put them aside & them throw them back in & start all over again. She asked for a towel to clean them off with & then put them in a container that night & set them next to her bed. Like I said, she really likes those gemstones.
Thank you as always for stopping by. Please follow us on Facebook as well.