Tag

dress up

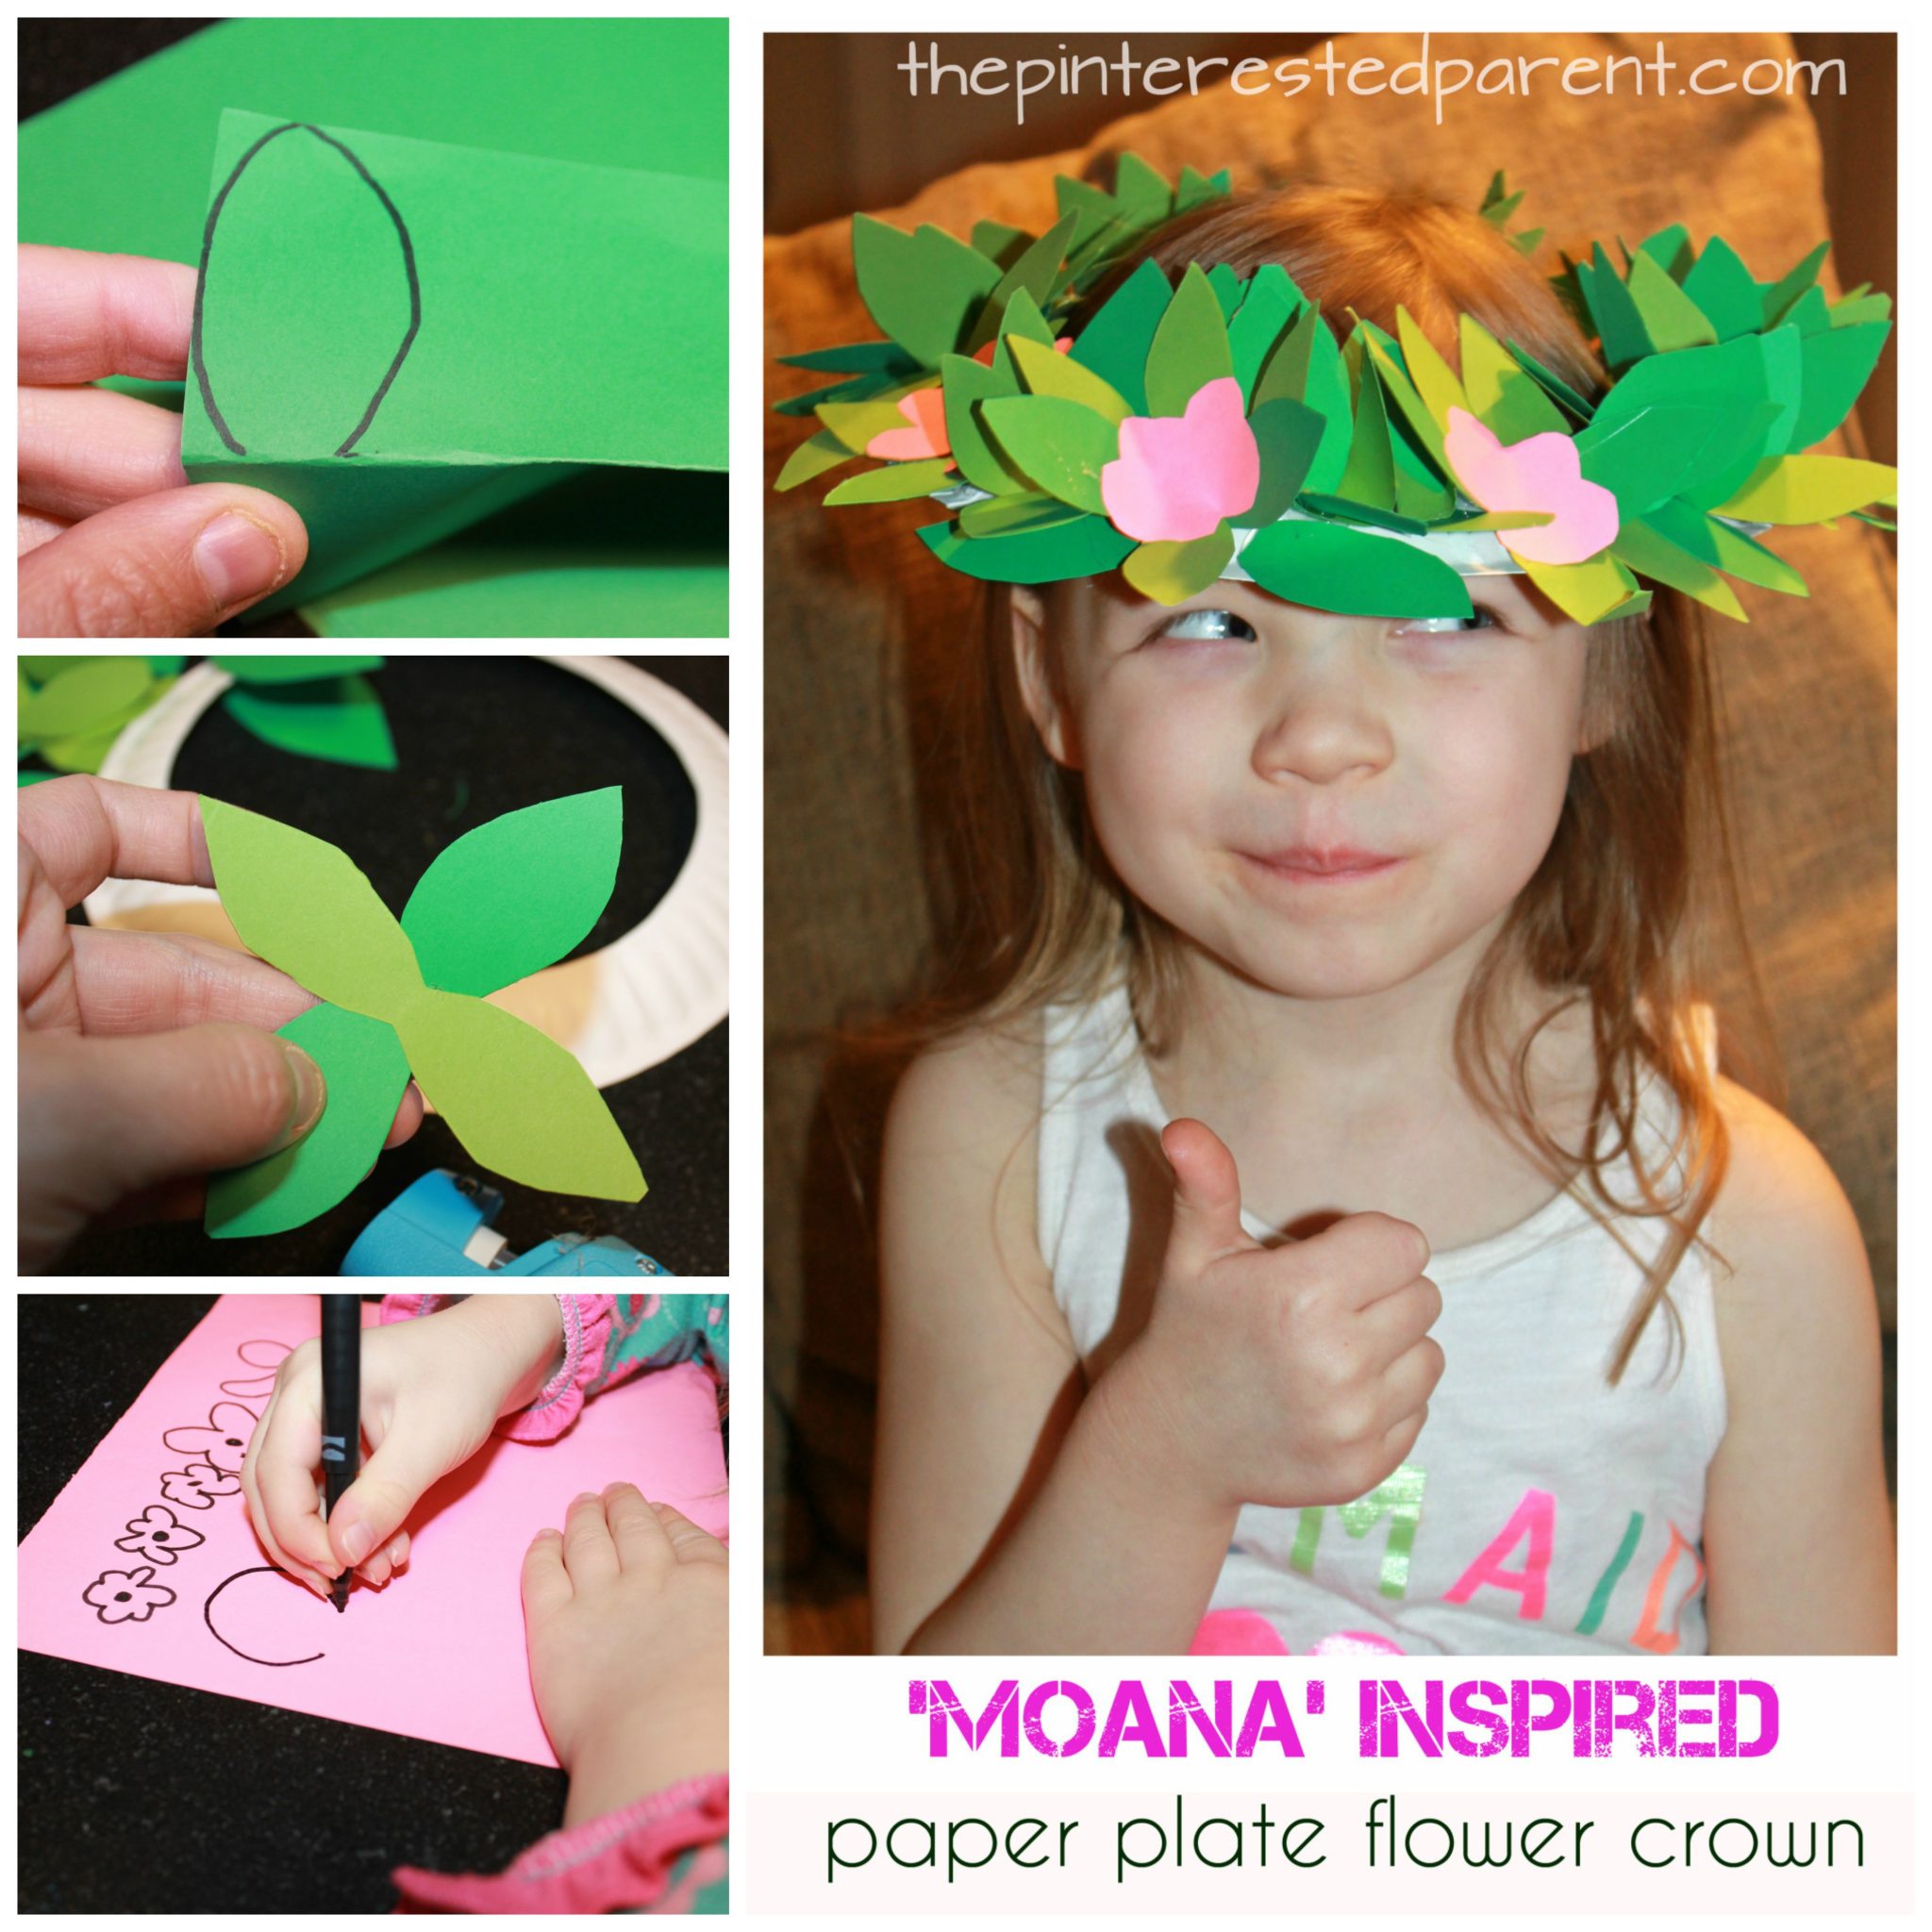
‘Moana’ Inspired Paper Plate Flower Crown

 Do you have a little Moana fan in your midst? If you do they will love this Moana inspired flower crown.

Moana madness has hit our home. Our little girl loves the brave and feisty Moana (affiliate link). We have watched the movie more times than I can tell you and there is no sign of our daughter losing interest any time soon. She has even already requested a Moana themed birthday party for next year. With as crazy as my daughter is for this adventurous young girl, I wanted to make her a little something special (with her help). Moana wears a few different crowns and headpieces throughout the film, but I love her simple leaf and flower crown. I thought this would be perfect for a little pretend play.Moana inspired paper plate flower crown. Kid's arts and craft. Construction paper headpiece for dress up and pretend play.

Continue Reading…

No Sew Barbie Mermaid Tail

Turn an old kid’s sock into a Barbie mermaid tail without ever picking up a needle and thread.

My daughter just received her first Barbie for her birthday, as well as an Elsa and Anna doll. She loves playing with them, but hates that they only have one outfit. I told her that when I was a little girl, I used to make my own Barbie clothes out of socks, so of course she wanted to do this. While sliding one of her dolls into a tube sock to show her, she told me that it looked like a Barbie mermaid tail. Light bulb! We found our first project.
Use an old tube sock and some sequins to make this no sew mermaid tail for your Barbie. Arts and crafts for your kids

Continue Reading…

Egg Carton Crown

We use recycled items in our crafts all the time. It is very difficult for me to throw anything out. This has crossed over to my 4 year old & my husband as well. My daughter will save bottle caps & other random things & tell me “This will be good for a craft” & my husband won’t throw anything away without asking me if I can use it first.

Egg carton crown craft - use recyclabes to make this dress up crown or tiara for pretend play for the kids

*This post contains affiliate links for convenience*

Our craft room has bins of recyclables, but most prevalent in our collection is egg cartons. We have piles of them. It was time to put some of them to some good use. Here is a great craft that parents can do for their little kings & queens.

Egg Carton Crown

What you will need:

Egg cartons

Glue gun (Use caution when operating a glue gun. Low heat guns are recommended for children.)

Acrylic Paints

Buttons

Pom Poms

Directions:

Egg Cartons do come in a variety of different shapes. We used a family sized pack that looked like this inside.

IMG_8129

Cut through the egg carton the long way. You will want to cut through the centers of the 2 spiky portions running along the middle of the carton.

IMG_8130

Your cut piece should look like this.

IMG_8131

Cut through the middle of your cut section the long way until you have two halves.

IMG_8132

Use a glue gun to glue the two pieces together to form one long piece. You should be able to get the spikes to match up so that they blend when gluing them together. Depending on the size of your child’s head you may need to glue on a few extra spiked sections.

IMG_8133

When you reach the desired length, bend the long piece of egg carton to form a crown shape & then glue into place.

IMG_8135

Paint your crown in the color of your choice. My daughter wanted red for hers.

IMG_8136

Use buttons & pom poms for embellishments or add on whatever you like to create your crown.

IMG_8137IMG_8138

My daughter loved her crown. It fit her head perfectly. She had a crown fit for a queen.

Egg carton crown craft - use recyclabes to make this dress up crown or tiara for pretend play for the kids. Arts & Crafts

Thank you as always for reading. Please visit us on our Facebook page as well.

Styrofoam Ball Necklace

Painted Styrofoam Ball Necklace

Painted Styrofoam Ball Dress up necklace - fine motor activity and craft for kids

*This post contains affiliate links for convenience*

Like many little girls, my daughter loves to play dress up. She loves putting on her princess dresses & trying to walk in mommy’s high heels and she loves jewelry too. Lately, she has been enjoying threading buttons & pasta and anything else she can get her hands on to make necklaces for me & her to wear. Yesterday, we added Styrofoam to that list too.

We grabbed a handful of 2″ Styrofoam balls out of our craft supplies & then one larger one. I poked a wooden skewer into each to make it easier for painting & drying.

IMG_4964

Hold on to the skewer & use acrylic paints to paint around each ball.

IMG_4980 IMG_4977

Put the skewers in a deep container ball side up & let them stand to dry.

IMG_4978

Once dry, remove the skewer & use a plastic yarn needle to poke through the existing hole & string up your painted Styrofoam.

IMG_4981

Threading Styrofoam balls for fine motor activity & necklace craft

Tie a knot at the end to finish it off.

Just look at that smile.

IMG_5021

Thank you as always for stopping by. Please follow us on Facebook as well.

Pipe Cleaner Tiaras

Pipe cleaner tiara for princess & pretend play

I have had a rough week. I have been sick this whole week. I left work early twice & yesterday stayed home all together. I lounged on the couch, slept a lot & binged watched Netflix, but then got very fidgety & bored. I had a big bag of shimmery white pipe cleaners that I had been wanting to make something out of, but I didn’t know what. I began playing with them & then knew what I wanted to make.

Pipe Cleaner Tiaras

So this is what happens when mommy stays home from work sick.

Grab two cleaners & twist them together. Do this again to another pair of cleaners.

IMG_1386

Take both twisted pairs & twist them together at the ends so that they formed a circle. Tuck in the sharp edges.

 IMG_1387IMG_1385

Make another twisted pair & formed it into a bow.

IMG_1388

With a single pipe cleaner, bind the bow to the circle by weaving it around the bow & the circle.

IMG_1389

Fold a pipe cleaner in half & then twist it. Roll the cleaner so that it forms a shape as shown below. Do this again with another cleaner.

IMG_1390

Use a pipe cleaner to bind each shape to the side of the bow & to the circle. Weave in and out. The better you bind it, the sturdier your crown.

IMG_1391

IMG_1392

Use another twisted pair. Fold it in half & then roll each end down & outward to form a shape like this.

IMG_1393

Bind it right above the center of the bow.

IMG_1394

Form a heart out of another twisted pair.

IMG_1395

Line up the point of the heart behind the center of the bow & bind in place with a single cleaner.

IMG_1396

Form two more curly shapes like shown & bind to each side of the heart and any other points that the shape meets. Weave in & out and always remember to tuck the sharp end in.

IMG_1390 IMG_1398 IMG_1399

IMG_1401

Add colored pom poms to your tiara with a glue gun to add color. (As always use caution when operating a hot glue gun. It is recommended for adult use only.) If you still have sharp edges from your pipe cleaners, try dabbing the edge with just a bit of hot glue to cover the end.

IMG_1419

I had so much fun with this one. I made a few more with different shapes & colors.

Pipe Cleaner Tiaras - For princess pretend play & dress up

Try your own designs. I surprised Mai when she came home from pre-school. She liked this one the best.


IMG_1531
Her animals really liked them too.

IMG_1449

Thank you as always for stopping by. Please follow us on Facebook as well.

Pipe Cleaner Tiaras

Paper Plate Wig Masks

IMG_34041My daughter loves to pretend play. She has a vivid imagination & it is fun watching her explore her world of make believe. She loves to play baker and bake us beautiful cakes. She will take the little cherries out of he Hi Ho Cherry-o game and decorate her stacking cups with them and make tiered cakes. Last week when I didn’t feel good she made me a bowl of chicken soup complete with ABC magnets & a plastic drumstick. Delicious!

One of her favorite cartoons is Sheriff Callie. She has a cowboy hat that she wears & a pink hamper that she calls Sparky her horse. Giddy Up Sparky.

IMG_2548

She loves wearing dresses & twirling around & saying “Look Mama, I look like a princess.” Yes you do.

With her growing interest with the world of dress up & make believe, I thought we could have a little dress up fun.

Paper Plate Wig Mask.

What you will need:

Paper plates

Yarn

Glue

Pipe cleaner or string

Scissors

Directions:

Cut a whole out of two paper plates following the line of the first inside circle in the plate.
Cut a hole out of two paper plates following the line of the first inside circle in the plate.
Glue the two paper plates together for a sturdier mask base.
Measure out how long you want your bangs to be & cut a piece of yarn at the desired length.
Measure out and cut several more pieces of this length.
Glue the bang pieces into place. Do not worry about them lining up perfectly, you can trim them later.
Trim along top and cut until flush along the curve of the plate.
After you have placed your bangs, add a strand of yarn on the out edge of the plate following the curve of the plate about a 1/4 of the way down & then let the yarn hang straight down & cut to desired length,
After you have placed your bangs, add a strand of yarn on the outer edge of the plate following the curve of the plate about a 1/4 of the way around & then let the yarn hang straight down & cut to desired length.
Add another piece of yarn  right up against the other following the same pattern. Do this until you have worked your way to the inner edge & then switch sides & repeat.
Add another piece of yarn right up against the other following the same pattern. Do this until you have worked your way to the inner edge & then switch sides & repeat.
Continue  until both sides are finished.
Continue until both sides are finished. Trim the uncovered portion of the plate.
Insert a pipe cleaner or string between the two plates or to the the back of the plates to create the backing to your mask.

IMG_3409 IMG_3407

And for the boys…

IMG_3416
Cut out a half circle within your paper plate.
Sketch out & cut a mustache shape.
Start with one side of your mustache, laying down strand by strand similar to above.
IMG_3421
Working from the top end of one side of your mustache work to the edge of the plate and follow downward along the curve of the circle until you meet the opposite side of the mustache.
My big kid enjoyed his mask too.

IMG_3424