Category

Play dough & clay

Printable Face Play Dough Mats

Free Printable mats for Play dough & for drawing inspiration for kids. Arts and crafts and creative activities

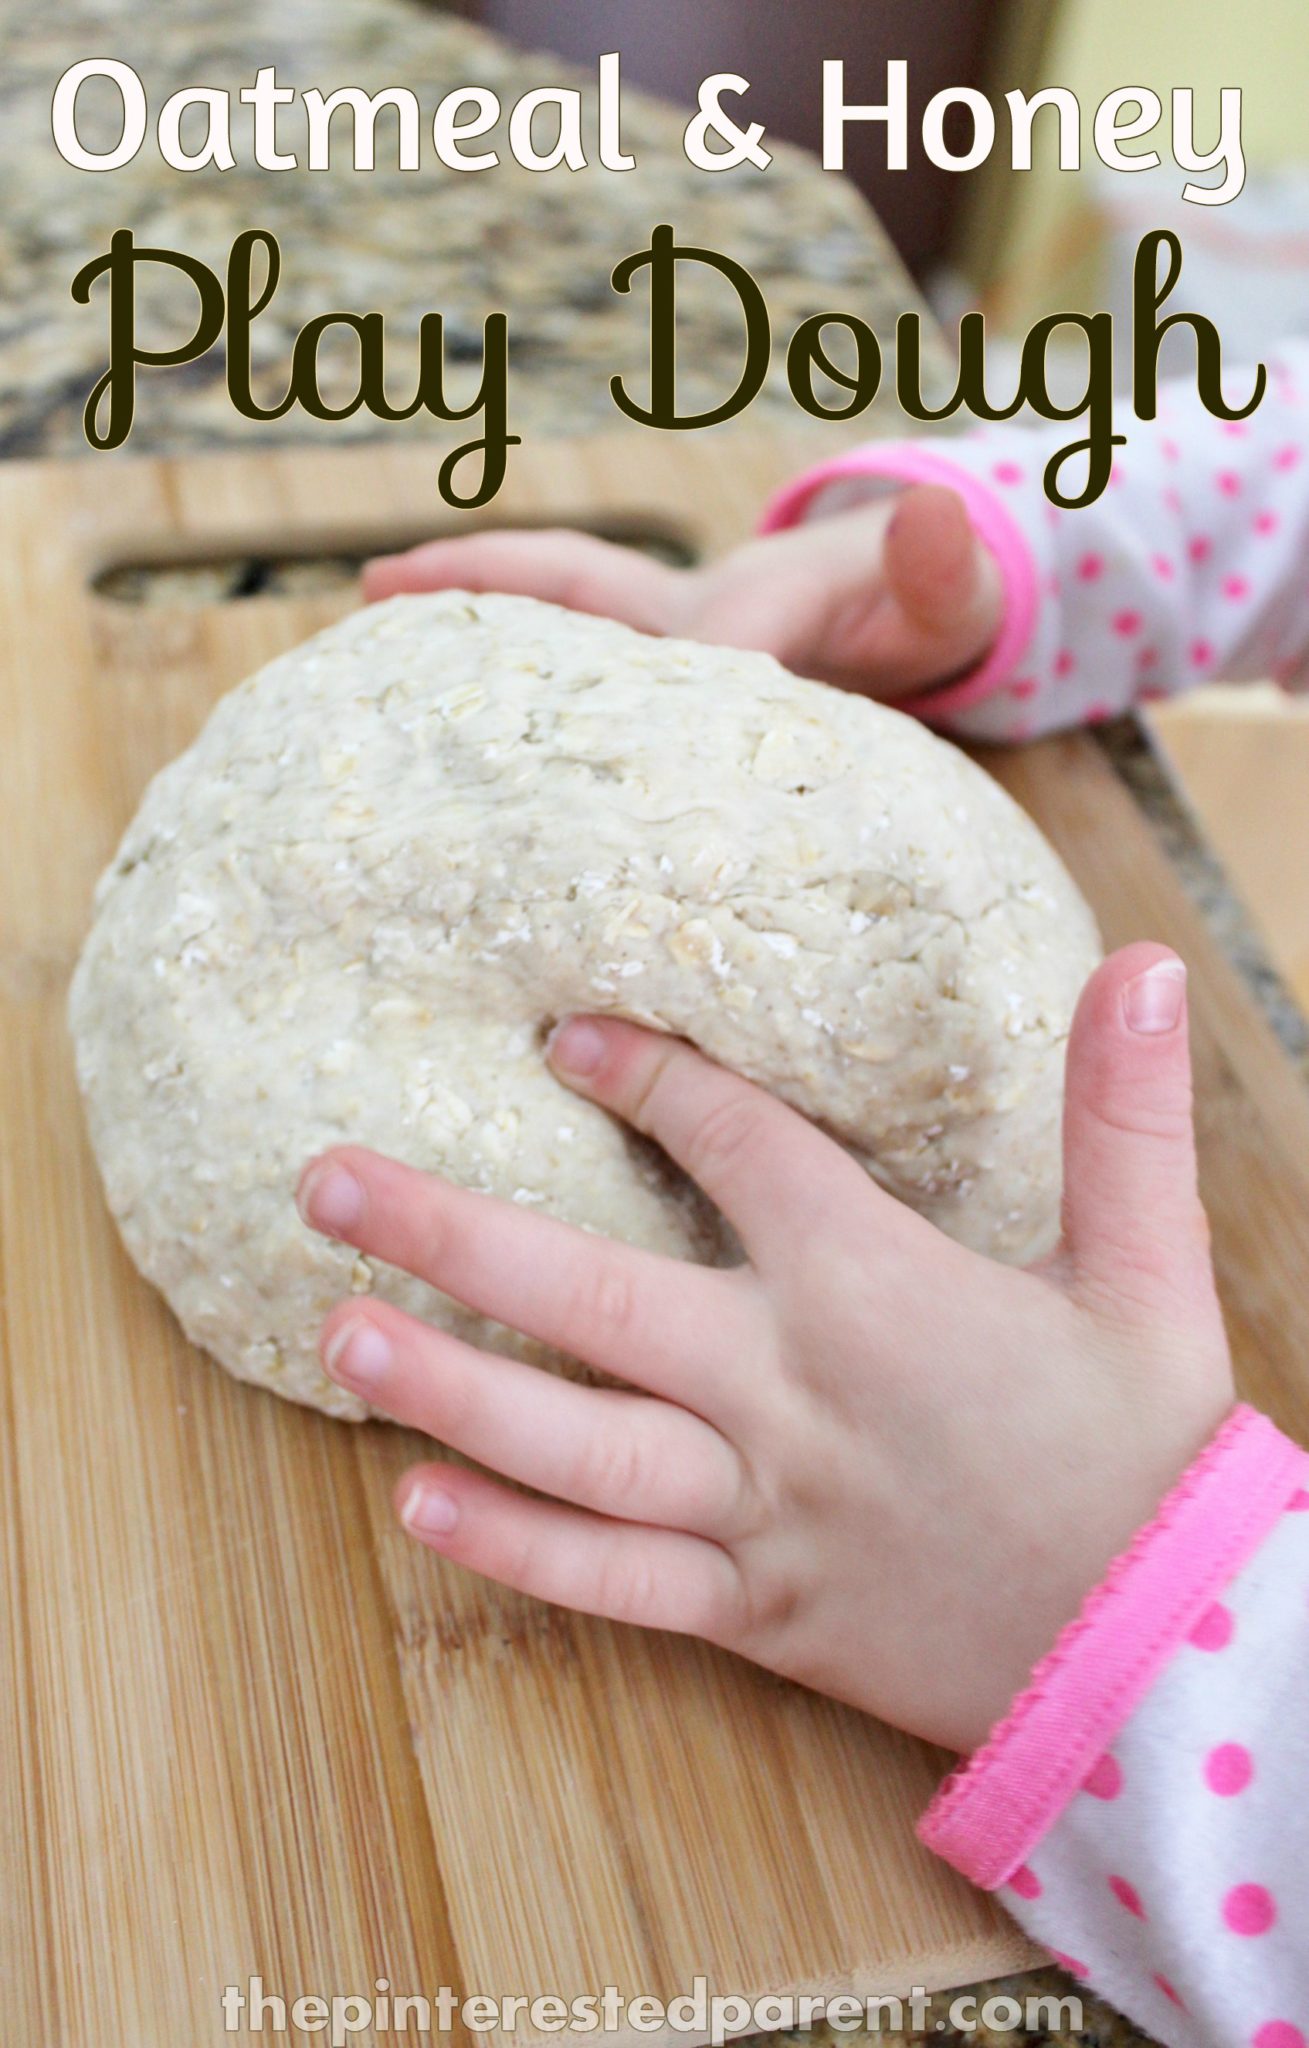
I have a play dough obsessed child. She loves all things play dough. Last year her birthday party was even, you guessed it, play dough themed.  We have tried many different play dough activities, but we have not really ever worked with play dough mats. Since my daughter loves making people, I thought that face mats would be a great idea for her.  Get your free printables at the end of the post.

Free Printable boy & girl face mats for Play dough & for drawing inspiration for kids. Arts and crafts and creative activities.

We started with a lot of dough. We rolled out the colors that we wanted. It made it easier to work with.

IMG_5401 IMG_5403

I helped her get started with the face and showed her how to spread the play dough out.

IMG_5406 IMG_5417

She spread out her dough & formed little eyes & a mouth for her little girl. She used a plastic knife to cut away any excess. She wanted to give her a shirt too. She made sure that the shirt had a flower on it too. She did a great job.

Free Printable face mats for Play dough & for drawing inspiration for kids. Arts and crafts and creative activities


Later that evening, she used wanted to draw on one too. She made a rainbow girl with rainbow hair. She was very proud.

IMG_5444 IMG_5446

Use laminate sheets over the printables to make them reusable. Laminate will make for easy clean up with the play dough. You could also use dry erase markers on it, to color & draw on it over and over again.

Download your free printables here.

Play dough mat (boy)Play dough mat (girl)

Thank you as always for stopping by. Please follow us on Facebook as well.


Oatmeal & Honey Play Dough

Oatmeal & Honey Play Dough - add a little texture to play.

We recently moved into a house that was still under renovation. Most of our belongings were in storage for months while we waited for our home to be move in ready. While unpacking our kitchen, I noticed that a lot of our food was getting close to their expiration. I had open containers of flour & oats that I wanted to use up, so this morning I made a couple of dozen oatmeal mini muffins. They were a big hit by the way. I still had a little bit more flour & oats left, so we tried our hand at oatmeal play dough.

Ingredients:

2 cup of oats

2 cup of flour

1 cup of water

1-2 tbsp honey

Food coloring optional

Directions:

Add the water to the oats and add the honey. Stir well. Mix in the flour & then knead with your hands. It may seem like a lot of flour, but keep kneading well and it will absorb. (Add extra water a tbsp at a time if needed until you reach your desired consistency)

Oatmeal & Honey Play Dough - Texture Sensory Play for the kids

I loved the texture of this play dough. It was very firm & moldable. My daughter of course wanted to dive right in.

Oatmeal & honey play dough - the oatmeal adds a different texture for the kids

IMG_4707

IMG_4710

I was so excited about how well it molded. I asked Mai what we should make. She said that she wanted to make a pyramid. We sliced the play dough into rectangular pieces and constructed our own pyramid.

IMG_4734

IMG_4729

As if the play dough wasn’t messy enough, mommy added another element of mess & made icing to bind the pieces together.

IMG_4744

IMG_4751

This was a great activity for both of us. While Mai constructed her towers & googly eye cookies, mommy made a little something of her own too.

Oatmeal Play dough owl

Thank you as always for stopping by. Please follow us on Facebook as well.

Roll , Cut & Construct and Build with Play Dough - Fine motor for kids

Play-Doh & Rice Sensory Play

Play-Doh Sensory Craft


This has been a tough few days. Our daughter sprained her wrist & hasn’t been able to do much.  We have kept her calm & entertained with books, Highlights magazines & hours of marathon watching Stella & Sam & Play-Doh videos. We had far too much screen time this weekend & I needed to entertain her another way.

IMG_0408 (1)

We made a simple sensory craft using Play-Doh & colored rice. You could just as easy use sprinkles, small gems or buttons too.

I cut a cone shape out of construction paper & glued it to a white piece of paper.

IMG_3290

I drew hash lines on the cone with a marker. I rolled out Play-Doh and formed ice cream scoops.

IMG_3291 IMG_3292

IMG_3293

We used dyed rice to press into our ice cream scoops as sprinkles.

IMG_3294  IMG_3297

IMG_3303

When we finished with this, Mai wanted to keep playing with the Play-Doh & rice. We made several other crafts using cookie cutters & free form creations.

IMG_3310

Mai made a sweet little hand print & I made a flower.

IMG_3307 IMG_3311

Mai made a bunch more too. This was a great activity that kept her happy & occupied with one hand for hours.

IMG_3318

Thank you as always for stopping by. Please follow us on Facebook as well.


Play-Doh & Rice Hand Print Activity & Craft

Play Dough Easter Egg Activity

Play Dough Easter Egg Activity


Play-Doh is my daughter’s favorite creative material. She has become quite the Play-Doh artist. Her creations include cakes, animals & even a mold of herself wearing a tutu. We buy it often, but make it in a pinch. When I told her that we would be making a fresh batch of play dough tonight, she became so excited that she could barely wait for the homemade dough to cool before she dug her mitts into it.

BeFunky_IMG_9963.jpg


IMG_9956

We kept going with our Easter theme. We used a piece of heavy stock paper & rolled out our dough onto it to form an egg shape.

IMG_9970

Using cookie cutters & other tools, we rolled & cut out shapes in different colors.

IMG_9968 IMG_9976 IMG_9974

We pressed our shapes into our play doughto decorate our Easter eggs. I pre-pressed lines into the dough to act as a guide for her to press her lines into. Add gems, string, buttons & other embellishments to dress up your eggs.

IMG_9975

IMG_9978

If you have a play dough lover in your home, they may love this cute & easy holiday activity.

Thank you as always for stopping by. Please follow us on Facebook as well.

It’s A Play Dough World

PlayDoughPark.jpg


I am currently living in a Play-Doh world. My living room is filled with containers & baggies filled with dough. Most containers are filled with multi-colored globs of dough that have been blended and smashed together. There are cutting tools, stamps & dough presses covering our tables & floors. It is easy to say that my daughter is obsessed with Play-Doh. Her birthday this year was even Play-Doh themed.

There is a kid’s television show that we will watch together called ‘Art & Music’. It is a lovely show that shows different mediums of art put to music. On every episode there is a segment called Clay World. They create amazing scenes & people right before your eyes. This is my daughter’s favorite part of the show. She oohs & aahs over their creations & tries to recreate them. I speak about inspiration often & it seems that even the youngest of artists get inspired.

Last night she asked me if we could make a Play-Doh village together. How could I say no to that?


We started with a pond laid out on a piece of poster board.

IMG_9286

Mai helped me form rocks to place around the pond.

IMG_9289

We rolled out a strip of mismatched green & sliced out grass blades.

IMG_9290

I worked the grass around the pond and rocks.

IMG_9291

I formed a walkway.

IMG_9294

Mai wanted to make ducks for the pond. She formed one with a cookie cutter. She got upset once she realized that it could not stand up in the pond.

IMG_9297

I showed her how to make a little duck that could float in the pond. She was a quick learn & made several little ducks to put in the pond.

IMG_9302


IMG_9304

We added a walkway to our pond & then pressed green dough around to form more grass.

IMG_9299


IMG_9301

Mai helped me press & work some brown dough around the side to form dirt.

IMG_9313

We added an additional path to the side & a stream.

IMG_9315

Mai made us a banana boat to put in our stream. That’s me in the orange. Mai is driving the boat of course & daddy & her cousin Sebby are in tow. I love that little girl’s imagination. Before she went to bed last night, she asked to add a zoo to our park. “Tomorrow baby girl.”  I really am living in a Play-doh world.

IMG_9318


Thank you as always for stopping by. Please follow us on Facebook as well.

IMG_9316

Play-Doh Birthday

Play-doh birthday party ideas

*This post contains affiliate links*

Picking a theme for Mai’s 3rd birthday was an easy decision. You have all heard me talk about our daughter’s love for Play-Doh. It only made sense to celebrate her special day with her favorite activity.

Continue Reading…

Play Dough Ornaments

playdohornament1

Over the last couple of months my daughter has found a new obsession. Morning, noon & night you can find her at our coffee table buried up to her elbows in Play-Doh. She has become quite creative with her dough. There are so many possibilities. The fun is endless. Check out our list of fun Play-Doh activities this week at Seek Magazine.

The only problem with Play-Doh, is that we go through it so quickly. It is not always convenient or cost effective for me to run out to the store to buy more, so I often make it at home. I have tried many different recipes. I have made it cooked, uncooked, with hair conditioner, with Jello, but my favorite one is a recipe I found on Instructables.

There is a lot that you can do with a basic play dough recipe. You can add different colors, spices, scented oils and various textures. My daughter is in a sparkly phase. She likes to wear her sparkle tutu everyday & her sparkle shoes & she loves playing with glitter. We decided to mix our dough with glitter. Mai called it sparkletastic play dough.

IMG_6838 IMG_6840

IMG_6858

glitterplaydough

It looked so pretty after we were through with it. It looked so festive. One of the activities that was on our play dough activities list was making Christmas ornaments. So that is just what we did.

Snowflake ornament

I rolled out a circle about 3″ around. I pressed a felt snowflake into my circle to make an imprint.

IMG_6868

Use the back side of a spoon & press in all the way around to form a snowflake shape. Pull the felt piece out of the middle of the ornament.

IMG_6870

Use a straw to poke a hole in your ornament where you would like your string to go. You may have to lift the ornament up so that the straw goes all the way through.

IMG_6812

Let dry to harden. This might take a couple of days depending on the thickness of the ornament. Do not bake as the glitter will melt & cause the ornament to explode. Add a ribbon or string.

IMG_6888

Family Hearts Ornament

Using a cookie cutters cut out three heart shaped ornaments. If you have 3 different sized heart cutters use the 3 different sizes. If you do not, use the same sized cutter & just spread out 2 of the hearts to form larger hearts so that you have three in increasing sizes.

IMG_6875 IMG_6871

Poke a hole into the smallest heart at the top center part of your heart. For the larger two hearts poke a hole in the top center & bottom center.

IMG_6876

Let the hearts dry & harden for a day or two. Using a ribbon or string, string your 3 hearts together with the largest on top & the other 2 dangling beneath in descending order.

IMG_6882

Using a marker or paint, write your names onto each heart.

IMG_6883


ornament

You may also paint your ornaments after hardening. Mai is very excited to put up the tree in a couple of weeks & now we have some new lovely ornaments for our tree.

Pasta Mosaic Craft & Activity

pastamosaic

This weekend it was my husband’s birthday. For his birthday, we had a nice family breakfast and spent some quality time together, but daddy really wanted to watch football today. Since he so willingly gives up football every Sunday for Paw Patrol & Doc McStuffins, Mai & I were determined to let him watch his team play today. We needed an activity to keep our little one occupied for a long period of time.

As you all probably already know, I am a huge fan of pasta crafts. We have more boxes of pasta for crafting than we do for eating in our house. One of my favorite pastas to use is Ditalini. When dyed, it looks like beads. We made pasta jewelry a while back and colored much more of the small pastas than we needed. We had a ton leftover to use. We just needed a project that we could use them on.

Luckily we had the perfect activity in mind that both kept her busy for a shockingly long long time & used up all of our little Ditalini.

Spread out Play-Doh in the center of a paper plate.

IMG_6171

IMG_6172

Color pasta by shaking pasta in a plastic Ziploc bag with food coloring & let dry.

IMG_6173

Have them press the pasta pieces into the Play-Doh one by one.

IMG_6180

IMG_6183

IMG_6192

You can also use another pasta to outline a shape and work around it.

IMG_6195

This was a fun activity and craft for us. I was impressed with how thorough and thoughtful Mai was when placing each piece as if she already had a plan for each piece.

IMG_6196

Hey, why does yours look better than mommy’s?

IMG_6199

Pine Cone & Play-Doh Turkey Crafts

ThanksgivingCraft.jpg

One of my favorite parts of my daughter’s days at daycare are receiving her daily reports & seeing all of the craft projects that she brings home. I love seeing her beautiful crafts, even the ones that she does with someone else.

This week she brought home a lovely fall one.  It was branches bound together & decorated with Play-Doh. Miss Laura said that Mai worked on it for 2 hours.

IMG_5740

This weekend there was a sale on Play-Doh at the supermarket, so I stocked up. Mai was so excited when I came home with a box filled with 24 different shades of it. She dove right in & started creating.

IMG_5735

She is becoming quite the little artist. Her imagination is developing so quickly. I watched her as she kneaded & forms different shapes & put them together. She explained to me as she molded her creation what she was making.  “Look mama, a frog! He has a blue fly on his tongue.” I have to admit, I was very proud.

IMG_20141025_101954346

She did not stop there. “Look Mama, I made Dukey’s poop.” Oh dear! It does look like Dukey’s poop.

IMG_20141025_111042731

Since we already were in such a crafty mood & had a table full of Play-Doh, I thought we could make something together.

Thanksgiving Turkey Craft

This just require pine cones & Play-doh. I used craft pine cones only because they were handy. You can use ones from your yard as well.

Form & mold the turkey’s head to the fat part of the pine cone. Show your child how to do it & let them do it to their own.
(If your pine cone is wobbly, place a chunk of Play-doh underneath to keep sturdy.)

IMG_5706

IMG_5702

Form long oval shaped pieces to use as the turkey feathers.

IMG_5707

Insert towards the back between the pine cone scales.

IMG_5712

IMG_5709

Again, show your little one how to do it.

IMG_5715

IMG_5714

Add the beak. Older children may be able to do this step, but the smaller hands might need the help. Mai asked mama to make her turkey face.

IMG_5710

Add the eyes next.

IMG_5711

Add the turkey’s waddle & you are done.

PineconePlayDohTurkey.jpg

Play-Doh & Popcorn Craft

IMG_51191

I was born with a creative soul. I didn’t have a choice, it was hereditary. I came from a family of artists. Every aunt & uncle on my father’s side had a God-given talent. Since I was a small child I have been drawing. For years I would flip through magazines & draw portraits that I found beautiful or interesting.

535222_3499114329837_267733555_n IMG_5125 IMG_5122

When our daughter came along, I was anxious for her to reach an age where we could start drawing & crafting together. My hope was that some of that creative gene would be passed down to her.

1013392_10200706513378486_131431881_n

As you all know my daughter has indeed followed in my footsteps. She loves drawing, painting & doing arts & crafts with mommy. I have to admit I swell with pride with each new drawing & art project. She has amazing vision. Here is an underwater drawing that she made, complete with sea creatures.

IMG_20140926_220431189_HDR

This is a drawing of a savanna. My two year old daughter actually used the word savanna while making this. What a little smarty.

IMG_20140926_220445581

Mai asked me to make her some Play-Doh tonight. So we did. We made a lot of it. With all that extra dough, we decided it was craft time.

What you will need:

Play-Doh or colored clay

A piece of cardboard

Popcorn

Sugar

Water

Food Coloring

Directions:

Find a square or rectangular piece of cardboard.
IMG_5095
Choose a color for your sky & roll it out over the top portion of your cardboard. It does not have to be perfect.
Add your tree trunk & grass using your dough.
Add a background color to cover our whole board.
Add a background color to cover the whole board.
Make popcorn & set aside to cool.
To color our popcorn, I followed the directions from this sight. I needed to use more water in mine. Add more water as needed. http://www.wikihow.com/Make-Rainbow-Popcorn Pour the different colored mixtures over separate containers of popcorn & allow to dry.
To color our popcorn, I followed the directions from this site. I needed to use more water in mine. Add more water as needed.
http://www.wikihow.com/Make-Rainbow-Popcorn
IMG_5104
Pour the different colored mixtures over separate containers of popcorn & allow to dry.
Give your child the mat & explain to them that the popcorn is for leaves.

IMG_5102 IMG_5108

IMG_5112

IMG_5111

There goes that maternal pride again. She made a beautiful tree with her popcorn. She showed me as she placed each popcorn leaf. “Look mama, I make a orange leaf. Seeeeeee.” I was very impressed that she placed every piece around the branches all by herself. She was proud too. Mai was so excited to show off her artwork that she woke up daddy from a much needed nap to show him her lovely craft. Daddy was proud too.

IMG_5119