Category

Felt Fun

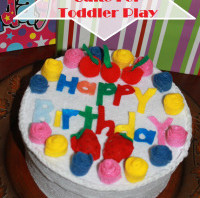
Felt Birthday Cake For Toddler Play

IMG_50731

Our daughter is a fan of the television. I am not a fan of her watching television, but still we do let her watch videos & toddler appropriate programming in moderation. She does not like it when we shut off the TV. She is a smart cookie though & knows how to work her family.
Daddy: “Mai, we have to shut of the TV.”

Mai: “How bout, we watch Patriots.”

She knows her daddy’s weakness.

She also knows her nana’s. “Nana, do you want to watch Cooking Channel?

Mai enjoys watching cooking with her nana. She also loves helping in the kitchen and pretend cooking in her play kitchen.

IMG_3987

Her favorite pretend food to make is cake. She makes cakes out of Play-doh. She stacks her stacking cups to make tiered cakes & then decorates them with the cherries from her Hi Ho Cherrio game. There is a learning exercise on ABC Mouse that allows you to decorate cakes & she adores this. She will draw with her imaginary icing & place flowers & fruit all over her virtual cake.

To help inspire our future little cake boss to continue to make tasty treats, we came up with this felt birthday cake for her to decorate.

What you will need:

A medium sized plain cardboard hat box

Assorted colors of felt sheets

Yarn

Craft pom poms

Elmer’s glue

Glue Gun

Scissors

Pen

Directions:

Start with a medium sized plain hat box. You can purchase on of these at a craft store for only a couple of dollars.
Start with a medium sized plain hat box. You can purchase one of these at a craft store for only a couple of dollars.
Remove the top & trace out the outline of the top on a felt color of your choosing & then cut it out.
Measure out and mark the felt to cover the side of your box top as well.
Using Elmer's glue, glue down the top & sides. The Elmer's glue will allow the felt to dry flat & smooth.
Using Elmer’s glue, glue down the top & sides. The Elmer’s glue will allow the felt to dry flat & smooth.
To make my icing edge, I braided 3 long strands of yarn & used the hot glue gun to glue down along the edge of the box top.
Cut and glue felt to cover the bottom half of the hat box as well. Allow to dry before proceeding.
Cut out colored felt strips about a 1/2 inch thick. Cut using a waving pattern on one side.
Roll the strip to form your cake flowers.
Glue the flowers in place using a glue gun.
To form a strawberry, cut out two heart shapes. Dot the heart shapes with a green marker to add seeds.
Place a craft pom pom in the center of one of the heart shapes. Add hot glue from the glue gun around the edges & place the other heart over it, dotted side facing out. Press the edge together all the way around . Cut  out a small star shape in green & glue over the top center of the strawberry.
Place a craft pom pom in the center of one of the heart shapes. Add hot glue from the glue gun around the edges & place the other heart over it, dotted side facing out. Press the edge together all the way around. Cut out a small star shape in green & glue over the top center of the strawberry.
To make a cherry, I just used a red pom pom & added a green felt piece for the stem.

Cut out letters & numbers. Make as many different fruits & flowers as you like. Let your little baker go to work decorating their cake.

IMG_5074

IMG_5067 IMG_5066 IMG_5084

Store cake pieces inside the box.

IMG_5081

feltbirthdaycake


Build A Felt Snowman

Buildafeltsnowman.jpgI’m a New Englander. Tonight, marks the first snowfall of the season for us. There is a love /hate relationship between snow with most New Englanders. Every year, I get excited when that first snowflake drops. It just does not feel like the holidays with out it. That first snowfall is so beautiful. It is perfect and untouched. It makes the ground & the trees glisten and it just invites you to come out & play in it. Then the problem is you do, then realize that it is also cold & wet and that you would rather be inside by the fireplace sipping your cocoa.

Last year was my daughter’s first winter. We couldn’t wait to take her outside & pull her around the yard in her sled, but once we got out there, I immediately began to worry about the cold. We pulled Mai around the yard a couple of times, took this happy family picture & then went back in the house where it was warm.

546398_4602443872386_1680925696_n

 I said to myself, “Next year will be better.” ” She will be older. We can build a snowman.”

Well the year flew by & here we are already into another winter. As the snow is touching down on the ground, I am already daydreaming about taking our daughter out in the snow again.

I know myself though & the paranoid mommy in me will probably do the same again this year. It made me think, I wish I could bring some of the fun of the snow into the warmth of our home.

I have seen a number of felt projects in my travels though Pinterest & other bloggers. I have seen the felt Christmas trees, advent calendars & a clever felt gingerbread house. Why couldn’t I make a felt snowman?

Let me just warn you ahead of time. I am not a seamstress. Sometimes I see some of the other posts on here, of recipes, family anecdotes, photos & crafts and it makes me feel a little inadequate. I am not a chef, I am not a writer, a photographer or a very good sewer.

I am a mommy, with big ideas, a tight wallet & all the best intentions, so occasionally my projects come out less than perfect. This would be one of those times.

FELT SNOWMAN

White Felt – I used about 2 yards

Black & orange felt (or colors of your own choosing)

Needle & thread

Sewing machine (optional, you may sew by hand if you do not own one)

Glue gun

Fiber fill (I used 2 30 oz bags)

Cardboard

Bean bags (I filled Ziplocks with rice)

FELT SNOWMAN

Decide how big of a snowman that you want. Draw out your circle on the felt.

0021
0031

Cut 2 of the same sized circles.

0181

Sew the two circles together by sewing around the edges. Do not sew all the way around. Leave a large opening unsewn.

0071

Stuff fiber fill in the open end.

0101

Here was mess up #1. I originally made the snowman just with the fiber fill stuffing thinking that this was going to be stable enough to stay upright. I was wrong. I reopened the bottom of the snowman & filled the bottom with homemade bean bags of Ziplock bags & rice.

0681

a piece of cardboard to fit the shape of the bottom of your snowman.

Cut a piece of cardboard to fit the shape of the bottom of your snowman.

Place inside the bottom of the snowman with the bean bags on top.

Place inside the bottom of the snowman with the bean bags on top.

Sew the bottom shut & then go and get a manicure because your nails look horrible.

Sew the bottom shut.

0172Repeat all steps except for filling with bean bags & cardboard to form a second ball.

Repeat all steps except for filling with beanbags & cardboard to form a second ball.

 0301Cut out circles using the black felt.

0211

Cut on thin white strips to glue into the black felt to make it look like a button.

0241

0271Cut out a carrot from the orange felt & make any other pieces that you would like for your snowman. Gather a hat & scarf.

0691

0771

If you are actually a seamstress, I am sure that you could bring a more polished look to this idea. The snowman is lumpy & I made a lot of sewing mistakes but my little girl loved her snowman. She was placing the button & coal pieces all over the place & thought that the scarf was his dress. She hugged him & tried to feed him some of her milk. Sometimes, imperfection can be beautiful…

0351 0381 0501 0491

                                                       Up next…Inside My Child’s Wild Imagination

Related topics:

http://perfectlyimperfectlovee.wordpress.com/2013/12/07/day-6-25-crafts-to-christmas/

http://kleckmusic.wordpress.com/2013/12/07/cotton-candycanes/

http://www.bloglovin.com/framehttp://handmadebysoo.wordpress.com/2013/12/08/traditional-christmas-tree-fairy-lights-hand-knitted/

?post=2021315991&group=0&frame_type=a&blog=10581179&link=aHR0cDovL3d3dy50aGlzb2xlbW9tLmNvbS8yMDEzLzEyL3RvaWxldC1wYXBlci1zbm93bWFuLmh0bWw&frame=1&click=0&user=0

http://alaskaknitnat.wordpress.com/2013/12/13/quick-craft-felt-christmas-tree/

PUPPET THEATER part 1 DIY felt puppets

0241

It can sometimes be exhausting finding activities to fill your toddler’s day, especially when they are as curious as my busy baby. We try to fill her days with fun activities and books but sometimes (and don’t think me a bad mom) it is a nice break to sit her down in front of Disney Junior or a Baby Einstein video, so I can fix dinner or just grab a moment for ourselves.

Lately she has been requesting to watch television far more than I want to accommodate. Mommy created a bad habit. This worries me. She has a particular fondness to ‘Little Einstein’s’. “Stein, Stein” she asks, when she wants to watch them. She loves these characters. I came across a few different ideas for puppets the other day & it made me think, maybe I could give her those characters she loves without having to turn on the dreaded t.v.

Tonight’s inspiration… ‘Little Einsteins’s’ felt puppets.

If you have been following us, you know that I love working with felt. It is easy & fun to work with & fairly inexpensive.

                                                                                  What you will need

Felt

Glue Gun

Markers

Scissors

Needle & thread

Decide how large you would like your puppets. Trace out the shape of your characters. I used a white marker, so lines would be less visible if missed after cutting. Cut out the body of your puppet (front & back).

005

Use scissor to cut out facial details such as eyes and mouth & hair if needed.

007

Use your glue gun to secure details to the body of the puppet.

009

011

Use markers to draw in fine details such as eyelashes or eyebrows.

014

Sew around the outside of the body to secure the front & back of the puppet together.015

016

Repeat this process for all characters.

017 020 033

Here is our finished ‘Little Einstein’ collection…

0322

Up next…Puppet Theater part 2 the stage

Felt farm forms

I found inspiration for this project from a pin that I found on Pinterest a while ago.

It was felt Christmas tree, with movable decorations.I remember thinking what a fabulous idea, a felt Christmas tree that my toddler can decorate herself. It reminded me of the Colorforms from my childhood. I loved this idea but did not think that it would appeal to my daughter, as she does not understand the concept of a Christmas tree yet. I wanted to take this idea and apply it to something that would peak her interest now.

Felt play farm - fun activity for toddler & kids - felt arts & crafts

Mai is a lover of animals, so I could not think of anything that would grab her attention more than a farm.

Supplies that I used for this project..

Different colored felt

Glue gun

Scissors

Cotton balls

Fabric markers

I use felt on a lot of projects, so luckily I had almost everything I needed already.

I started with a 36″ X 36″ of green felt for my background. I added blue felt to the top for the sky, attaching it with the glue gun. I then applied glue to the sky and dragged cotton balls across it to form the clouds.

001

I added a barn with a dirt road to complete my background.

003

Mai & Duke helped too.
019

006

I then drew and cut out all of the movable pieces. Our farm included a pond, tree, horse, duck, sheep, pig, cow & a rooster. Mai was quick to point out after I finished, that there was no hop, so I quickly made a bunny.
015

Our farm was now complete. Felt sticks to felt, so you can also hang this on the wall and the movable pieces will stick.

The verdict: It was a hit. She loved pointing out all the animals to mommy and daddy and moving the pieces around.

013
009

Since I was still in a crafty mood and had alot of felt left over, I made one more project.

037

033

These should keep my busy little toddler occupied for at least 5 minutes. Sigh!