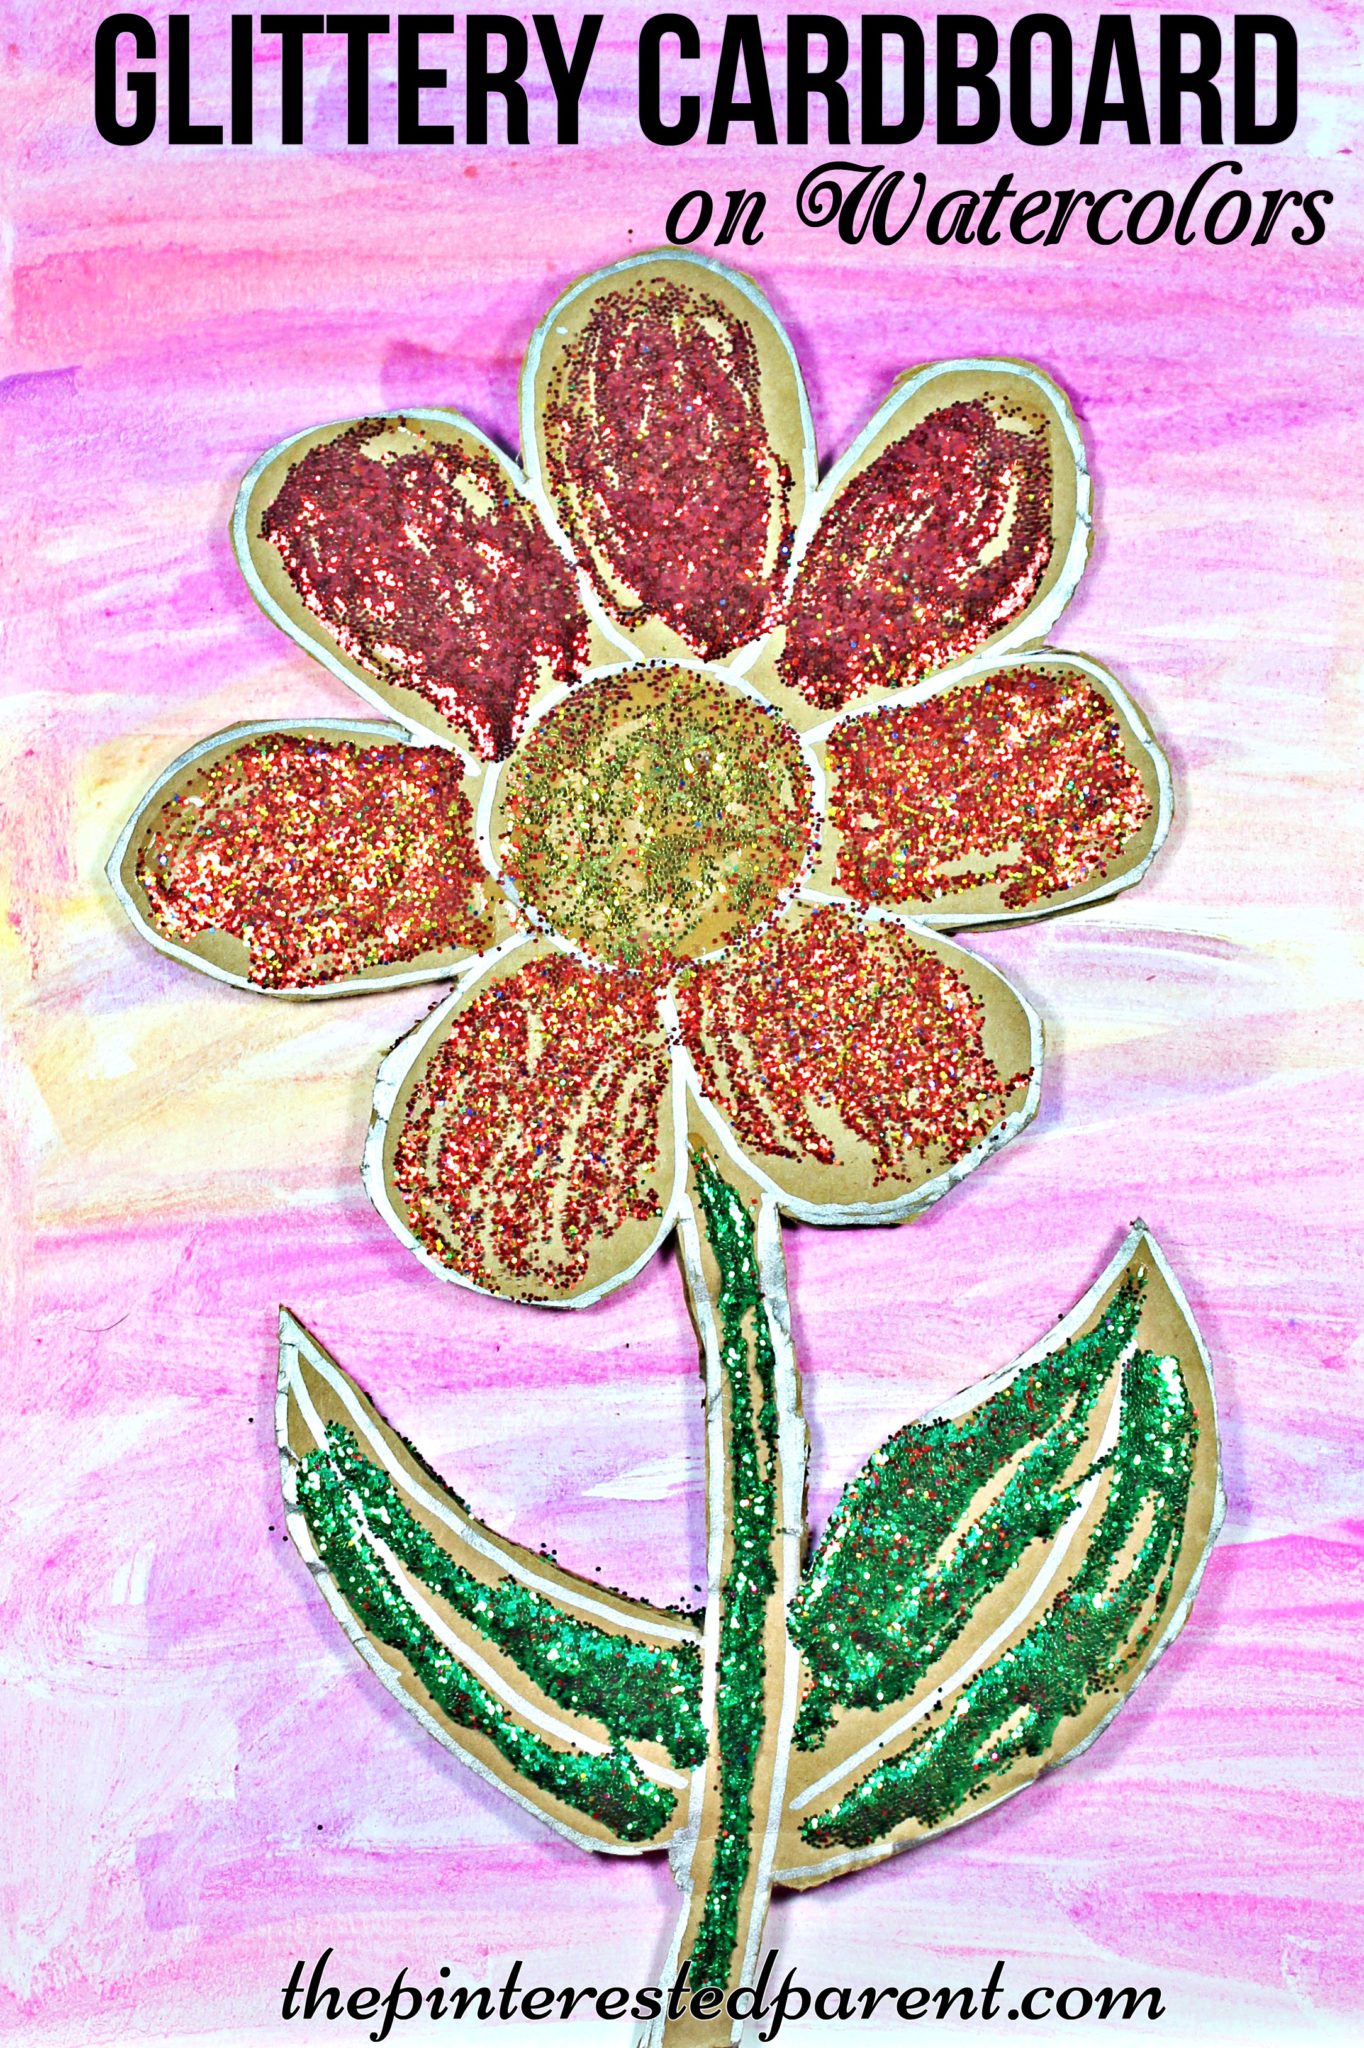
Tag

cardboard

Homemade Fashion Plate Crayon Rubs

Last year on Valentine’s Day, I made homemade crayon rubs inspired by a gift that my daughter had received.  We had a lot of success with our DIY crayon rubs from last year and wanted to try them again. I don’t know how many of you used to play with,  fashion plates(affiliate link) as a child, but they were a favorite of mine.  I thought this would be a fun idea for my little girl.Remember Fashion Plates from when you were a little kids? DIY fashion plate crayon rubs . Quick and easy to make & tons of fun. Arts & crafts and activities for kids.

*This post contains affiliate links*

Do you remember Fashion Plates from when you were a kids. Make these easy to make crayon rubs using cardboard and a glue gun. Printable templates are available as well. Use this to make shapes, letters or any designs. Kid's arts and crafts and activities.

All you need to make these are cardboard,  pencil and a low temp glue gun. We have also included printable templates for your convenience. If you choose to use the templates, you will also need scissors and a glue stick.

Crayon Rub Templates

Cut the cardboard into 3X3 squares. Lightly draw in simple clothing designs or print and cut out our printable templates and use a glue stick to glue them on to the cardboard. Use a glue gun to trace your drawings.

Remember Fashion Plates from when you were a little kids? DIY fashion plate crayon rubs . Quick and easy to make & tons of fun. Arts & crafts and activities for kids.

Place a top and bottom clothing section under a piece of paper and use different colored crayons and rub them over the cardboard pieces until images appear.

IMG_7774IMG_7773

Mix and match your pieces to create different outfits. Try this method to make shapes, letters, or any other designs. They are so simple to make and a lot of fun to play with.

Remember Fashion Plates from when you were a little kids? DIY fashion plate crayon rubs . Quick and easy to make & tons of fun. Arts & crafts and activities for kids.

Thank you as always for stopping by. Please follow us on Facebook as well.


Cardboard Box Marble Run

Kids love boxes. The larger the box, the more fun to be had. We are still in the process of getting our house unpacked after our move and have a ton of empty cardboard boxes. We have been having a lot of fun making things out of our boxes & the cardboard.
Cardboard box marble & pom pom ramp. This was so much fun & a great activity for kids - arts & craft

*This post contains affiliate links*

 My daughter has a great building blocks marble run set.  She used to play with it all of the time. The whole family loved playing with it. Unfortunately, since our move, we have been unable to find it.

IMG_2766

I have seen a number of homemade marble runs made out of cardboard tubes, straws & even Legos & I thought we could try our hands at our own while we searched for our missing one.

Cardboard box marble & pom pom ramp. This was so much fun & a great activity for kids - arts & crafts from recyclables

We used a large cardboard box. We cut the flaps off of one side to leave one side wide open. We used the flaps to form our ramps.  I wanted to add different options & obstacles to the ramp so I cut a hole or multiple holes into each piece of cardboard.

IMG_5529

I used a glue gun to glue the cardboard pieces in place at an angle, making sure to leave space on the bottom end of each piece for the marble to be able to drop. I used plenty of glue around the edges to hold the ramp pieces in place and used cardboard tubes in a couple of areas for additional drop options.

IMG_5530

We tested it out a couple of times & found that our marbles fell forward a few times, so we glued a couple of extra scraps of cardboard under the bottom front to balance it out. We used the marbles, but then found that a handful of poms poms was just as fun.

Cardboard box marble & pom pom ramp. This was so much fun & a great activity for kids - arts & crafts from recyclables Cardboard box marble & pom pom ramp. This was so much fun & a great activity for kids - arts & crafts from recyclables

My little girl was so excited about her cool new toy. “This is soooo awesome, mama.”

Thank you as always for stopping by. Please follow us on Facebook as well.


Cardboard Lemonade Stand

Don't toss your old cardboard boxes. Upcycle them into fun.Cardboard box lemonade stand for the kids

You have always heard that if you give your kids a new toy, that they all they are going to want is the box. It is true. Children love to play with boxes & the bigger the better. I am a big online shopper & just purchased a new floor lamp for our living room. It was packed in a box within a box within another box. The outer box was a huge one. My daughter was excited to jump into each & every one of them  & I was excited because I knew right away what I was going to do with the large one.

My daughter has been asking me all winter long if she could have a lemonade stand. We set up a table in her playroom a few times & hung a sign, but I promised her that once the nice weather hit, we would build her a special stand for outside. The nice weather definitely has not hit yet, but I could not pass up the opportunity to build her a stand.

The box was a long one with the flaps on the both sides on the long ends. I opened both ends.

IMG_5250

I cut a slit in the cardboard about 1/3 of the way down on both sides. On the side that would be my front, I kept the top & bottom side flaps. On the backside, I cut off the top side flaps. Also on the back, I cut the top & bottom flaps. I cut them carefully, as one of those flaps was going to be my counter & I wanted it in good shape.

IMG_5251

For the front section, I had to tape the bottom side flaps together & then tape them to the bottom of the box. I removed the front bottom flap as well, but left the top for the awning.

IMG_5252

Here is a view of what the box looked like from behind.

IMG_5253

I cut the top side flap in half like shown below & then cut more off of the top portion so that I could lower the top flap down & to form a slant for the awning. I glued the awning in place.

IMG_5254

IMG_5259

I used one of the removed top/bottom flaps to form my counter & then glued it in place at the top of the taped front portion. I cut narrow pieces of cardboard width wise from another previously removed flap to form braces for the counter.

I bent the narrow pieces on both ends.

IMG_5257

Then glued all 4 braces in place using a glue gun to hold the counter underneath.

IMG_5258

Once the body of the stand was assembled, the fun began.

I cut pieces of construction paper to form the awning.

IMG_5261

I painted the counter & windows & then used decorative masking tape in several placed to add just a bit more color.

IMG_5280

When my daughter woke in the morning, her face lit right up. She could not wait to start selling lemonade to mommy & daddy.

The lemonade stand is open for business.

IMG_5289

Don't toss your old cardboard boxes. Upcycle them into fun.Cardboard box lemonade stand for the kids

Thank you as always for stopping by. Please follow us on Facebook as well.

Melted Crayon Hearts

Melted Crayon Hearts. This art & craft for kids is perfect for Valentine's Day

*This post contains affiliate links*

My daughter received a new book from her cousins on Christmas. It has since been promoted to her favorite book.

51HoHYJv6TL._SX258_BO1,204,203,200_

The Day The Crayons Quit‘ is a funny book about a group of frustrated crayons that air their grievances to their owner with individual letters to him. In only a short couple of weeks, my daughter has memorized the book from cover to cover. We read it every day, sometime multiple times a day. It made me realize how neglected her own crayons have been. Mai is much more interested in paint & markers these days, but I had a project that I thought might change her mind.

Melted Crayon Hearts

This is a messy project. Lay down paper or a drop cloth for easier clean up.

We started with a piece of cardboard.  I cut the cardboard into heart shapes & used a paper hole punch to poke a hole in the hearts to be able to add ribbon or string to later.

IMG_3389

We grabbed any unwrapped crayons that we had in our collection to start. We tried a number of different methods to achieve our final projects. We started by holding the crayon on the cardboard & using the blow dryer on a low-speed, high heat setting. Mai needed assistance with this because our dryer to too heavy for her to hold with one hand. I held the hair dryer for her as she worked the crayon around. *Operate caution as hair dryers can get very hot on the skin*

IMG_3391

Next we cut small chunks of crayon and laid them a couple of pieces at a time on the heart. I let Mai operate the hair dryer using 2 hands. This created a different effect as the melted crayon ran on its own pattern. I would suggest putting your project into a box or something contained if using small pieces as they do blow around a bit.

IMG_3395

My daughter came up with another idea as well. She grabbed a paint brush and pushed around her melted crayon and painted it on. The crayons cooled quickly, so she had to use the dryer often.

IMG_3397

When the crayon cooled & dried, we wrapped a ribbon through the holes.

Melted Crayon Hearts - process art & crafts for kids

This was a fun project. Mai loved watching the crayons melt. When the crayons got shiny, she knew that they were melting and that she could use them. “Mama, it melts just like an ice cube.” When we finished, she even asked if we could melt more crayons tomorrow.

Thank you as always for stopping by. Please follow us on Facebook as well.

Melted Crayon Hearts for Valentine's Day - process art for kids

Cardboard Art Display

Kid's Play & Art Room Display Wall

*This link contains affiliate links*

It has been a long couple of months for my family. After months of construction, my husband’s childhood home was renovated. We were eager and ready to move into our new home. The majority of our holidays were spent moving furniture & boxes and unpacking. It was a lot of work, but it was so exciting to watch it all come together. There was none more excited than our daughter. She was ecstatic.

She has a lovely new bedroom & most excitingly, a playroom of her very own. Since my daughter loves arts & crafts, I just had to make a craft corner for her & if we are being honest, for me too.

I have always wanted a display area in our house to showcase my daughter’s artwork.  Mai loves showing off her most recent drawings or crafts & would often hang them on the refrigerator or tape them to the walls.

We have an abundance of cardboard boxes (obviously) & I wanted to put them to good use.

Cardboard Art Display

I drew out & cut the letters to spell the word create.

IMG_3105IMG_3106

I used several different craft materials to decorate each letter. For the C, I covered it in pom poms using a glue gun. The R was made with school glue & glitter, the E was covered in buttons. The A was made with swirls of yarn, the T was covered in pieces of tissue paper & for the E, I just used paint. After each letter dried, I glued a strand of yarn around the edge.

IMG_3107IMG_3109

Since we have new freshly painted walls, I hate to mar them up with nails or hooks. I am a huge fan of using 3M Command strips for displaying wall hangings & our family photos.

71dLo1iNizL._SX522AA522_PIbundle-2,TopRight,0,0_AA522_SH20_

I hung our letters high up on the wall.

IMG_3124

IMG_31161

I cut another piece of cardboard into the shape of an artist’s palette & painted it white. When the white dried, I added splats of different colored paint around the edges. I lined the palette with yarn too.

IMG_3115IMG_3119

I cut two paint brush sticks out of cardboard & painted them. Foam sheets were used to form the paint dipped bristles.

IMG_3122

Clothespins were glued around the outside of the palette in between each color splat.

IMG_3123

The palette was mounted under the letters using 3M strips again.

Mai picked out her favorite artwork & asked me to hang them on her new display board.

Kid's Playroom Art Display Wall

Thank you as always for stopping by. Please follow us on Facebook as well.

Star Wars Tie Interceptor With Recyclables

Star Wars Tie Interceptor Craft made out of paper bowls & recyclables

Star Wars mania has hit my house. The premiere of the new movie is less than a week away and I can’t wait. My husband & I are already planning our Star Wars date night. My daughter is not that much into Star Wars yet, but she is still always willing to help me with a craft, no matter what it may be.

Tie Interceptor

What you will need:

2 Paper bowls

2 sections of egg carton cups

2 sections of egg carton pointed

2 long narrow pieces of cardboard about 14″ long

Gray or silver paint

Black & Silver markers

Glue gun

Wooden skewer

Directions:

Cut your egg carton & cardboard pieces.

IMG_2732

Glue the two paper bowls together with the wooden skewer centered in the middle.

IMG_2820

Paint all of your pieces. I removed the skewer so that my daughter could paint & not poke herself.  (Notice her festive attire. She has been in her holiday dress the whole weekend. She loves being Mrs. Claus.)

IMG_2737 IMG_2738

Let all the pieces dry. Draw the windows of interceptor with black & silver markers in the center of the bowl.

IMG_2741

I slid the skewer back through & the cut two slits into the egg carton pieces &  slid it through. Use a glue gun to secure the egg carton in place & do this to the opposite end as well.

IMG_2807

Next glue the pointed egg carton end to the center of the cardboard pieces. Bend the cardboard on both ends at about 5″ in. Use a bead of glue in the crease to keep the bend formed.

IMG_2808

Squeeze glue into the hole at the top of the pointed egg carton section. Add glue to the top of the section and onto the skewer.

IMG_2809

Let the glue dry.

My daughter does not like Star Wars, but did still have fun flying our new interceptor around.

Star Wars Tie Interceptor Craft made out of paper bowls & recyclables

Thank you as always for stopping by. Please follow us on Facebook as well.


Cardboard & Yarn Craft Ornament

IMG_6234

Since Mai has started daycare our craft collection has doubled itself. We have a collection of home crafts & now the take home ones as well. Our kitchen island has a pile of them. This week, we hung up a few of our favorites to display them. This weekend we decided to make some crafts that were meant to be hung. Since Halloween is over & Christmas is everywhere, now was as good a time as any to make our first ornament.

What you will need:

Cardboard

Paint

Yarn

Glue

Directions:

Cut out your desired shape

IMG_6133

IMG_6134

Cut out notches in the cardboard.

IMG_6135

IMG_6136

IMG_6129

Paint the cardboard shape.

IMG_6131

IMG_6132

Wrap yarn around an empty toilet paper roll to make it easier for little hands.

IMG_6210

Pull the end of a piece of yarn through one of the notches. Pull tight around another notch & continue until you achieve the look you like. Younger toddlers may need a hand with this.

IMG_6211

IMG_6214

Pick a side that you like better. Glue a string to the opposite side.

IMG_6219

IMG_6229

Chalkboard Floor

Chalkboardfloor

I have seen & heard about chalkboard paint for a while now. I have seen it used on everything from full walls to refrigerators, coffee tables & baking sheets. Some of the projects I have seen have blown me away. One woman had a chalkboard accent wall behind her bed. She designed her own chalk headboard and chalk wall hangings. Amazing!
I have always wanted to try it because let’s face it, the stuff is pretty cool. I am not quite as ambitious as some of the great ideas that I have come across. I merely wanted a fun little area for my daughter to doodle on.

Mai has a fenced in play area in our living room with foam matting & a kitchen & toy boxes. I wanted to make her a small area on the floor to draw on kind of like a sidewalk.
I have seen the paint used on wood, metal & glass & heard that you could use cardboard as long as it is sturdy.

I opted to try it on cardboard since this was my first attempt & I have plenty of it readily available.

I used the chalkboard spray paint. I found the spray paint to be rather messing. I followed the instructions but the can leaked a lot, so make sure to use gloves. I think the next time I will try the roll on.

I found a sturdy piece of cardboard. Make sure if choosing cardboard to use on that is rigid & that will not crack or indent if you put pressure on it. Peel of any tapes or stickers until the cardboard is smooth and clean.

034

The fumes are strong, so I brought my project outside to use. I placed a second piece of cardboard underneath to collect overspray.

036

The can recommends using two coats. I covered 4-5 times until I finished the can.

037

I removed one of the foam mats in Mai’s play area & placed the finished project in its place tucking it under the surrounding foam squares.

055

I show Mai her new chalkboard & she asks mommy to draw a train.

065

My little girl dives right in to her new bucket of chalk
& shows off her artistic skills.

IMG_20140202_1957551251

Mai loved this & so did mommy. The paint works just as well as everyone says that it does. I can’t wait to find something else to paint.

Related Topics:

http://thedottedbow.wordpress.com/2014/02/01/life-is-beautiful-chalkboard-sign/

http://thecraftcomplex.wordpress.com/2014/01/29/say-i-love-you-everyday-chalkboard-frame-day-2/

http://accordingtoleanne.com/2014/01/28/more-chalkboard-signs/