Tag

egg carton

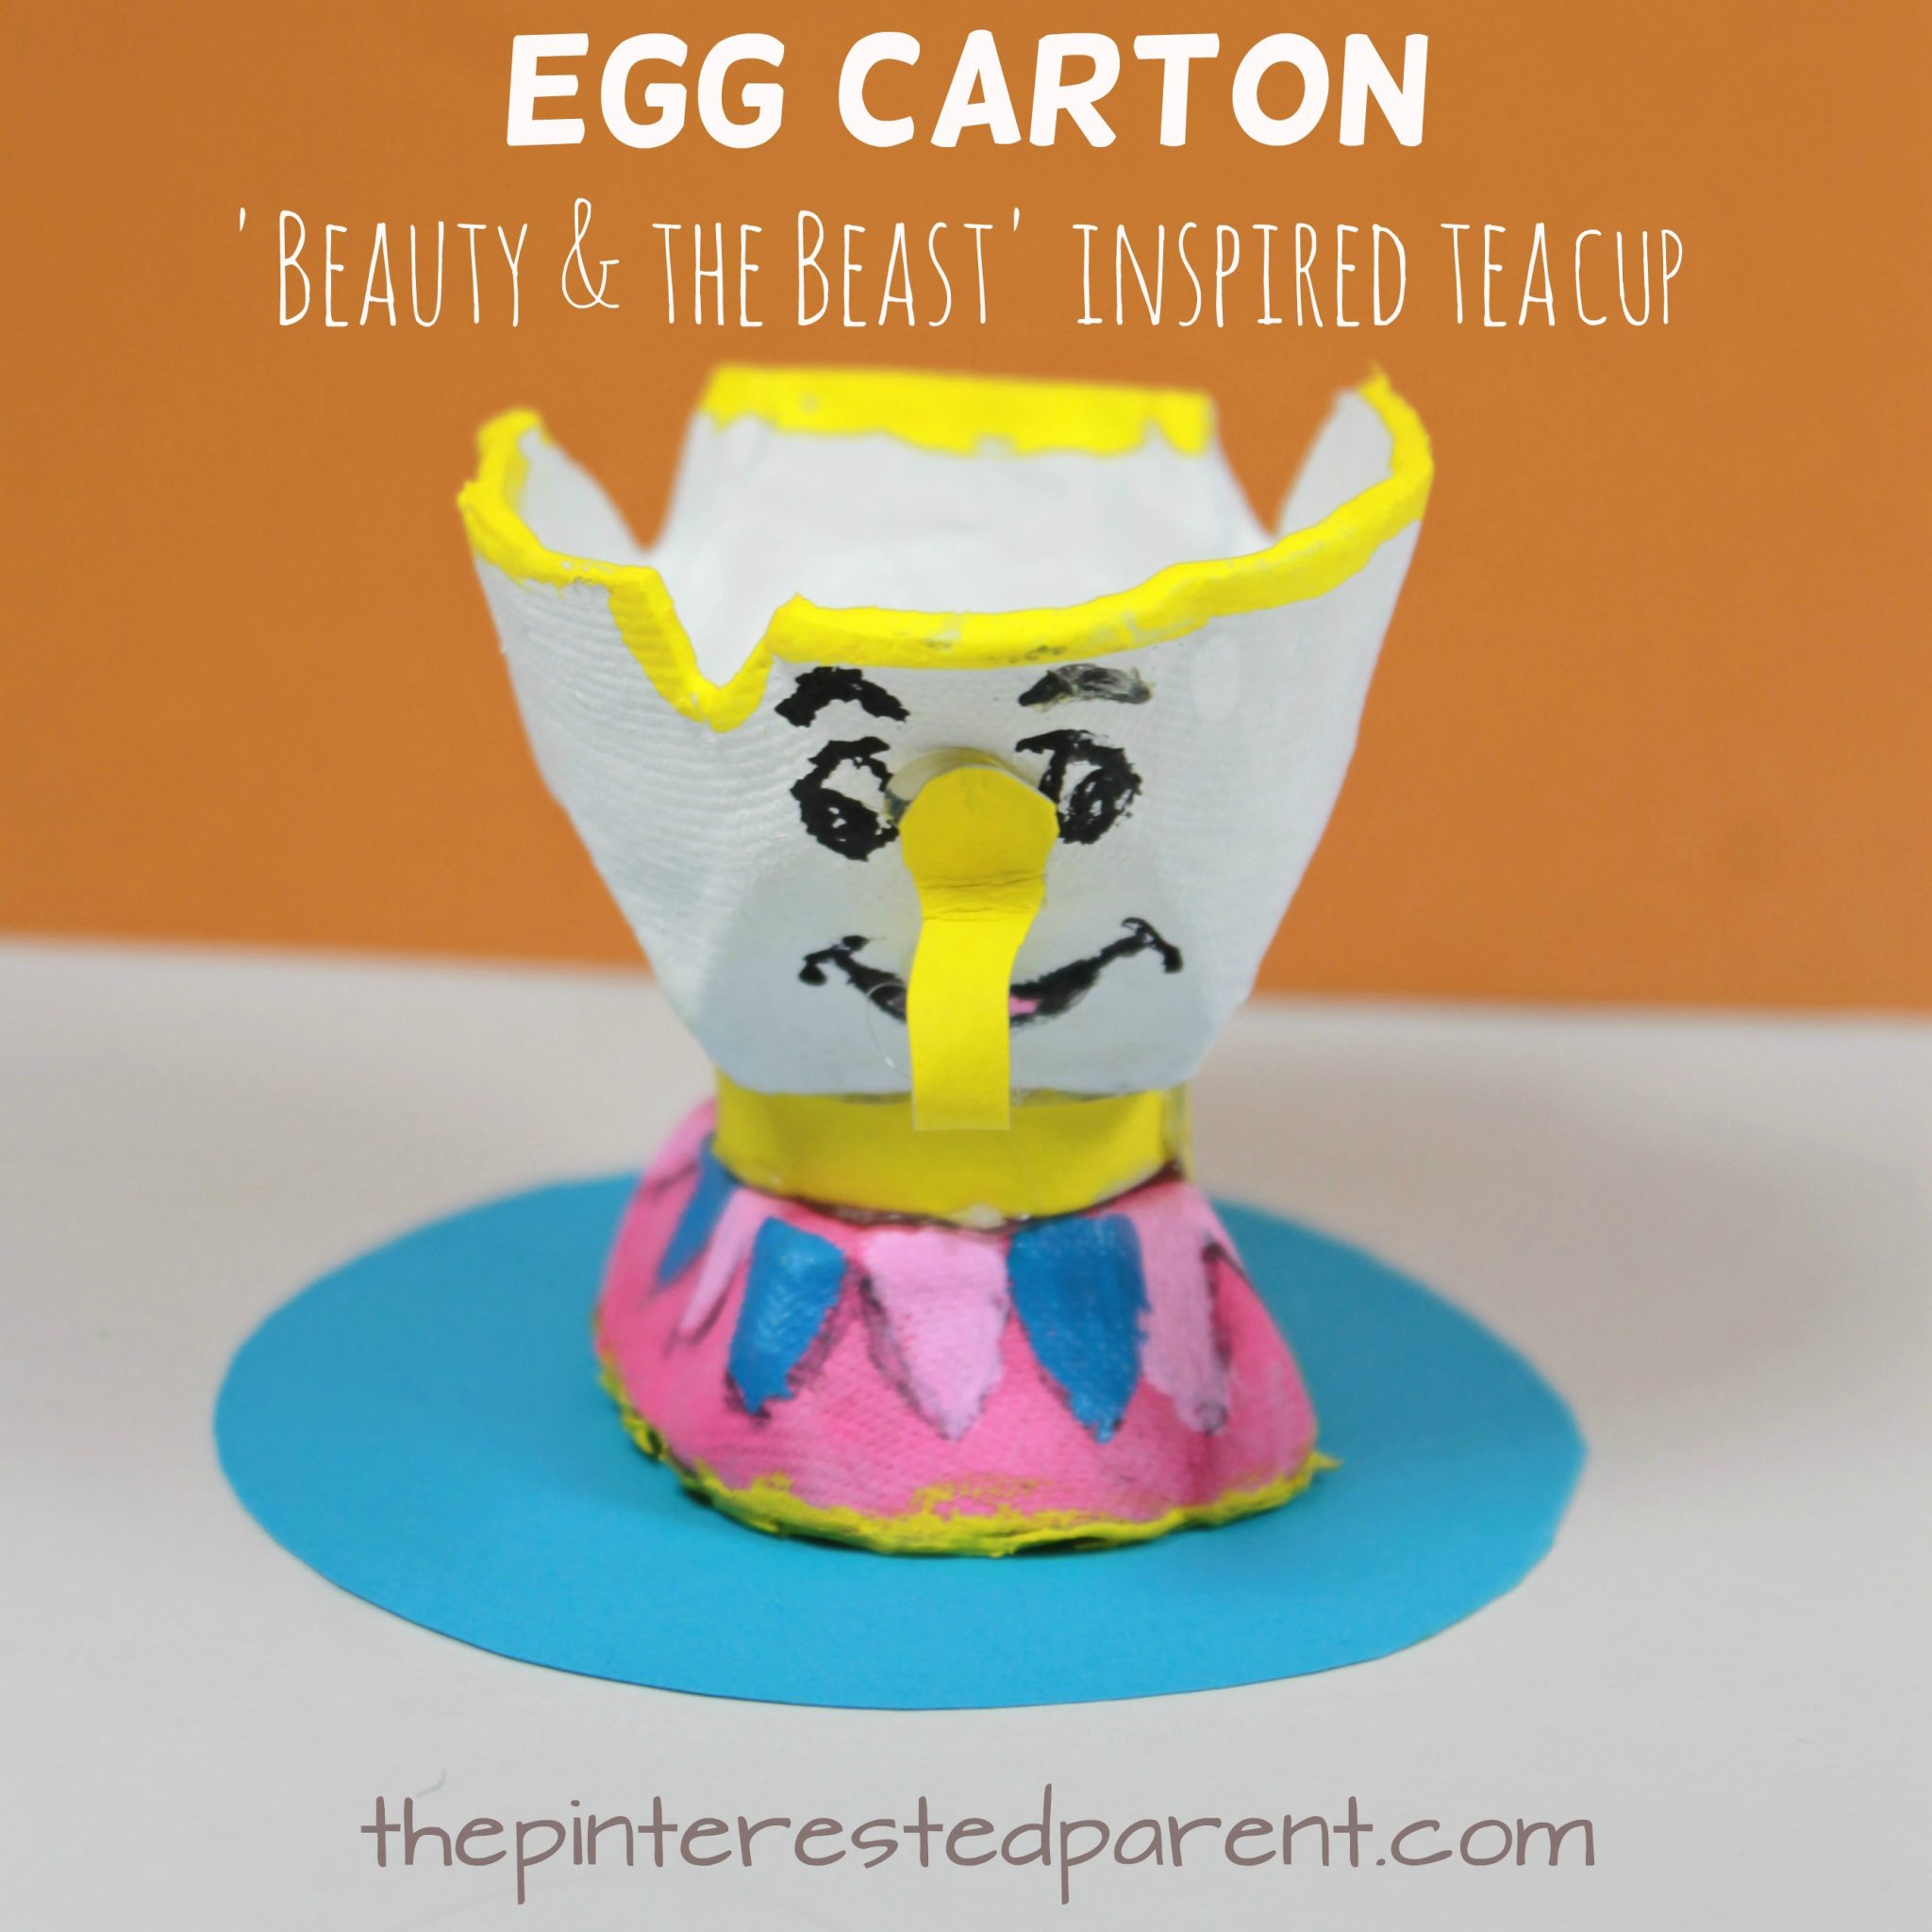
Egg Carton ‘Beauty and the Beast’ Inspired Teacup

If you are a ‘Beauty and the Beast’ fan, you will love this adorable Chip inspired teacup craft made out of recyclables.

We were lucky enough to get out to the movies this weekend and see the new ‘Beauty and the Beast’ movie. I am a big fan of the animated version, so I wasn’t sure how I was going to feel about the live action movie, but I loved it. It was absolutely beautiful. I love all of the characters from the movies, so it is hard to pick a favorite, but if I had to pick just one, it would have to be Chip. He is just so cute. I couldn’t resist making a teacup craft inspired by my favorite little teacup.
Egg Carton 'Beauty & the Beast' Chip inspired teacup craft. Kid's character inspired arts and crafts. Recyclable crafts

Continue Reading…

Love Goggles

Springy love goggles made out of egg carton & pipe cleaner - Valentine's Day arts & crafts for kids. Recyclable dangling heart glasses

I used to love in old cartoons when the characters would fall in love and their eyes would bulge out of their heads filled with hearts. This would always crack me up. With Valentine’s Day coming up, I thought that these love goggles would be a quick and fun project.

Continue Reading…

Holly and Mistletoe Arts and Crafts

My daughter and I had a lazy pajama day yesterday. We starting baking for our annual gingerbread project and we painted, crafted and drew. We made a lot of mess, but had a lot of fun.

Holly and mistletoe arts & crafts. Winter and Christmas paint and craft projects for kids and preschoolers.

*This post contains affiliate links*

We painted and crafted a ton, but we did get a bit carried away with making holly and mistletoe.

We made Christmas holly out of egg cartons first.

Continue Reading…

Egg Carton Crown

We use recycled items in our crafts all the time. It is very difficult for me to throw anything out. This has crossed over to my 4 year old & my husband as well. My daughter will save bottle caps & other random things & tell me “This will be good for a craft” & my husband won’t throw anything away without asking me if I can use it first.

Egg carton crown craft - use recyclabes to make this dress up crown or tiara for pretend play for the kids

*This post contains affiliate links for convenience*

Our craft room has bins of recyclables, but most prevalent in our collection is egg cartons. We have piles of them. It was time to put some of them to some good use. Here is a great craft that parents can do for their little kings & queens.

Egg Carton Crown

What you will need:

Egg cartons

Glue gun (Use caution when operating a glue gun. Low heat guns are recommended for children.)

Acrylic Paints

Buttons

Pom Poms

Directions:

Egg Cartons do come in a variety of different shapes. We used a family sized pack that looked like this inside.

IMG_8129

Cut through the egg carton the long way. You will want to cut through the centers of the 2 spiky portions running along the middle of the carton.

IMG_8130

Your cut piece should look like this.

IMG_8131

Cut through the middle of your cut section the long way until you have two halves.

IMG_8132

Use a glue gun to glue the two pieces together to form one long piece. You should be able to get the spikes to match up so that they blend when gluing them together. Depending on the size of your child’s head you may need to glue on a few extra spiked sections.

IMG_8133

When you reach the desired length, bend the long piece of egg carton to form a crown shape & then glue into place.

IMG_8135

Paint your crown in the color of your choice. My daughter wanted red for hers.

IMG_8136

Use buttons & pom poms for embellishments or add on whatever you like to create your crown.

IMG_8137IMG_8138

My daughter loved her crown. It fit her head perfectly. She had a crown fit for a queen.

Egg carton crown craft - use recyclabes to make this dress up crown or tiara for pretend play for the kids. Arts & Crafts

Thank you as always for reading. Please visit us on our Facebook page as well.

Star Wars Tie Interceptor With Recyclables

Star Wars Tie Interceptor Craft made out of paper bowls & recyclables

Star Wars mania has hit my house. The premiere of the new movie is less than a week away and I can’t wait. My husband & I are already planning our Star Wars date night. My daughter is not that much into Star Wars yet, but she is still always willing to help me with a craft, no matter what it may be.

Tie Interceptor

What you will need:

2 Paper bowls

2 sections of egg carton cups

2 sections of egg carton pointed

2 long narrow pieces of cardboard about 14″ long

Gray or silver paint

Black & Silver markers

Glue gun

Wooden skewer

Directions:

Cut your egg carton & cardboard pieces.

IMG_2732

Glue the two paper bowls together with the wooden skewer centered in the middle.

IMG_2820

Paint all of your pieces. I removed the skewer so that my daughter could paint & not poke herself.  (Notice her festive attire. She has been in her holiday dress the whole weekend. She loves being Mrs. Claus.)

IMG_2737 IMG_2738

Let all the pieces dry. Draw the windows of interceptor with black & silver markers in the center of the bowl.

IMG_2741

I slid the skewer back through & the cut two slits into the egg carton pieces &  slid it through. Use a glue gun to secure the egg carton in place & do this to the opposite end as well.

IMG_2807

Next glue the pointed egg carton end to the center of the cardboard pieces. Bend the cardboard on both ends at about 5″ in. Use a bead of glue in the crease to keep the bend formed.

IMG_2808

Squeeze glue into the hole at the top of the pointed egg carton section. Add glue to the top of the section and onto the skewer.

IMG_2809

Let the glue dry.

My daughter does not like Star Wars, but did still have fun flying our new interceptor around.

Star Wars Tie Interceptor Craft made out of paper bowls & recyclables

Thank you as always for stopping by. Please follow us on Facebook as well.


Egg Carton Christmas Ornaments

Egg Carton Christmas Ornaments - holiday arts and crafts for kids with recyclables.

We are officially just 50 days until Christmas & I have a confession to make. I love Christmas. I know everyone is moaning & groaning that it is too early to get in the holiday spirit, but I just love it. I can’t wait to put up our tree and I can’t wait for Christmas carols & snow, but alas I must wait a few more weeks for those things. One thing I do not have to wait for are the Christmas crafts.  What better way to start getting me into the spirit.

Last week we cut up multiple empty egg cartons to build towers with. We had so many & I wanted to put them to good use, so last night we made a simple Christmas craft using our egg carton pieces,

Egg Carton Christmas Ornaments

Cut 2 egg carton sections for each ornament that you want to make.

IMG_0808

Paint the sections in the color of your choice & let dry.

IMG_0425

Glue your sections together like shown.

IMG_0809

Cut the tips off of the tall pointed sections of the egg carton. Paint them in silver or color with a marker & let the dry. Stick a piece of pipe cleaner into the hole & form a loop.

IMG_0810

Add a liberal amount of glue to the inside of the piece & glue to the top of the egg cartons as shown.

IMG_0811

Use glue & glitter to decorate your ornaments. Let dry.

IMG_0812

There you have a quick & easy homemade ornament for your tree.

Egg Carton Christmas Ornaments - holiday arts and crafts for kids with recyclables.

Thank you as always for stopping by. Please follow us on Facebook as well.

Tissue Box Tow Mater Craft

Tissue box Tow Mater character craft - use recyclables to make this cute tow truck

*This contains affiliate links for convenience.*

My daughter love cars. She loves cars, trucks, trains & planes. It is probably no surprise then, that she also loves movies like Planes and Cars. One of the most memorable characters from Cars is Tow Mater. In my daughter’s eyes all pick-up trucks are him.

We go through a lot of tissues in our house. My husband keeps a box in every room. We ran out of a couple of boxes of tissues last week & my daughter told her father that he needed to save them for me. “Mama, will probably want them for a craft.” I love that kid. She knows me so well. She was right. They were perfect for our Tow Mater craft.

What you will need:

A rectangular tissue box

A cube tissue box

Acrylic paint (brown & orange)

Egg carton

Construction paper

Pipe cleaner

Magic markers

Hot glue gun (Please use caution when operating the glue gun. Adult operation is recommended.

Directions:

Cut the cube tissue box, leaving about 1/3 of the box.

IMG_9434

Cut half of the top of the rectangular box off. Glue the cube to the top of the rectangular box as shown.

IMG_9435

Swirl the brown & orange paint. Do not blend completely. Paint both boxes. With the paint. The best part is that the paint does not need to be perfect because Tow Mater is rusty.

IMG_9437

Cut a crooked mouth & teeth out of construction paper. Cut the front window out of construction paper & draw in the eyes.

IMG_9443

Glue the window & mouth in place and cut out two headlights.

IMG_9444

Paint 4 egg carton pieces black and let them dry.

IMG_9466

Glue the egg carton pieces on for wheels.

IMG_9468

Cut a brown piece of pipe cleaner in half & fold as shown.

IMG_9469

Glue the pipe cleaners to the side of the top tier. Cut two rectangles out of egg carton & glue the rectangles in the pipe cleaners to for the rear view windows.

IMG_9470

Cut two pieces out of the egg carton cover for the tow.

IMG_9467

Glue them to the open pick-up portion of the truck as shown.

IMG_9472

Glue a pipe cleaner off the end of the tow to finish it off.

IMG_9487

IMG_9474

My daughter was so happy with the finished truck. Tow Mater has had a busy couple of days towing all of my daughter’s toys.

Thank you as always for stopping by. Please follow us on Facebook as well.

Jelly Fish Crafts

Cupcake Liner Jelly Fish Craft

For the past few weeks we have been preparing our house to put it on the market. We have been packing for weeks & trying to get all of the clutter out our home. I don’t think I realized just how much craft stuff Mai & I actually had until I started trying to box it all up. I have been having a hard time throwing any of it away & an even harder time picking which items have to get packed away & put into storage until we move. Right now I am just trying to use any loose pieces of craft material or pre-painted or pre-cut items. Mai wanted to work with cupcake liners and make jelly monsters. She had a very specific idea in mind.

IMG_4858

While she created her jelly monster, I worked on a different kind of jelly creature.

Cupcake Liner Jelly Fish

Directions:

Cut a wavy pattern into the bottom of a cupcake liner.

IMG_4862

Cut 4 pipe cleaners in half. Curl the ends of all 8 pieces.

IMG_4861

Place the liner on a piece of paper & arrange the pipe cleaners underneath. Use a liberal amount of glue & glue the pipe cleaners to the paper. Do not worry if not every section of pipe cleaner touches the paper, when the glue dries the cleaners will hold. You may weight down your pipe cleaners while they dry if you want them to lay flat.

IMG_4864

Add googly eyes to finish off your cute little sea creature.

Cupcake Liner Jelly Fish Craft

We had several egg carton sections that Mai had painted last week for a different craft. We used those to make another jelly fish craft.

Egg Carton Jelly Fish

Directions:

Paint a section of egg carton & let dry. Poke a hole through the center of the egg carton section.

IMG_4865

Poke a string through the hole & tie a knot on the inside of the section.

IMG_4868

Similar to the craft above, cut pipe cleaners in half &  & curl the ends. Glue the pieces of pipe cleaner to the inside of the egg carton. Let the glue dry & add googly eyes.

Egg Carton Jelly Fish

Thank you as always for stopping by. Please follow us on Facebook as well.


Peppa Pig Craft

Peppa Pig Craft made out of styrofoam ball & recyclables.

Ever since my daughter first began feeding herself she has been a challenge at mealtimes. We became creative in order to keep her little bottom planted in her seat & interested in her food. Our most successful method was to read to her. She loved being read to during her meals. She still does. The deal is, if she wants us to keep reading, she has to keep eating. Her new favorite mealtime read is Peppa Pig & the Great Vacation.

IMG_4620

“I love Peppa Pig, mama!”
“I know you do.”

I told her that after we finished eating that we could make a Peppa craft, so we did.

What you will need:

Styrofoam ball

Egg carton section

Dixie cup

Pink & red acrylic paint

Pink foam sheet or construction paper

Googly eyes

Glue gun (For adult use)


Directions:

Glue the section of egg carton to the styrofoam ball.

IMG_4612

Paint the styrofoam & egg carton in pink.

IMG_4616

Paint a circle of darker pink on the ball for a cheek & put aside to dry. The styrofoam may take a little while to dry. We used a hair dryer to quicken the process,

IMG_4619

Paint a Dixie cup in red & let dry.

 IMG_4614

Cut ears & arms out of the pink foam or construction paper.

IMG_4622

Glue the ears to the head. Draw in a mouth & add googly eyes.

IMG_4624

Glue the head to the bottom end of the Dixie cup & glue the arms onto the cup to complete your Peppa.

IMG_4634

Now Peppa can sit with us at dinner while we read about her great vacation.

Thank you as always for stopping by. Please follow us on Facebook as well.