Tag

craft

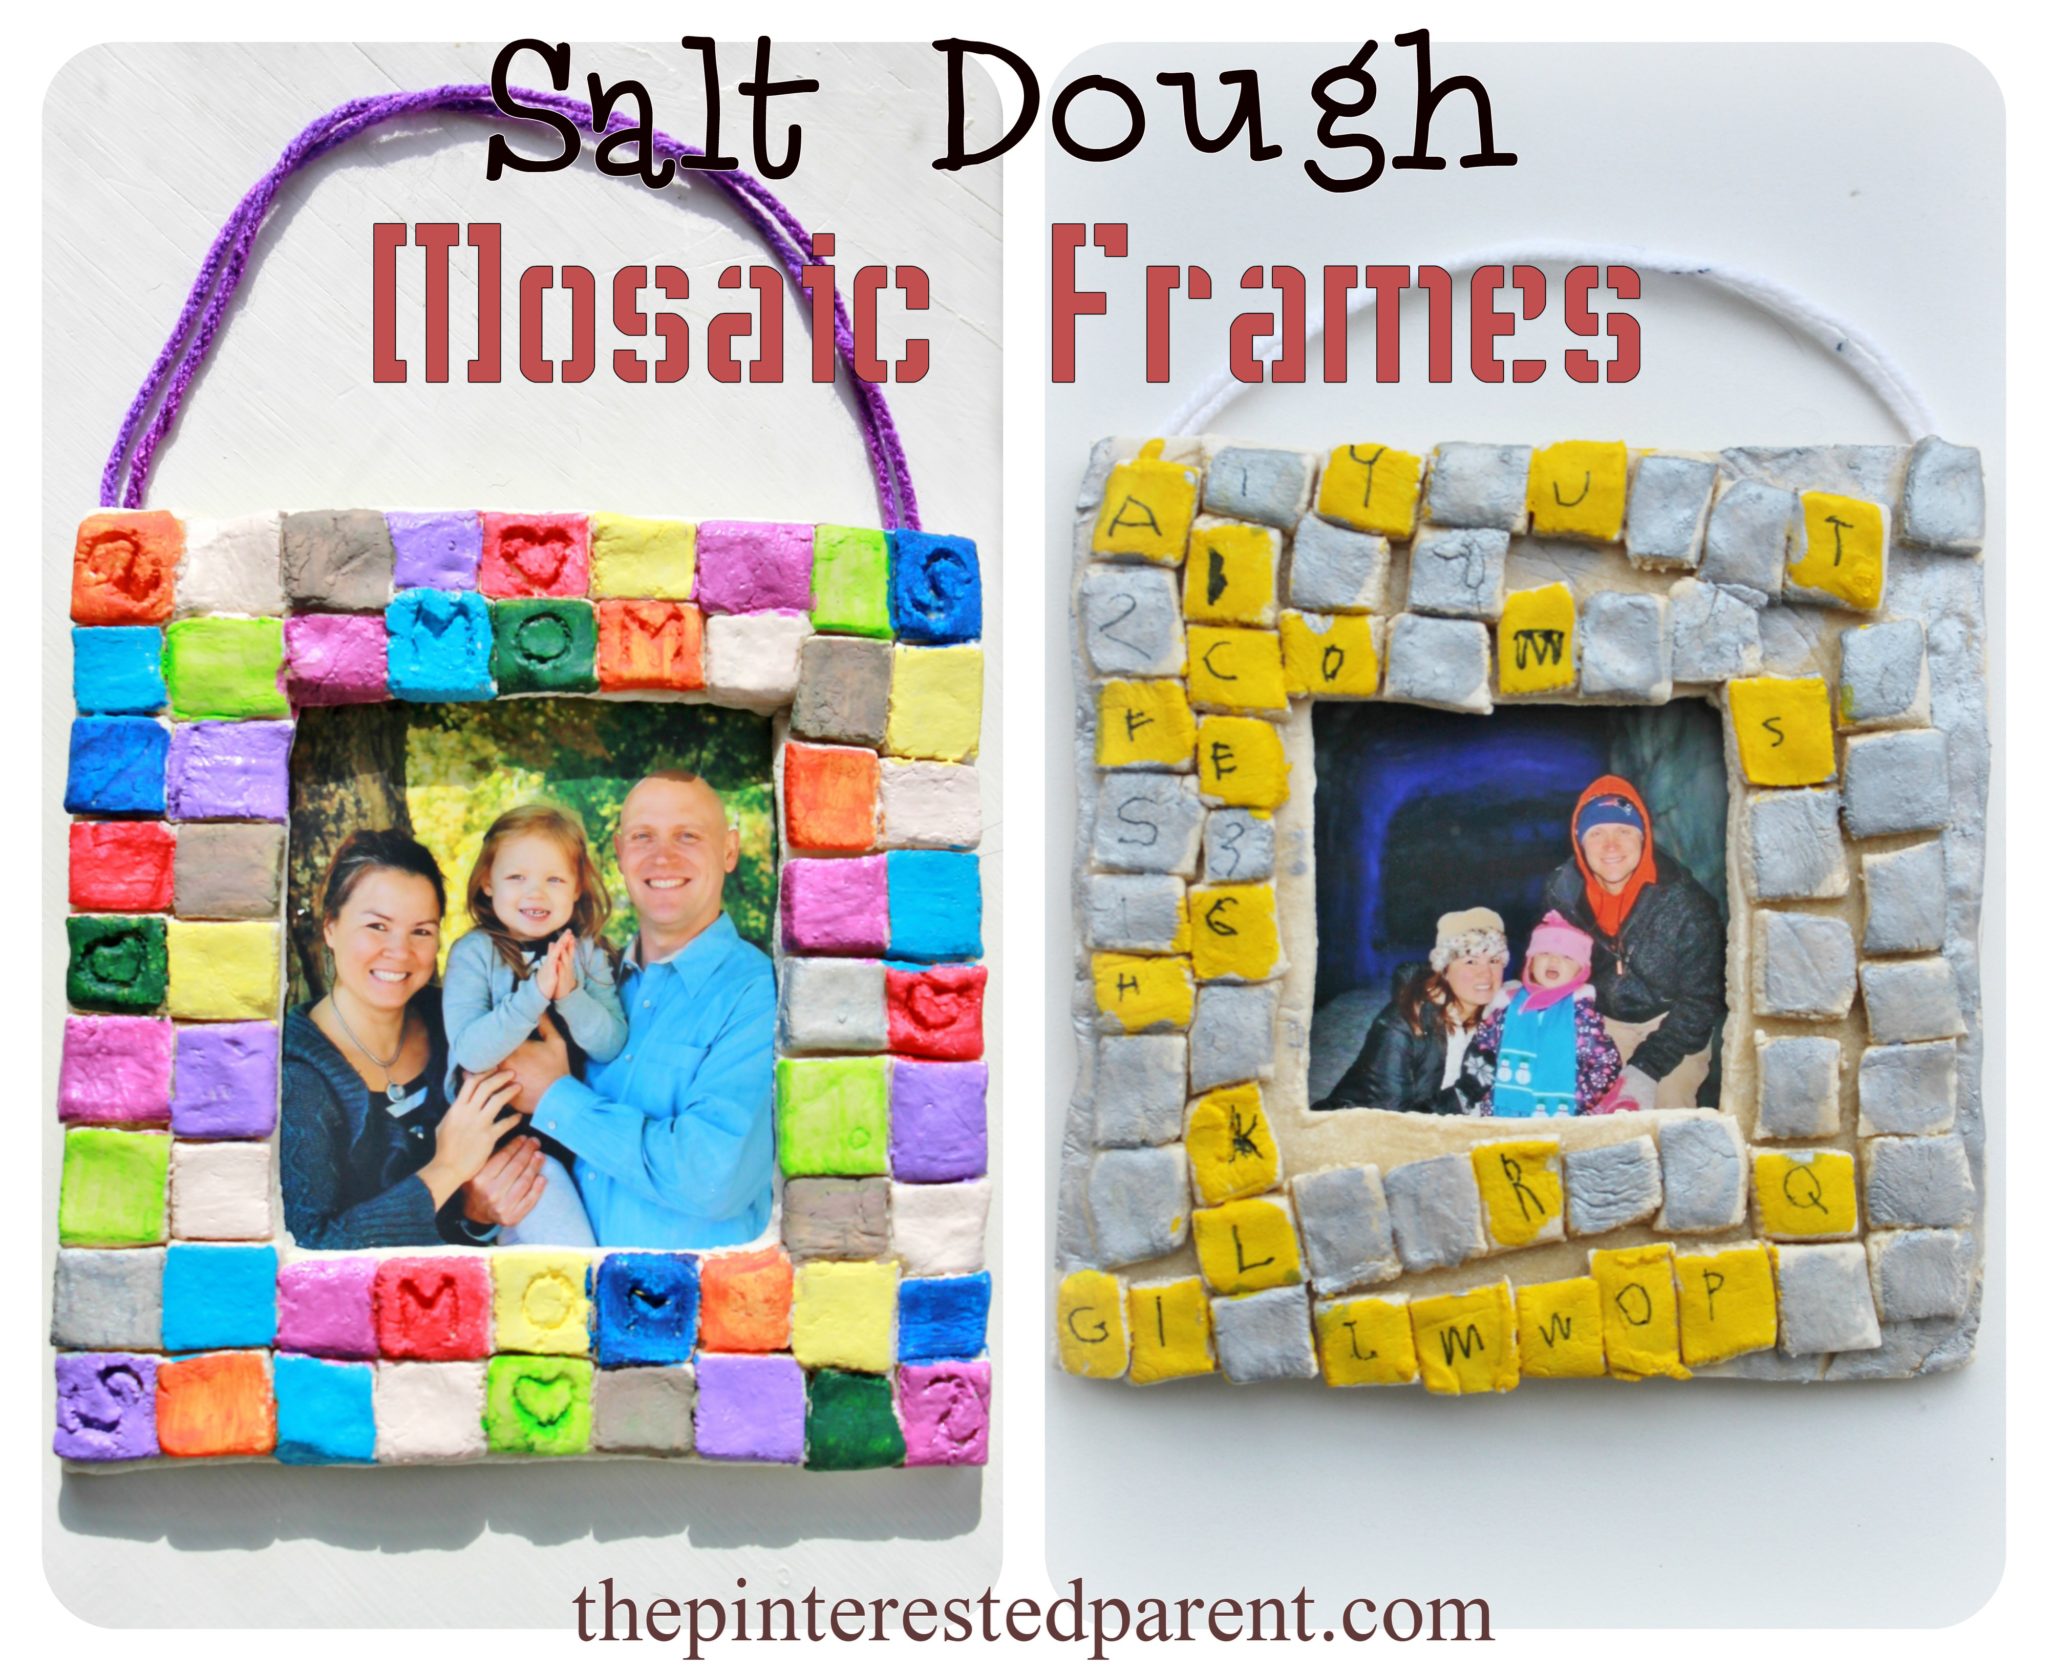
Salt Dough Mosaic Frames

Diy salt play dough mosaic frames - a great gift idea for the kids to make- clay crafts

We love clay & play dough projects in our house. My daughter just can’t get enough of it. We make new dough every week, sometimes even a couple of times a week. We are just about settled into our new home, but are still missing pictures on our walls. I thought it would be fun for us to make some homemade frames together.

We started with a simple clay recipe.

2 1/2 cup of flour

1 1/4 cup of water

1 cup of salt

1 Tbsp of oil

1 Tbsp of cornstarch

Mix all the ingredients together & then knead with your hands. My daughter always loves this part. You may need to add less or more water.

IMG_6215Diy salt play dough mosaic frames - a great gift idea for the kids to make- clay craftsIMG_6221

Roll out your clay.

IMG_6219

Cut a few long strips out of your dough & then cut into small squares.

IMG_6221IMG_6222

Cut out a shape for your frame & then cut out the inside window. Use a photo as a template to know how big to cut your window.

IMG_6224IMG_6223

Lightly wet the top of your frame. Press the squares on top until the frame is covered. Press the squares in enough so that they stick. For my frame, I etched designs in with a toothpick. Since Mother’s Day is nearing, I thought that a Mother’s Day themed frame would be a good choice. Mai chose to draw in her designs after.

IMG_6309IMG_6311

Preheat your oven to 250 degrees. Bake for 1 hour & then flip your frame & bake for another hour. Depending on the thickness of your frame, you might need more or less bake time. When hardened, remove from the oven & let cool.

Paint your squares with acrylics or glaze.

IMG_6322

After the paint dried, Mai used a marker to draw in her designs. She wanted to write letters & numbers on hers.

IMG_6326

Glue yarn or a ribbon to the back to hang & glue a picture to the back. (We used crazy glue. Let adults apply crazy glue.)

IMG_6314

Diy salt play dough mosaic frames - a great gift idea for the kids to make- clay crafts.

My daughter was so proud of her finished project. She asked that both be hung in her room.


Diy salt play dough mosaic frames - a great gift idea for the kids to make- clay crafts

Thank you as always for stopping by. Please follow us on Facebook as well.

Button Wind Chimes

Button Threaded Wind Chimes - Great for fine motor skills -spring craft for kids

My daughter is obsessed with threading buttons.  When she is bored she will just grab the box of buttons and thread one pipe cleaner after another.  I have a drawer full of button necklaces made by my sweet little girl. With spring around the corner, I thought that we could put those button stringing skills to some good use and make a new wind chime for our new home. For our purposes, we used pipe cleaners. You may do this with yarn or string as well.

What you will need:

2 paper bowls

A variety of buttons

Pipe cleaners –

A small Play-doh lid

A foam sheet in any color

Glue

Directions:

Poke holes around the top of the paper bowl forming a circle. Poke one more hole through the center.

IMG_5983

Pull a pipe cleaner through the center hole and bend at the top to secure. Poke a hole through the small Play-Doh lid & slide it up the pipe cleaner.

IMG_5984

Cut 2 identical pieces of foam in any shape & glue the pieces together around the bottom part of your pipe cleaner.

IMG_5991

Cut some of the pipe cleaners so that you have different lengths going around.

It did not take much convincing to get my daughter to start stringing up some pipe cleaners with the buttons for our wind chime. I had her only fill about 1/4 of the pipe cleaner& then we spread the buttons out. Poke each pipe cleaner through the hole in the bowl & bend at the top to secure.

IMG_5988

Poke two holes in the other paper bowl & make a loop with another pipe cleaner like shown. Bend to secure underneath. Glue this bowl over the top of the other bowl. This will cover up all of the pipe cleaner knots on top of the other bowl & just make it look cleaner.

IMG_5992

Find a spot to hang your wind chime.

Button Threaded Wind Chimes - Great fine motor spring craft for kids


Thank you as always for stopping by. Please follow us on Facebook as well.

Craft Stick Easter Basket

Why buy an Easter basket? If you have craft sticks and a glue gun, you can make your own craft stick Easter basket.

My daughter must be getting just as excited for the spring as I am. She has been laying out picnics on our living room floor for the past couple of weeks. I was impressed when she made herself a picnic basket out of a tissue box and pipe cleaners to carrying her food in. I was very proud of her for being so inventive.

Popsicle Craft Stick Easter Basket Craft - a pretty project that you can make with your kids

Continue Reading…

Cardboard Art Display

Kid's Play & Art Room Display Wall

*This link contains affiliate links*

It has been a long couple of months for my family. After months of construction, my husband’s childhood home was renovated. We were eager and ready to move into our new home. The majority of our holidays were spent moving furniture & boxes and unpacking. It was a lot of work, but it was so exciting to watch it all come together. There was none more excited than our daughter. She was ecstatic.

She has a lovely new bedroom & most excitingly, a playroom of her very own. Since my daughter loves arts & crafts, I just had to make a craft corner for her & if we are being honest, for me too.

I have always wanted a display area in our house to showcase my daughter’s artwork.  Mai loves showing off her most recent drawings or crafts & would often hang them on the refrigerator or tape them to the walls.

We have an abundance of cardboard boxes (obviously) & I wanted to put them to good use.

Cardboard Art Display

I drew out & cut the letters to spell the word create.

IMG_3105IMG_3106

I used several different craft materials to decorate each letter. For the C, I covered it in pom poms using a glue gun. The R was made with school glue & glitter, the E was covered in buttons. The A was made with swirls of yarn, the T was covered in pieces of tissue paper & for the E, I just used paint. After each letter dried, I glued a strand of yarn around the edge.

IMG_3107IMG_3109

Since we have new freshly painted walls, I hate to mar them up with nails or hooks. I am a huge fan of using 3M Command strips for displaying wall hangings & our family photos.

71dLo1iNizL._SX522AA522_PIbundle-2,TopRight,0,0_AA522_SH20_

I hung our letters high up on the wall.

IMG_3124

IMG_31161

I cut another piece of cardboard into the shape of an artist’s palette & painted it white. When the white dried, I added splats of different colored paint around the edges. I lined the palette with yarn too.

IMG_3115IMG_3119

I cut two paint brush sticks out of cardboard & painted them. Foam sheets were used to form the paint dipped bristles.

IMG_3122

Clothespins were glued around the outside of the palette in between each color splat.

IMG_3123

The palette was mounted under the letters using 3M strips again.

Mai picked out her favorite artwork & asked me to hang them on her new display board.

Kid's Playroom Art Display Wall

Thank you as always for stopping by. Please follow us on Facebook as well.

Paper Plate New Year’s Clock

Paper Plate Clock with movable hands & pendulum - A great way to teach time & a cute craft for New Year's Eve

*This post contains affiliate links*

Before my husband & I had our daughter, New Year’s Eve was a whole lot different from it is today. We used to have a big New Year’s party every year complete with a New Year’s back drop. Our celebration has changed over the last few years. It is a far quieter evening, but has still remained festive and fun only in a much different way.

282956_4622870503039_595493863_n (1)

Last year we celebrated with friends & the kids almost made it to 11 o’clock.

10888704_10204401186543006_5101573673649197494_n (1)

11 o’clock last year meant nothing to my daughter as she had very little concept of time, but this year she understands it a bit more & we have been working on our time telling skills. With New Year’s fast approaching, it seemed fitting to make a New Year’s clock. It would be a great craft for the holiday & allow us to continue with our teachings on time.

What you will need:

Paper plates (2 for each clock made)

Construction paper

Paint

Markers

Split pins

Glue

Directions:

Paint inside of the bottom of a paper plate avoiding the outside edges. Let the paint dry.

IMG_2538

Use a marker to write in your hour numbers around the clock.

IMG_2541

Cut out clock hands. Make one larger than the other.

IMG_2542

Push a split pin through the hands & the paper plate. Secure loosely so that the hands move easily.

IMG_2543

Cut a pendulum shape & another shape like shown to house your pendulum. Glue the pendulum housing to the back of the clock face. Center it under the 6 o’clock.

IMG_2540

IMG_2545

Use another split pin to insert the pendulum to the middle of another paper plate.

IMG_2544

Glue the paper plates together while avoiding the area that houses the pendulum.

IMG_25571 IMG_25531

Use your new clock to teach your child how to tell time. Hopefully they love changing the time & moving the pendulum as much as my little girl does.

IMG_2565

Paper Plate Clock - a time telling craft & activity

Thank you as always for stopping by. Please follow us on Facebook as well.


Gingerbread Men Crafts

Footprint gingerbread man craft - cute little Christmas keepsake of your children's feet

This post contains affiliate links for convenience.

“Run, run as fast as you can. You can’t catch me. I’m the Gingerbread Man.”

I know it is early & we have not even had Halloween yet, but always around this time of year my mind starts wandering to gingerbread. Why, you might ask? Because every year, I start getting ready to construct my annual holiday gingerbread house. Since it is usually a time consuming project, I typically start in the beginning of November.

Here is a gingerbread version of our old house from a few Christmases ago.

1913725_1213664115010_5634830_n

This year has been hectic with moving out of our house & waiting for the construction on our new home to finish. With all of this going on, a gingerbread house is not in the cards, but that can’t stop us from making some gingerbread crafts.


We are staying with relatives during our construction. We just so happen to be sharing a roof with a little girl, a little younger than Mai, who also enjoys crafts as much as we do. Last night the three of us worked on a couple simple crafts together.

Build a gingerbread man

This was a quick & easy craft for both children. The skill level will be different depending on age. I did this craft with a 2 & 3 year old.

What you will need:

Construction paper (brown & white)

Googly eyes

Buttons

Pom poms

Glue sticks or school glue

Magic marker


Draw & cut out a few gingerbread man shapes.

IMG_0371

Cut wavy lines out of white construction paper for the icing for the arms & legs. Put those, googly eyes, buttons & pom poms on a plate to be used for decoration.

IMG_0372

Give your child or children some glue & let them go…

IMG_0373

IMG_0374

IMG_0376

Here was Mai’s original craft. She then decided that she wanted to draw in a tutu, ballet shoes and some hair as well.

Build a Gingerbread man craft for kids. Cute & easy for Christmas Gingerbread Man Christmas craft for kids

Our other tiny crafter did a great job on hers as well.

IMG_0384

And of course, mommy did one as well. I stole the rosy cheek idea from my daughter.

Gingerbread Christmas Craft for kids

They both did great on their crafts, but before we picked up we squeezed in one more.

Footprint Gingerbread Men

I painted both children’s cute little tootsies in brown paint & pressed them onto a piece of paper one at a time.

IMG_0396

I dipped a finger into the same paint & formed the arms on either side of each foot. With white paint, I added the icing to the arms & across the bottom of the feet.

IMG_0398

We finished them off by drawing in the face, bow & buttons using magic marker. This will make a lovely holiday keepsake & a great memory for the kids of this time that they are sharing together.

IMG_0422

Thank you as always for stopping by. Please follow us on Facebook as well.


Pasta Ants & Pasta Tree Crafts

Pasta Ant Crafts

My daughter likes to play different characters on a daily basis. Some days she is her favorite cartoon characters, such as Joy from ‘Inside Out’ or Elsa from ‘Frozen’, but most days she like to pretend that she is different baby animals. For the past few days we have been a whole family of ants. She even insisted that she had to wear a black tutu because ants wear black tutus of course. When our post dinner craft time came, it only made sense that baby ant & mama ant made some pasta ants to join our little ant family.

Hot glue 3 pasta shells together side by side as shown. (Adults should operate glue gun)

IMG_4479 

Glue pasta elbows to the sides to form legs.

IMG_4480

Add a couple of short strands of spaghetti to the head for antennae.

IMG_4481

Paint your little pasta ants in your favorite ant color. Let it dry.

IMG_4483

Add googly eyes to finish off your ants.

Pasta Ant Crafts

Mai set aside a bowl of food for her ants. They were very hungry.

IMG_4487

She continued to paint shells & told me that she was making leaves to cover her ant babies. That lead us into craft #2. We painted a handful of shells in green. We let them dry.

IMG_4489

Since it was so late we went to bed & picked up our craft the next day. I cut a tree trunk out of construction paper & glued it to a piece of paper. I gave my daughter the shells & some glue and let her fill up her tree.

IMG_4518

She scattered her shells all around the branches & then set her project aside to let dry.

Pasta Shell Tree Craft

Thank you as always for stopping by. Please follow us on Facebook as well.

Button Gumball Machine Craft

Button Gumball Machine Craft


We have bags of buttons in our craft bins at home. My daughter loves to play with them. She separates them by color & lines them up into rows. She studies the different sizes & textures on the buttons & if I give her a glue bottle & some paper, her face lights up. Last night when she saw me pull out the buttons & construction paper, her face did just that. She pulled up her chair & sat down next to me.
“Mama, what are you doing?”
“Making a gumball machine. You can decorate it with your buttons”

She was thrilled.

Button Gumball Machine Craft

Cut out the shapes to make your gumball machine out of construction paper & glue down to another piece of paper with a glue stick.

IMG_3802

Draw & color in the dispenser & dial with crayon.

IMG_3803

IMG_3804

Instruct your child to glue the buttons into the white circle.

IMG_3812

IMG_3818

She even named her buttons as she placed them. The purple button was Mai & the brown one was her friend Henry.

IMG_3820

Thank you as always for stopping by. Please follow us on Facebook as well.

Toilet Paper Roll Poodle

Toilet Paper Roll Poodle


There is something about poodles. They are so grand and elegant. My daughter has a cute poodle purse that hangs on the door knob in her room. I was looking at it today while we were playing in her bedroom and I felt an overwhelming need to make a poodle.

What you will need:

2 toilet paper rolls

Mini cotton balls

3 cake pop sticks

Construction paper or foam

Acrylic paint

Markers

Glue gun (For adult use)


Directions:

Paint two toilet paper tubes in white or any other color that you would want your poodle to be. Cut one tube for the body & cut a smaller section for the neck. Cut them at a slant on one end.

IMG_3385

Poke 4 holes into the larger tube where you would like your legs to be.

IMG_3387

Cut 2 cake pop sticks in half & poke all 4 stick pieces into the holes.

IMG_3388

Cut a head out of construction paper & draw in the face.

IMG_3382

Cut out the ears.

IMG_3389

Glue the neck to the top of the body with the slant on top & facing away from the body. Glue the head over the neck hole opening.

IMG_3390

Glue cotton balls over the ear pieces & then glue the pieces to the side of the head.

IMG_3391

Fill the openings on either end of the body with cotton balls & glue more balls around the edge. Make sure to keep the center of the body bare. Add another half piece of cake pop stick to the rear. Glue a couple of cotton balls around the tip to form the tail.

IMG_3392

Stretch out a cotton ball as shown & glue around the bottom of a leg & repeat with the other 3 legs.

IMG_3394

IMG_3397 IMG_3395

Thank you as always for stopping by. Please follow us on Facebook as well.