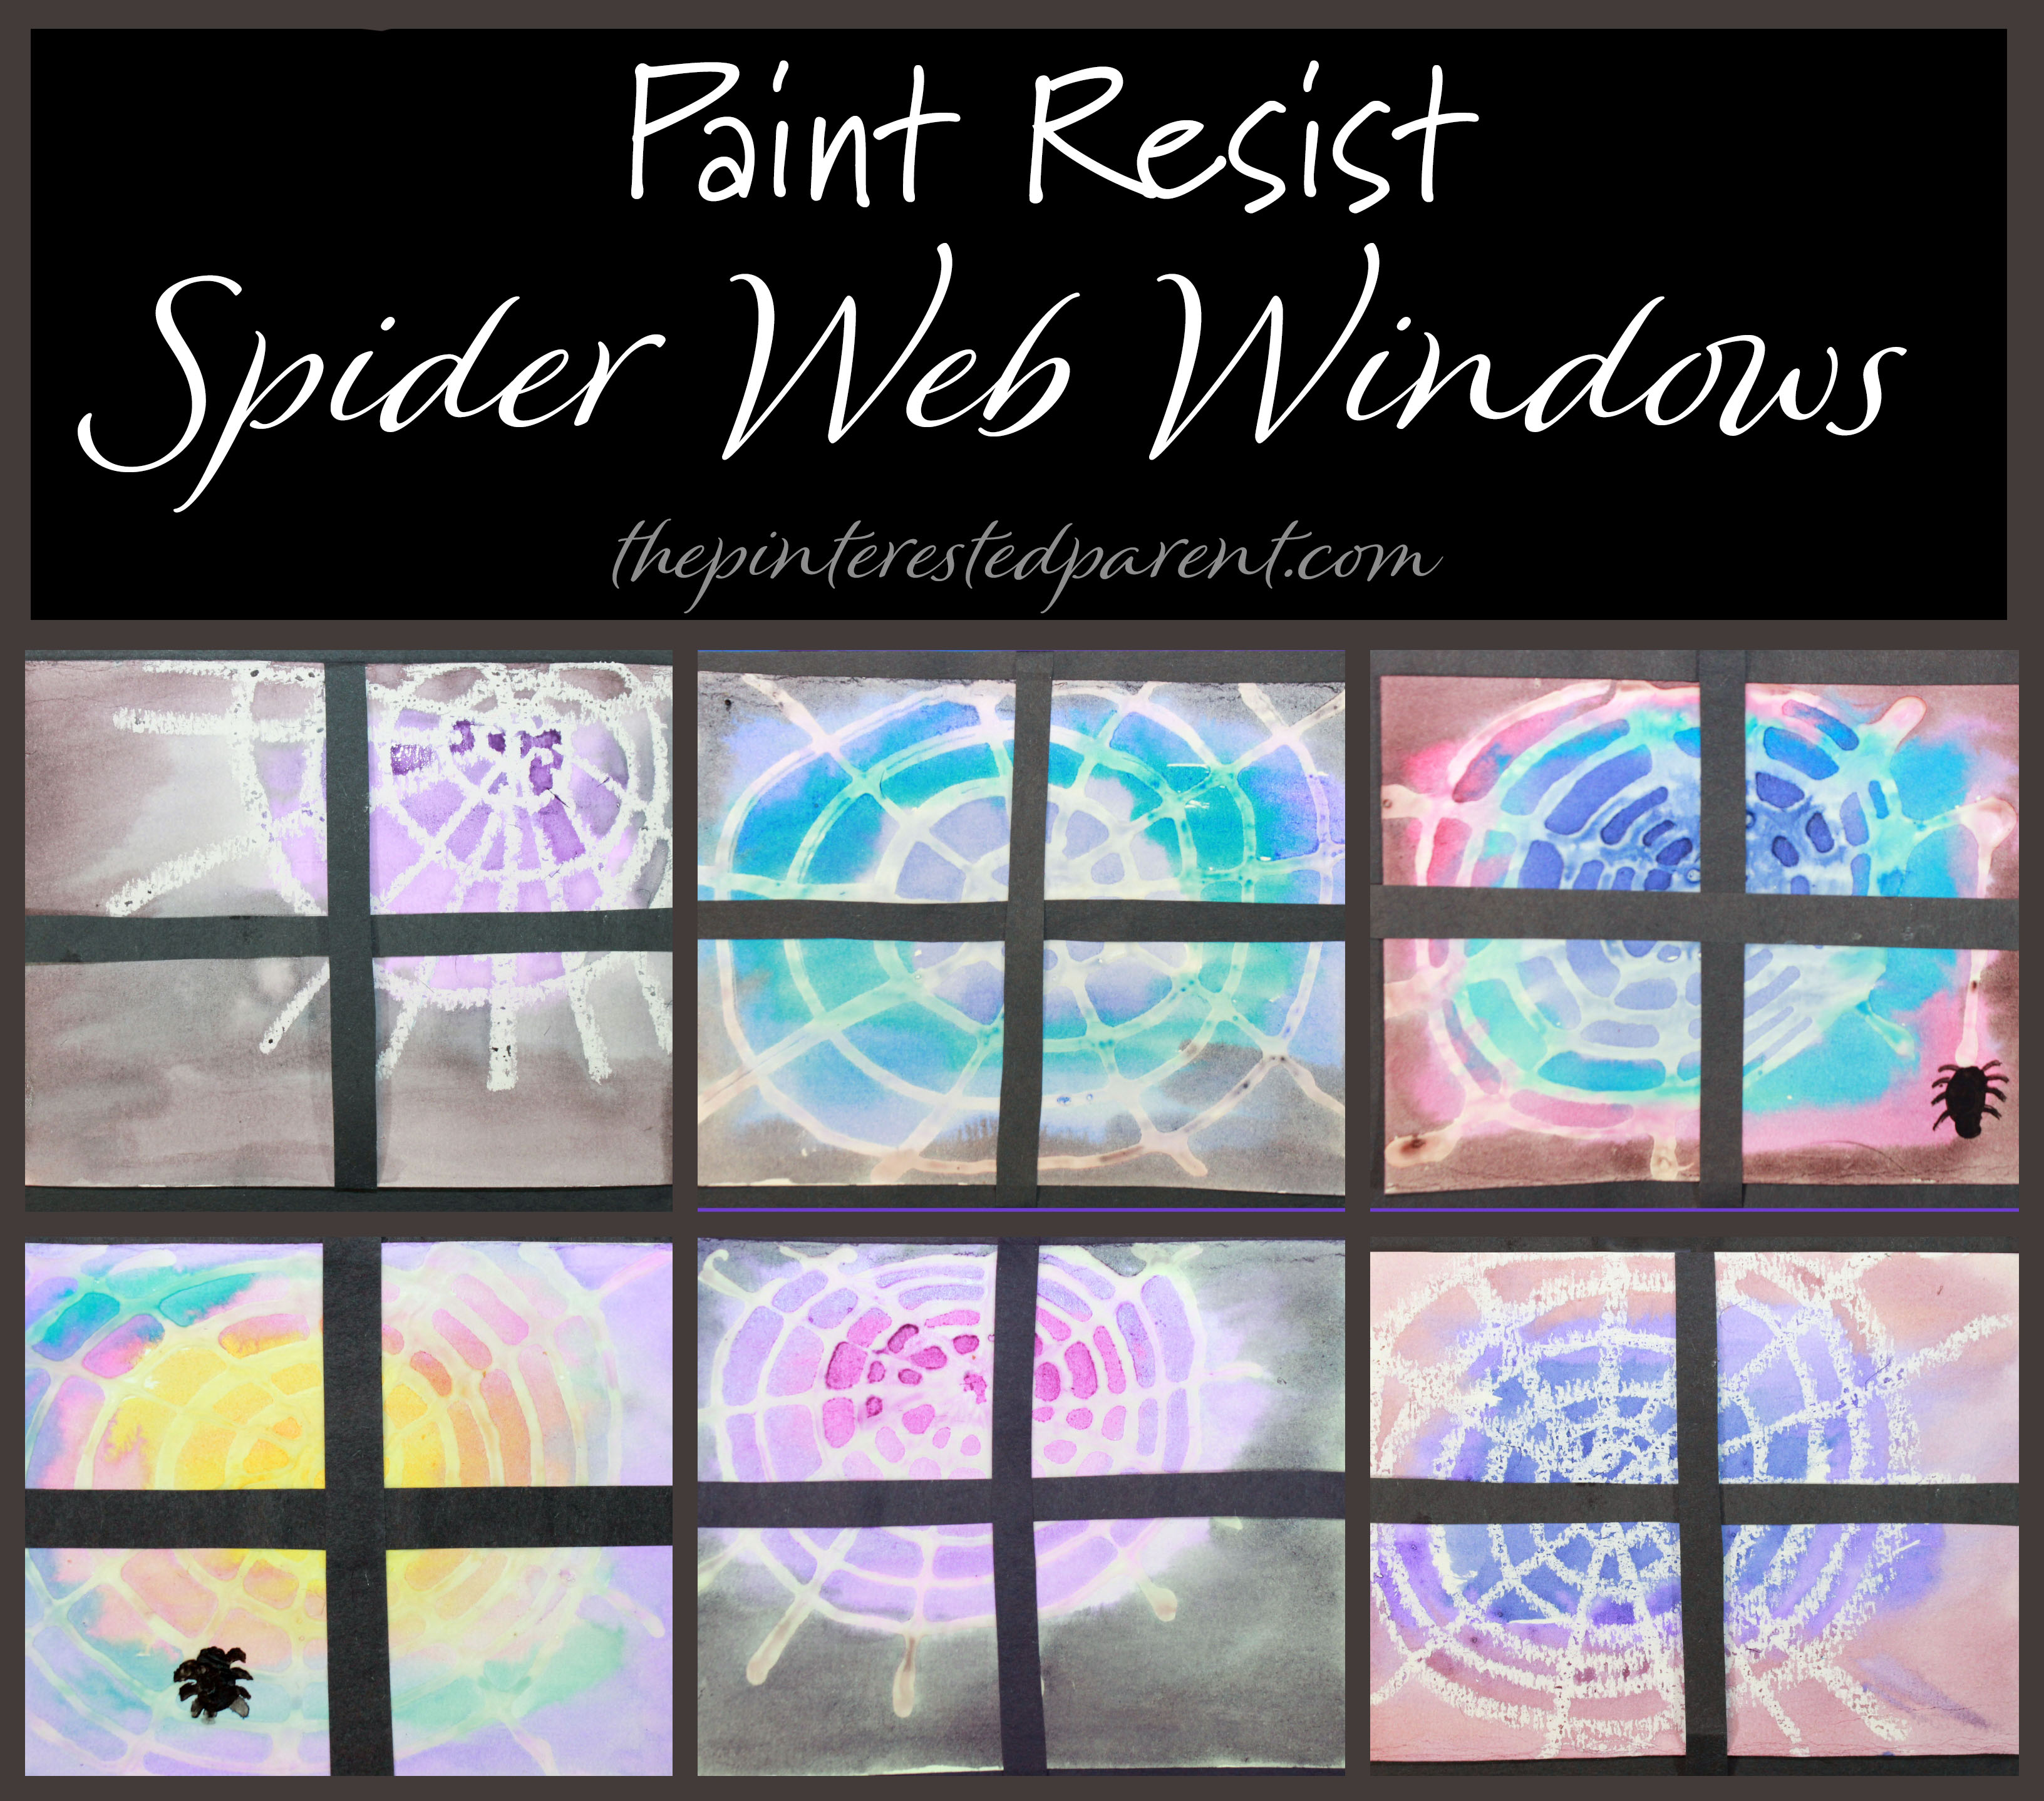
Spiders may give some people the creeps, but I still think that their webs can be hauntingly beautiful. These paint resist spider web windows are fun and easy to make and would be great for a collaborative project or for a classroom. These are spooky enough for Halloween and pretty year round.
*The Pinterested Parent is a participant in the Amazon Services LLC Associates Program, an affiliate advertising program designed to provide a means for sites to earn advertising fees by advertising and linking to Amazon.com. In addition, text and image links in this post may be affiliate/referral links, which means we may be compensated if you make a purchase after clicking through these particular links* See full disclosure policy.
My love for pasta crafts needs no intro. If you follow me regularly, you already know about my many boxes of pasta set aside just for projects such as these. This weekend we spent 2 days making crafts out of a variety of pasta for the latest article that we were doing in this month’s SEEK. I have to admit, we got a bit carried away. I could not stop once we started.
For these crafts you will need assorted pasta, Elmer’s school glue or a glue gun (for adult use only), paint, glitter & some ribbon
Pasta wreath
Pasta needed:
Bow ties
Place your pasta on wax paper & glue bow ties in a circle as seen below. Let dry. Paint the wreath in green & paint 3 more bow ties in red. Let dry & then glue the red bows to the wreath. Attach a bow, string or pipe cleaner around the wreath to hang.
Pasta snowflake
Pastas needed:
Ziti
Wagon wheels
Bowties
Ditalini
Place your pasta on wax paper & glue as seen below. Let the glue dry. In a small container mix the school glue with a few drops of water to thin out the glue. Paint the entire assembled snowflake with the mixture & the sprinkle with glitter. Let the glue dry & flip over. Attach a ribbon with glue to form an ornament,
Pasta Ornaments
Pasta needed:
Large shells (stuffed shells pasta shells)
Wagon wheel pasta
Elbow macaroni
Glue a wagon wheel on top of the flattest end of a pasta shell. Glue an elbow to the top of the wagon wheel. It should form a half circle hole.
Paint your ornaments in colors of your choice. Let dry completely. Using glue draw an ornament design on your shell. Shake glitter over the top. Let dry & then shake off excess glitter. String a ribbon or string through the hole.
Pasta Rudolph
Pasta needed:
Large shell
bow ties
Elbow macaroni
Medium sized shells
Uncooked chick pea for the nose
Googly eyes
Paint both sized shells brown. Paint the bow ties and elbows in black. Attach the pasta as pictured. Add the googly eyes & a red painted chickpea for his nose.
Please stop in & visit us at Seek and check out our latest article. Fun With Pasta Crafts
Last weekend was a big fun fall weekend for us. We did our hayride, went apple picking, went to the fair & picked pumpkins too.
This weekend, in the aftermath of a bad tummy virus, we put a hold on our plans to go to the corn maze & leaf peeping. All is well now, but I wanted Mai to continue to rest at home rather than running around. Last weekend we picked up a lot of pumpkins. I bought two full sized ones for carving, but Mai really wanted the little pumpkins because they were so cute.
The mini pumpkins were great because they were just the right size for my little pumpkin. She may still be too small to be wielding carving tools, but that doesn’t mean that she can’t have some fun. Pumpkins are not just for Jack-O-Lanterns anymore, after all.
Painting Pumpkins
We painted pumpkins mid-week. She is getting to be such a great little painter. She painted one pumpkin red with a green stem. “Look mama, it looks like an apple.” It really does.
Yesterday she asked to paint more pumpkins, so we did. Then we broke out the glue & the glitter for some extra fun. Seriously nothing lights my daughter’s face up faster than the prospect of pouring glue & glitter on something. This is a super easy, moderately messy, but very cute craft. Simply let your artist pour or paint on the glue & then shake on the glitters of your choice. Let dry & then shake off the excess glitter. Use paper or drop cloths to work on & to catch the glitter. When you are done, if you are stingy like me, you can pour the excess glitter back into its container for next time.
Glitter Pumpkins
Mai had so much fun making these. She even made one as a present for her Auntie Linda. “I make this one for Auntie Linda. She is so proud of me.” I bet Auntie is going to love it.
Mai’s are in front & mommy’s are in the back.
Our little pumpkin family.
As I have told you before, our daughter has a very strong sense of family. It is extremely cute how she refers to everything in terms of mama, dada & baby. When we were picking the pumpkins, she would tell me, “This is mama pumpkin, daddy pumpkin & the baby pumpkin.” And so they shall be.
Draw out you pumpkin family’s faces & then carefully carve out.
For daddy pumpkin, I fashioned him a Patriots hat out of foam.
For mommy pumpkin, I just hot glued some yarn to the top of the pumpkin. I did the same for the baby & then braided the hair into pigtails
I hot glued all 3 pumpkins together, putting the daddy on the bottom, mommy in the middle & baby on top. I used a pipe cleaner as a scarf for the mama.
It looks just like us doesn’t it? These were all so much fun, I think we will have to pick up more pumpkins next weekend.
Thank you as always for stopping by. Please follow us on Facebook.
As the mother of a toddler I often look around my house & try to remember what it looked like before kids. I vaguely remember having a clean home once upon a time. I will be honest I have not been the best at keeping a tidy house since the birth of our daughter. I find it exhausting trying to keep her thousands of toys & books organized. This became even more the case once I started introducing sensory play and arts & crafts into our regular play. If you can get around the mess that will be made in your home from this kind of play, it can be very rewarding for you & your child.
My daughter loves arts & crafts, the messier the better, so when I found this craft in one of our library books that combined glue & glitter, I knew that she would have a field day with it.
What you will need:
Wax paper
Elmer’s Glue
Colored glitter
Newspaper or throw cloth to catch mess
Directions:
Lay down some newspaper or a something to catch any stray glue or glitter. On a piece of wax paper draw pictures, shapes or designs. Show your child & allow them to do the same. Shake glitter over the glue & move around the wax paper until all the glue is covered & then shake off the excess glitter. Let dry. (Depending on the amount of glue that needs drying this may take a full day. You may also use a blow dryer on a slow setting to help speed up the drying.) Peel of from the wax paper.
I will be honest with you, I did not believe this would work, but I was wrong. The shapes & designs peel off nicely & easily.
Mama goes first to show Mai what to do.
Lay down your drop cloth or newspaper & place wax paper on top of it.
Draw your picture out with glue.
Shake out the glitter onto the glue.
Move the glitter around until there is no glue showing.
Have your toddler do it next.
My daughter is only 2, so her drawing are a little more abstract, but she is fine with that.
Let the glitter fly. Don’t be surprised if they get a little zealous with the glitter.
Mai could not get enough of the glitter. I kept reminding her to make a new glue picture in between her glitter frenzies.
Here is one of many of Mai’s pretty sparkly designs.
And another
Let all of your designs dry & then peel.
This was a cute & fun craft. Mai liked it so much, we did it two night in a row.
This website uses cookies to improve your experience. These cookies feedback information to our analytics and advertisers. We track views of the site - which pages are visited, whether you are a regular or returning visitor to help generate a more personalised experience. You can switch cookies off or follow the READ MORE. AcceptRejectRead More
Privacy & Cookies Policy
Privacy Overview
This website uses cookies to improve your experience while you navigate through the website. Out of these, the cookies that are categorized as necessary are stored on your browser as they are essential for the working of basic functionalities of the website. We also use third-party cookies that help us analyze and understand how you use this website. These cookies will be stored in your browser only with your consent. You also have the option to opt-out of these cookies. But opting out of some of these cookies may affect your browsing experience.
Necessary cookies are absolutely essential for the website to function properly. This category only includes cookies that ensures basic functionalities and security features of the website. These cookies do not store any personal information.
Any cookies that may not be particularly necessary for the website to function and is used specifically to collect user personal data via analytics, ads, other embedded contents are termed as non-necessary cookies. It is mandatory to procure user consent prior to running these cookies on your website.