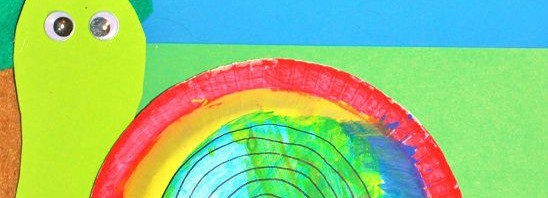
Tag

Arts & Crafts

Snail Crafts

Paper bowl & plate snail craft for kids - great spring craft


Slow & steady wins the race.

We had a fun & busy weekend. It was my husband’s weekend off so we were able to enjoy one of our rare family weekends together. We took Mai to an animal fair that was in town for a few days. Mai dressed the part to go play with the farm animals.

IMG_9003


She ran from animal to animal & was overjoyed about all of the rides & other activities that the fair had to offer. She had a ton of fun, but wore out mommy & daddy. After a few hours we returned home. Still wired from her fun day, her energy did not wane. Unfortunately for her, mommy’s did. We played super heroes for an hour, but then my super powers started to fail. It was time to slow things down a bit. Quiet time in our house is a great time for crafts.

Egg Carton Snails

What you will need:

Empty clean egg carton

Paint

Pipe cleaners

Marker

Glue

Googly eyes


Directions:

Cut your egg carton into individual cups.

IMG_9111 IMG_9110

Have your child paint the cups in colors of their choice. Let dry.IMG_9115

With a marker, draw a spiral on the side of the egg carton cup.IMG_9117

Twist & bend a pipe cleaner to form a pointy tail on one end & a head with antennae of the other.IMG_9123

Glue the pipe cleaners in place under the cup. Add googly eyes to the antennae.IMG_9131

Egg carton snail craft for the spring - cute crafts for kids


Paper Bowl Snail

What you will need:

Paper bowls

Paint

Construction paper

Pipe Cleaners

Marker

Glue

Googly eyes


Directions:

Let your child paint the bowl however they like. Let it dry.

IMG_9104IMG_9109

Cut out a shape for the snail body & glue it underneath.

IMG_9125

With a marker, draw a spiral in the middle of the bowl. Add pipe cleaners to the top of the head & googly eyes for the face.

IMG_9136


Thank you as always for stopping by. Please follow us on Facebook as well.

Patchwork Craft

Patch work quilt kid's craft


My mother-in-law has a wonderful talent.  She makes the most beautiful quilts. Our daughter has been lucky enough to have been the recipient of a few of her nana’s creations. For her birthday last month nana made her this eye spy quilt. I love it so much that I even made it the backdrop to my blog.


10857834_10204511218733742_4448282145914813446_n

IMG_20150107_191404


Nana’s quilt was the inspiration for our crafts tonight.

Patchwork Craft

Things you need:

Construction paper

Paint

Glitter

Glue

Optional: crayons,markers,stampers, sticker, tissue paper


Cut different colored construction paper into six 3 1/2X 3 1/2 squares. Let your child paint, stamp, glue glitter or tissue papers to the squares to make different designs. Let them decorate them however they like.

IMG_8931

IMG_8932


Set the squares aside & let dry.

IMG_8928


Glue the squares down on another piece of construction paper, making sure to space them out evenly.

IMG_8938


Draw different patterns in the spacing.

IMG_8944


IMG_8945


Mai did such a beautiful job with this craft. While I watched her paint, she told me “I like doing projects with my mama.” I love doing them with you too, baby girl.

Fingerprint Cherry Blossoms

Finger print cherry blossom craft for kids


As many of you know my daughter Mai is named after my mother. I get questioned on her name all the time.

“That’s an unusual name.”

“How do you say it? May?”

“How did you come up with that name?”

Typically, when I am asked what her name is, it comes out in one giant run-on sentence. Inhale & go…”Her name is Mai. Like a Mai Tai, but that isn’t why I named her that. She is named after my mother. It is Vietnamese. It means cherry blossom.” Exhale. Mai must have heard this story many times because she has begun referring to herself as Cherry Blossom, Princess Cherry Blossom to be accurate.

The princess & I were snowbound again for the weekend, so took advantage of our time with some arts & crafts inspired by her lovely name.

Fingerprint Cherry Blossom

Draw a branch for your cherry blossoms with a marker or paint.

IMG_8805

Mix a few different shades of pink.

IMG_8806

Have your child dip their finger in the paint & press onto the branches.

IMG_8807 IMG_8808

Switch shades of pink & keep dabbing.

IMG_8809

IMG_8813

A flower as pretty as my little girl.

Fingerprintcherryblossom.jpg

Paint Scrape Art

PaintScraping.jpg

One of my favorite things about my daughter is her creativity & her imagination. I love her ability to think outside of the box. Give her a box of random odds & ends and she can turn it into hours of fun. We have a container full of plastic forks & spoons that have become her most recent source of fun. A while back she traded in her paint brush for the day & attempted to paint a picture with a fork. While the fork did not quite do the job that she wanted, it did create a nice textured effect. So when Mai asked me to do a project a few days later, I thought we would pull out those forks again & create a pretty craft.

You can of course create a figure of your choosing, but for our purposes we chose a flower & peacock.
Using several different colors of construction paper, cut out different colored shapes for the petals, leaves, stem & center of your flower as shown below.

P1180848

Paint over one shape each at a time.

P1180849

IMG_6700
Mai works ahead of me on the peacock, while mommy does the flower.

Before the paint dries, use your plastic fork & drag it across the paint to scrape off some of the paint & reveal the under color. Do this for all shapes & let dry.

IMG_6702

IMG_6703
Mai’s little hands are hard at work, scraping the paint off in various designs.

Glue your pieces into place on top of a piece of paper.

P1180852

P1180853

P1180858

Let dry & proudly display your artwork.

For the peacock, we used the same method. We cut out different colored construction paper, 9 teardrop shapes for the feathers, 3 hook shapes for the head feathers & one the shape of an eggplant for the body. All steps were followed as above & then googly eyes & a construction paper beak & legs were added at the end.

img_6709 (1)

Thank you as always for stopping by. Please follow us on Facebook as well.

Paintscrape.jpg

Paper Swedish Heart Baskets

paperheart

It has been a rough winter in New England. On Monday, we had yet another storm, a big one.  We added another foot of snow to last week’s accumulation.

P1180718 P1180721

Sufficed to say, we were snow bound & stuck home. My mother-in-law got caught up in the storm & was snowed in with us. Mai & I were making glittery paper hearts, when my mum-in-law asked me if I knew how to make a Swedish heart. I did not. She gave me a quick tutorial & weaved a lovely heart out of newspaper to practice.  They were so cute & easy to make. She showed me how they formed a little pocket & I thought how cute these would be for our daughter to give out filled with little Valentine’s candies.

Paper Swedish Heart Baskets

All you need for this craft is some paper, glue & scissors.

Choose 2 different colored pieces of paper. Fold each piece in half. Cut out a shape like shown below, rounding the tops of the unfolded edge.

P1180726

Overlap the shapes so that they form a heart shape.

P1180728

Draw a faint line across the top edge of the overlap on each side of your heart.

P1180729

Cut 1 slit 1/3 of the width of one of the shapes. Cut from the folded edge up to the line that you just drew. Cut a second slit another 1/3 of the way the same way. Do this to the other shape as well.

P1180730

This should give you 3 even loops on each.

P1180732

Start weaving your two hearts together. Stick the 3rd loop from the green through the first loop on the purple shape as shown below.

P1180734

Pull the same purple loop through the 2nd green loop.

P1180735

Work that same purple loop all the way over & insert the 1st green loop into the purple to finish off the first weave.

P1180736

Push the purple shape all the way up to the top of the green shape to make room to start your next loop. Start this row the opposite way this time, pulling the next purple row through the green & then continue to alternate in this pattern until the end.

P1180737

P1180738

Add a couple of strips of paper to the inside of each side to make handles.

P1180746

Fill the basket with some treats.

P1180740

Thanks Nana for teaching me something new. These will be adorable to give to Mai & her friends.

paperheart

Thank you as always for stopping by. Please follow us on Facebook as well.

Bongo Drums Craft

BongoCrafts.jpg

There are days that I have a particular activity or craft in mind. I have all of our tools out and ready to go, when Mai changes the whole plan with her own ideas.

I have a set of wooden spoons that have seen better days. They were old & cracking and looking sad. My mother-in-law bought us a new set of bamboo spoons, so it was time to get rid of my old ones.

P1180647

As I hate to throw out anything, I had a craft in mind for me & Mai. We were going to make spoon dolls. We had all the paint out and were about to start painting when Mai grabbed the spoons & a few containers and showed off her drumming skills.
“Drums are my favorite instrument mama? What is yours?”
“Mama’s favorite is a guitar.”
“I like drums, mama. This is my drum set.”

P1180587

Far be it for me to try to argue with a toddler. I would hate to take her drum sticks away to make dolls out of them, so we will keep them as drum sticks & make her a set of drums instead.

What you will need:

Empty oat containers (any size)

Paint – Kid’s washable paints work fine or acrylics

Yarn

Construction paper or foam

Hot glue gun – ***Glue guns should be used by adults only***

Optional items – Gems, glitter, tissue paper, pom poms etc..

Directions:

Start with a clean & empty oat’s container. Peel off the label around the container.

P1180590

Remove the lids & paint your containers in a color of your choosing. The drums had to be pink for our little princess. Mai was very thorough & wanted to make sure she painted the inside as well. I helped her smooth out the paint and fill in the bare spots. Let the paint dry.

P1180595 P1180600

Paint your spoons and let dry.

P1180653

While your paint is drying, cut out some thin strips of construction paper or foam pieces.

P1180602

With a glue gun, glue the yarn into a zig zag pattern up & down on each drum. (Glue gun should be used by an adult.)

P1180642

P1180643

Put the lids back on the containers. Wrap the pre-cut strips around the top & bottom of the drums. Use a hot glue gun to hold it in place. Use a few pieces to add to the top & bottom of your spoon handles as well.

P1180644

We added a gem between the centers of our zig zags on each side. Use whatever craft materials you have available to decorate it in a design of your own choosing.

P1180650

P1180656

My little drummer rocked out both with her drum sticks and without. I think we have a future musician in our midst.

P1180661 P1180662

Thank you as always for stopping by. Please follow us on Facebook as well.

Valentine’s Day Rubs

GlueRubs.jpg

For Christmas this year, one of my dear friends bought my daughter Fashion Plates. When Mai unwrapped her gift, it was Mommy’s face that lit up not hers. I loved Fashion Plates as a girl. I felt like a young girl again. As I sat on the floor rubbing a crayon against the plates, I thought to myself this is probably something that we can do at home with our own designs.

Valentine’s Day Rubs

What you will need:

A few squares of cardboard

A hot glue gun

Crayons

Paper

Directions:

I cut a few squares out of a cardboard box.  Be sure the squares are clean & even. With a glue gun draw a design. (For adult use only) Keep your designs simple & try to apply the glue as evenly and level as possible for the best effect.

P1180544

For our Valentine’s themed designs, we went with a heart, an arrow & the word love. The glue should dry in a couple of minutes.

P1180545

Once dry, place the squares under a piece of paper. Using the side of a crayon, rub back & forth & watch the design transfer onto the paper.

CrayonRubs.jpg

Unfortunately for me, not all of my ideas are winners with my daughter. Like the Fashion Plates, this was more entertaining for mommy than her. She made one arrow & then moved on to drawing a picture of a monster family.

P1180554

It was not a total waste for Mai though. We discovered that the rubs also make a lovely paint stamper.

P1180555

Thank you as always for stopping by. Please follow us on Facebook as well.

Patriots “Foot”ball

New England Patriots Football foot print craft kid's crafts
As you already know from my ‘Football Widow’s Rant’, I am not a football fan. I could care less about it. My husband loves it. He loves all sports really, but football is his favorite. From the day our daughter was born, we both hoped that we would be able to share our interests with our daughter. For me, I hoped that she would enjoy art & doing crafts with mommy. She does & I couldn’t be happier. My husband has a longer list of interests. He dreams of running marathons with her as she gets older, playing golf and taking her to sporting events. He is off to a good start as she has already run her first fun run, loves golfing with daddy & at 2 years old is already a Pats fan.

10365729_10202947228674968_8164934536128196897_n IMG_5490

At only 7 days old, Mai watched her first game with her father. Fast forward to today where she gets excited when she sees the Patriots emblem, cries if her Pats sweatshirt is dirty and screams “Good job, Tom Brady!!” at the game while stuffing popcorn down her gullet.

402512_2758812982766_84955260_n392979_4593814936668_1851421465_n414327_4698386790899_2108666029_o1507642_10201988182539414_954771791_n

Who knows if her love for football & the Patriots will continue as she gets older, but for now daddy is enjoying his little New England fan. I thought we could make a keepsake for them to look back on some day.

Mai loves foot & hand crafts. She thinks it is fun to paint her feet up. I had to help to ensure that we had the colors in the right spots.

IMG_5596IMG_5597IMG_5600

While the paint dried, Mai thought it was only fair that she got to paint mommy’s feet too.

IMG_5598

When the paint dried, we painted on our Patriot’s game face, dated it & framed it for daddy. He loved it of course. GO PATS!

IMG_5606