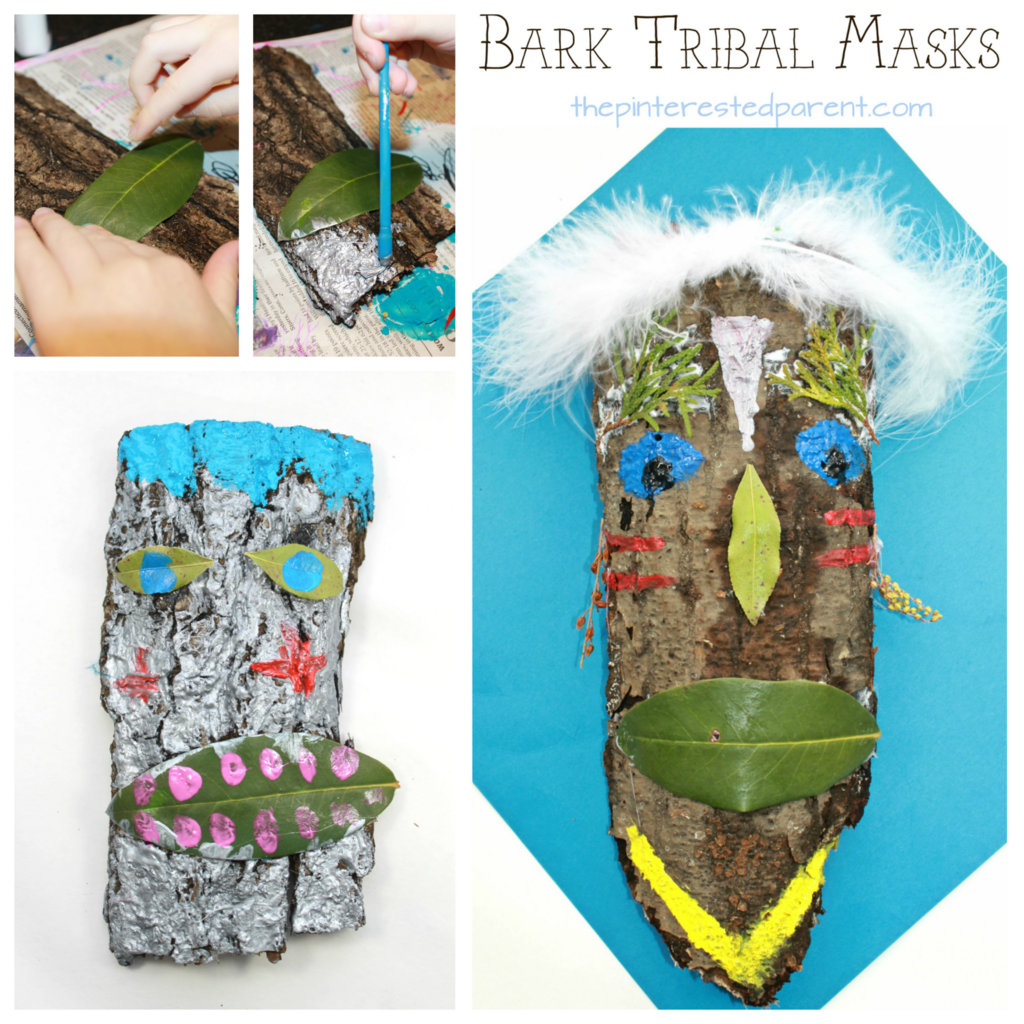
Recently, we played around with painting on texture and painted on bark from our wood pile. We enjoyed painting the bark. Our finished bark had a very tribal look to it. It was cool and they reminded me of tribal masks. Since that day, I have wanted to try to make tribal masks using bark and paint. It took a few weeks to get to, but we finally had an opportunity and a couple of good pieces of bark to work with.
Tag
masks
Shopkins Inspired Paper Plate Mask
My daughter loves the Shopkins. We have a bunch of those little Shopkins baskets and characters all around our house. My daughter loves all of those little characters.
*This post contains affiliate links*
What she also loves are masks, more specifically paper plate masks. I have made her many over the past couple of years & we still have every one. Our latest is inspired by the green apple from Shopkins.
We have a ton of pre-painted paper plates left over from a mask making activity that we had at a kid’s craft party, so I just grabbed one of those.
I drew a simple flower on white foam using a green outline with magic marker & drew a simple stem on brown foam.
I cut out the flower & the stem & glued them to the top of the plate.
I cut a worm out of pink foam and leaves out of green. I drew in details to both and added googly eyes to the worm.
I glued extra-large googly eyes to the plate & drew in the rest of the face using Sharpies.
I added the little feet in at the bottom to finish it off.
My little girl loved her new mask.
Thank you as always for stopping by. Please follow us on Facebook as well.
Paper Plate Shape Monster Masks
Mr. Paper Plate Head Mask
We went to Applebee’s for dinner last night. Applebee’s has small laptops at each table that you can place your orders from. It also has a bunch of games & kid friendly apps. My daughter found one that allowed you to take photos of yourself & then add artwork to it. She thought this was great fun. She kept giving herself a mustache and laughing. I got a kick out of watching her and her mustached face.
Her funny faces inspired this paper plate craft.
Mr. Paper Plate Head Mask
What you will need:
Paper plate
Flesh-toned paint
Felt in different colors
Velcro tabs
Craft sticks
Glue
Magic markers
Directions:
Paint a paper plate in a flesh tone. Let it dry. Glue two craft sticks to the back of the plate for your mask handle. Place Velcro tabs around the plate where you would like your facial features to be. Make sure that you use the rough end of the Velcro. Add one to the top of the mask handle for the bow ties.
Draw & cut out facial features such as eyes, noses, mouths, mustaches & ears. We also cut out glasses & assorted bow ties.
Let your child decorate their mask.
Add as many extra features as you like for more face varieties.
Mai daughter thought the mustaches were funny here too.
Thank you as always for stopping by. Please follow us on Facebook as well.
50+ Mask Crafts For Your Kids
‘Home’ Inspired Paper Plate Masks
*Contains affiliate links*
Last weekend we took a mini vacation to the beach with some family friends. We had a great time & made some wonderful family memories.
The drive to the beach was long though & the drive home seemed even longer. Mai’s uncle downloaded her a movie on the Ipad before we left for our trip. It was for just in case she started getting punchy during the drive. She did great the first hour, but then started to get antsy. We started the movie for her. It was Dreamworks ‘Home’.
As we drove, all I could hear were squeals & laughter coming from the backseat. She loved the movie & quickly started to imitate the characters.
My daughter loves to pretend play. To encourage her pretend play, we often make paper plate masks. Last night, she very enthusiastically helped make ‘Home’ – inspired masks. Here is how.
What you will need:
A paper plate for each mask
Paint in purple, blue, white, light brown, dark brown, red & green
Craft sticks
Purple foam or construction paper
Glue gun (for adult use – use caution)
Black sharpie
Directions:
Draw a slightly curved lined about 1/3 of the way up from the bottom of a paper plate.
Paint on the top of the line in purple. I helped my daughter by painting a strip of purple for her along the drawn line. I let her paint the rest.
Paint under the purple in blue.
Outline between the blue & purple with a darker purple & then draw a curve to form Oh’s uniform. Paint a purple circle in the middle of the curve as show, Paint in the white’s of the eyes & use a Sharpie to draw in the mouth & eyebrows. The face does not have to be perfect. Your child will know who it is supposed to be.
Cut long ovals out of purple foam & glue them to the side of the head.
Glue two craft sticks together & then glue them both to the back of the mask.
Paint in the eyeballs to finish off your mask.
To make a Tip – inspired mask:
Paint the plate in light brown.
Paint in the hair using a swirling pattern to form curls. The headband is optional.
Draw in the face. Markers work best on smaller details.
Paint in Tip’s green eyes & her sweatshirt. Add the craft sticks for the mask handle.
Mai could barely wait until these were finished. She stood next to me anxiously waiting for the masks to be ready.
She loved them of course.
Thank you as always for stopping by. Please follow us on Facebook as well.
Egg Carton Eye Mask Craft
We have been packing up our house this month to prepare it for being put on the market. We only have a couple of weeks left to get our house ready, so we have to clear as much of the clutter as possible. I have had to pick & choose which craft materials I can store & which I can’t live without. Mai & I have a large collection of recyclables which include tissue boxes, paper towel rolls & more empty egg cartons than I know what to do with. Since I do not want to pack all of them, but cannot bring myself to throw them away, we decided to use some of them last night.
Egg Carton Eye Masks
This is a fun craft with many possibilities.
What you will need:
Empty egg carton
Acrylic paint
Cake pop or popsicle sticks
Glue
Optional: glitter, ribbon, googly eyes, jewels etc..
Directions:
Cut out 2 connected pieces of egg carton leaving a small amount of the outer lip of the carton as shown.
Flip the section of carton over & clip away the bump on the lip to form a small triangular opening.
Cut the centers out of each carton section. Push your finger through the holes to smooth out jagged edges.
Paint the sticks & let dry.
Paint your egg carton pieces.
Shake glitter onto your wet paint & let dry.
Add any other embellishments of your choosing. We glued googly eyes to one of our designs.
Mai loved her new sparkly eye masks.
Thank you as always for stopping by. Please follow us on Facebook as well.
‘Inside Out’ Paper Plate Masks
*Contains affiliate links*
Yesterday we took our daughter to the movies to see ‘Inside Out’. She had been asking us to go all week & finally broke us down. She was so excited all morning & could hardly wait until we got there.
I knew that our daughter would love it, but I had heard mixed reviews & was not sure how I would feel about it. As it turns out, I loved it too. It was full of emotion, which made sense since all of the characters were actual emotions, Joy, Sadness, Fear, Anger & Disgust all played a part. I found myself crying through much of the movie. My husband even got a little choked up during it.
When we were leaving Mai asked us if we could go again tomorrow. “Maybe not tomorrow, baby.”
Joy was her favorite character. When we got home she wanted to change into a green dress because Joy wore a green dress. “I wish I had blue hair.” she told me. She started calling me Disgust & calling her daddy Anger. “Disgust, can I have some more juice please?” Even our dog Duke became a part of it. He was Sadness. All she could talk about the rest of the day was the movie. It seemed only fitting that we made a craft inspired by it.
Since she wanted us all to play our parts so badly, I thought that masks would be the most fun.
We painted 5 paper plates, one in the color of each character. We painted peach for Joy, blue for Sadness, green for Disgust, purple for Fear & red for Anger. We let them dry.
We did Sadness first.
I cut white ovals out of construction paper to make the eyes. I drew in eyeballs with magic markers & then glued the eyes into place.
I used another paper plate as a template & cut the hair out of construction paper.
I drew in eyebrows & then formed Sadness’ glasses out of pipe cleaners & glued them into place.
We finished off our mask by drawing in the nose & mouth & I used a lighter shade of blue paint to paint in the turtle neck of her sweater. I used blue magic marker to add the sweater’s details. I added two craft sticks to the back for the mask’s handle.
SADNESS
We finished off the rest of our cast of characters in the same fashion using construction paper & magic markers.
JOY
ANGER
DISGUST
FEAR
Thank you as always for stopping by. Please follow us on Facebook as well.
An Old ELf, A New Elf & A Crafty Elf
For somebody that was as eager for the holiday season to begin as I was, I was a little behind in putting up our Christmas decorations. It had been a busy few weeks, but we finally found an evening to put up our Christmas tree.
The first year that my husband & I started dating we purchased our first Christmas tree as a couple. We put it up in my apartment. We spiked some eggnog, put in the movie Elf and decorated the tree together. Eight Christmases later & we are still doing the same thing. Now we just have an extra set of hands & there is one smaller glass of eggnog minus the rum added into the mix.
We let Mai do most of the decorating this year with a few boosts from mommy & daddy. She did a lovely job.
We also added a new elf tradition to our holidays. Last year my sister bought Mai an Elf on the shelf for Christmas. Tonight I read her the elf’s story. She listened, intrigued by his tale, nodding in between sentences as to say that she understood. She named her Elf “Koontz”. She whispered to him that she would like a train set. Forgive me if the next few weeks are filled with pictures of our sneaky little visitor.
In the midst of all of our new & old traditions, Mai asked me if we could make a project. She loves working on projects. Since we were surrounding ourselves with elves, I figured why not one more.
Paper Plate Elf Mask
What you will need:
Paper Plate
Paint
Foam sheets or construction paper
Cotton balls
Glue
Pipe cleaners
Pencil
Directions:
Draw eyes on the back of your paper plate & cut them out.
Paint your plate in flesh tone. Let dry.
Paint on two pink circles for cheeks.
Paint a mouth and nose.
Cut out shapes for the hat, ears and collar. You may use construction paper. I always opt for foam sheets though as they do not rip or wrinkle. Glue into place.
Bend 4 pipe cleaners into curls as shown.
Glue the curls to the edge of the hat. Draw on eyelashes & eyebrows with a marker or paint.
Glue two pipe cleaners to the back of the mask. Use the pipe cleaners to secure the mask to your head.
Glue cotton balls to the rim of the hat & to the end of it to form the fur.