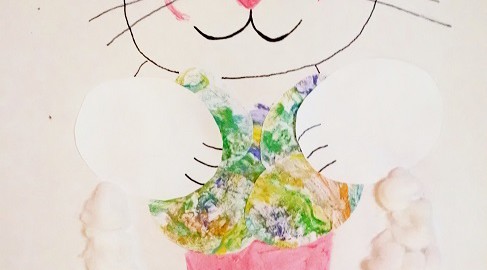
A funny thing happened at my daughter’s preschool last week. One of the teachers mentioned to me that my daughter talks to her about all of the crafts that we do at home. She said to me in a very puzzled voice that my daughter was telling her about Kandinsky. This made me smile. I gave her a little lesson on Kandinsky last month and then did an art project with her inspired by his works. She remembered it well and when she sees circles now, she observes that they look like a Kandinsky. We did the same with Jackson Pollock last month & this weekend we learned about one of my personal favorites, Andy Warhol.
Category
Easter
Paper Bag & Washi Tape Easter Basket
Chocolate Covered Pretzel Bunnies & Sunday’s Best Link Up # 13
I took a poll on my Facebook page yesterday. I was curious about what people preferred, sweet or salty. My husband is salty & I am definitely sweet, but the truth is I love the two mixed together the best. One of my weaknesses is for chocolate covered pretzels.
With only one week left before Easter, I have a few more days of Easter inspired fun. Tonight we made some sweet & salty Easter treats in the form of our favorite Easter pal.
Melt white chocolate in the microwave. Put the chocolate in a microwave safe dish & heat for a minute. Check it & microwave in 30 second intervals, checking to see if it is melted before each interval. Be careful not to burn.
When the chips are soft & shiny stir with a spoon.
Dip pretzel dipper sized rods into the melted chocolate & lay out on wax paper. Lay two dipped pretzels side by side to form a V shape.
With a spoon, spoon out a dollop of chocolate over the bottom in the shape of a circle. Be careful to not dribble chocolate over the top. It works best when the chocolate is smooth. Use a rubber spatula to smooth out any rough edges while chocolate is still hot.
Melt pink chocolate or in a pinch use white chocolate with just a touch of food coloring gel. Using a toothpick draw a line for the inside of the ears & add a dot for the nose.
Melt a small dish of milk or dark chocolate & add in eyes, mouth & whiskers. Let your chocolate cool & remove from the wax paper. If you have any imperfections, which I had a plenty, scrape the hardened chocolate with a knife to smooth out.
Now let’s hop on over to our main event. Welcome to week 13 of our Sunday’s Best Link-Up.
This week we’re celebrating the thaw across the country, so linkup Easter posts, crafts, recipes, gardening, decorating ideas, room makeovers, Easter tablescapes, spring cleaning and organizational tips. Blow the dust off your old posts and link those too. Don’t have posts that fit into the theme, link up whatever post you would like to share. We would love to have SEO, blogging, and parenting tips, DIY projects, homesteading, homeschooling, and your posts on life. Your linkups and giveaways are welcome too. Anything goes here, as long as it’s family friendly and you may linkup as many as you would like.
Each week your hosts will select their favorite post and it will be featured the following week. An image from your post will be used on my blog the following week with a link back to your blog. Be sure to check back to see if you’re a Sunday’s Best featured blogger. All Featured Bloggers will have their posts Pinned to the Sunday’s Best Pinterest Board.
If you are interested in becoming a Sunday’s Best host, please contact me for details at rhonda@mother2motherblog.com
Your Sunday’s Best Hosts:
Rhonda – Mother 2 Mother Kim U. – Pinterested Parent Kim M. – Life In A House of Testosterone
Here’s the rules, please connect with us on social media before you leave or subscribe/follow our blogs:
Mother 2 Mother: Please like my Facebook Page, follow me on Twitter, Google+, Pinterest, BlogLovin or subscribe/join my blog on the right before you leave.
The Pinterested Parent: Please like Kim’s Facebook Page, follow her on Twitter, Google+, Pinterest, Bloglovin before you leave.
Life In A House of Testosterone: Please like Kim’s Facebook Page, follow her on Twitter, Google+, Pinterest, Bloglovin, or Instagram before you leave.
Kim U. selected Moss Covered Bunny from Pinterventures
![]() |
I selected Pastel Deviled Eggs from Intelligent Domestications
Kim M. choose Keeping Up With the Joneses from Sequins In The South
Play Dough Easter Egg Activity
Play-Doh is my daughter’s favorite creative material. She has become quite the Play-Doh artist. Her creations include cakes, animals & even a mold of herself wearing a tutu. We buy it often, but make it in a pinch. When I told her that we would be making a fresh batch of play dough tonight, she became so excited that she could barely wait for the homemade dough to cool before she dug her mitts into it.
We kept going with our Easter theme. We used a piece of heavy stock paper & rolled out our dough onto it to form an egg shape.
Using cookie cutters & other tools, we rolled & cut out shapes in different colors.
We pressed our shapes into our play doughto decorate our Easter eggs. I pre-pressed lines into the dough to act as a guide for her to press her lines into. Add gems, string, buttons & other embellishments to dress up your eggs.
If you have a play dough lover in your home, they may love this cute & easy holiday activity.
Thank you as always for stopping by. Please follow us on Facebook as well.
Bunny Tail Craft
My daughter loves crafts that allow her to play with glue. We have bottles of glue in our house & she just loves getting her paws on them whenever she gets a chance. Tonight I thought we could make little bunny bottoms. It would give her a chance to use some glue & play with fluffy cotton, which I thought she would love.
What you will need:
Paper bowl
Cotton balls
Glue
Construction paper
Directions:
Glue cotton balls all around the bowl.
After you have covered the bowl, add extra cotton to the middle to form the bunny tail.
Cut out two ovals for the foot paws.
Cut out a pink oval & 3 circles for each foot & then glue them into place to form the bunny paws.
Cut out ears & glue them under the bowl in place.
Glue the feet into place & let dry.
To be honest, Mai did not take to this craft. When I told her that we were making bunny bums, she laughed. She grabbed her bowl & grabbed her glue. She added one cotton ball to the middle of the bowl & said “I done, mama.” That looks great too, baby.
Thank you as always for stopping by. Please follow us on Facebook as well.
Pasta Shell Easter Bunny Craft
The best thing about doing arts & crafts with my daughter is the time that we get to spend together. My daughter says to me all the time. “Mama, I have fun with you. I like making projects with you.” This melts my heart. I love doing crafts with her as well. She is becoming so creative & is learning so much from our craft time together. When I told her today that we were going to make bunnies out of pasta shells, she cheered loudly & pulled her safety stool right up to our work space. So began this evening’s craft.
Pasta Shell Easter Bunny Craft
What you will need:
Jumbo pasta shells (3 for each bunny made)
Spaghetti (just one strand)
Paint
Hot glue
Directions:
Paint the inside of the shells in pink. These shells will be the ears.
Paint the outside of the shell in the color that you choose for your bunny’s ears. I chose gray, Mai wanted purple ears.
Paint a shell for the head.
Paint a strand of spaghetti in black. Let it all dry.
Paint a nose in the middle of the face.
Add in the eyes & mouth.
Break the spaghetti into small pieces for the whiskers & glue on to the face.
Glue the ears into place from the back using a hot glue gun. Use a generous amount of glue to secure. (Sorry kids, hot glue is only for us grown-ups)
Thank you as always for stopping by. Please follow us on Facebook as well.
Hatching Chick Craft
Egg cartons have become my new favorite craft material. We eat a lot of eggs, so we always have them in abundance. There are so many fun & simple things that you can do with them. I like to pre-cut them & keep on hand for when we are ready to use them. Mai was playing with them and made a monster face with a couple of them. “Rrrrwwwarrr” “Let’s make monsters mommy.” She is going through a monster phase right now. How about we make something less scary? Since Easter is upon us, we changed the monsters into little hatching chicks.
Cut up your egg cartons. Like I said, I have a lot of them.
For this craft you will need two individual sections for each egg that you will be making. One side of the piece will be solid. On the opposite end, it will be more jagged. On the jagged end, cut out an upside down V to form the look of a crack. Do this to both pieces.
Paint both sections in pastel colors.
Let dry.
Form your chick with yellow pom poms, googly eyes & a small piece of pipe cleaner glued into place for the beak.
Place a chick in the bottom half of your egg.
Glue the top half on to form your hatching Easter egg. Peep,peep, peep. This is a cute and simple craft for kids of all ages.
Thank you as always for stopping by. Please follow us on Facebook as well.
Paper Bowl & Plate Easter Bonnets
Rice Krispie Easter Eggs
There is a sweet commercial on TV which features a mother & a daughter making Rice Krispies treats eggs together. Not only does watching this make me want to spend quality mommy & daughter time with my little girl, it makes me really want to make these eggs. This looked like such a cute idea, I had to try it, but nothing is quite as easy as it seems.
Ingredients:
5 cups of Rice Krispies
1/4 cup of butter
40 large marshmallows
Food Coloring (optional)
Marshmallow peeps
Plastic Easter eggs
Directions:
In a saucepan, melt butter on low heat. Add marshmallow to melted butter. Cook until marshmallow is melted, stirring occasionally. Once marshmallow is melted & smooth, add the Rice Krispies slowly & stir until evenly coated. Add food coloring if colored eggs are desired. For a more speckled look add food coloring & toss, do not stir.
Clean & dry the plastic eggs & spray the insides with cooking spray. Wet your hands. **This is very important to do between eggs or your hands will stick to the mixture.**Press Krispies inside the eggs, press in the middle to create the hollow for the egg. Repeat this until you have used all of your mixture. Remove your formed treat from the egg. Use a knife if you have a difficult time removing any. Place a Peep inside of one half of your egg & place the other half on top. Cut the Peep on the bottom if it is too large.
These were a little more of a pain than I anticipated. Again be sure to wet your hands frequently. It is not easy to mold when hands are dry. It is a little time consuming & messy but it in the end it does make a cute Easter snack.
Related Topics:
http://sleeplesssleeper.wordpress.com/2014/03/17/best-38-effortless-diy-easter-crafts-to-inspire-you/
http://dunnitagaindesigns.wordpress.com/2014/03/16/bunny-holders/
Footprint Easter Bunny Craft
I just never get sick of my daughter’s cute little piggies. There is just something so cute about baby feet. With time racing by, she is quickly becoming less of a baby & more of a little girl. Mommy needs to preserve all these baby moments while I can. With Easter nearing, I thought it time for our first Easter craft.
What you will need:
Poster board
Plain white paper
Paint
Paint brush
Markers
Cotton Balls
Glue
Paper plate
Directions:
Spread paint on a paper plate.
Dip your child’s feet in the paint.
Press the paint covered foot on a piece of paper. Repeat with the other foot & let dry. Cut out the feet prints.
Sketch out your bunny around the baby’s feet, using the feet as bunny feet
Draw some egg shapes on a piece of paper & have your child paint on it.
Cut out the eggs & set aside.
Glue the eggs to the chest where the hands would be holding them.
Cut out two oval shapes as hands & glue them down over the eggs to make it appear as if they are holding them. Draw lines on the paws.
Paint/color your bunny’s ears, eyes, nose & tummy. Outline the mouth & whiskers.
Squeeze glue on to the parts that you want fluffy, like the bunny ears.
Spread cotton balls out across the glue.
My daughter loves gluing. This is a part that you can do together.
We chose to cut our bunny shape out & hang it on the refrigerator with magnets.
We also made a smaller one with floppy ears. This looks a little more like a floppy earred dog than a bunny, but I still think it came out pretty cute.
My daughter got a real kick out of making the paint foot prints. We made several set of foot prints because she thought it was so funny. We hung our craft on the refrigerator. Before bed this evening Mai ran up to it & said “Goodnight Bunny”. She is so cute.